 Notch
Notch- Difficulty
- Intermediate
- Time
- 6.3–12.3 hours
- Cost
- $$$
About this build
You can create your own lighting, and make it beautiful. It’s easier than you think, and this floor lamp proves it. You can make the lamp base from a few boards (we chose oak). Even the shade is easy. Just cut and glue some square dowels to make a frame, then cut light diffuser film and apply it.
Tools
Essential
- Drill / Driver
- Miter Saw
- Pocket Hole Jig
- Random Orbit Sander
Optional / nice to have
- Bar / Pipe Clamps
- Combination Square
- Tape Measure
Materials
| Item | Qty |
|---|---|
| Board, 1x2 96" | 2 board |
| Board, 1x4 36" | 1 board |
| Plywood, 3/4" Thick 24" x 24" | 1 board |
| Square Dowel, 5/8" x 5/8" 36" | 5 board |
| 1 1/4" fine-thread pocket hole screws | 28 each |
| 6" Lamp Nipple | 1 each |
| Porcelain Light Cord Set | 1 each |
| Double-Stick Fabric Tape | 1 each |
| 12" x 36" Light Diffuser Roll | 1 each |
Overall cost: $$$. Lumber prices vary by region, species, and season, so we give a band rather than a figure we would only be pretending to know.
Cut list
| Part | Qty | T × W × L |
|---|---|---|
| Leg | 4 | 3/4" × 1" × 36" |
| Leg Filler | 4 | 3/4" × 1" × 6" |
| Top/Bottom Block | 2 | 3" × 6" × 6" |
| Long Leg Brace | 1 | 3/4" × 1" × 9" |
| Short Leg Brace | 2 | 3/4" × 1" × 3" |
| Rail | 4 | 3/4" × 3" × 5" |
| Frame Vertical | 4 | 5/8" × 5/8" × 22" |
| Frame Horizontal | 8 | 5/8" × 5/8" × 6" |
| Long Shade Brace | 1 | 3/4" × 1" × 6" |
| Short Shade Brace | 2 | 3/4" × 1" × 2" |
| Spacer Block | 1 | 3/4" × 1" × 1" |
What to buy
Buy 7 boards at 8 ft.
3" × 6"
1 board
3/4" × 3"
1 board
3/4" × 1"
3 boards
5/8" × 5/8"
2 boards
Assumes 8 ft stock, a 1/8" saw kerf, and buying each part at its own width. Change the board size or kerf on the full board plan →
Instructions
1Cut the Legs
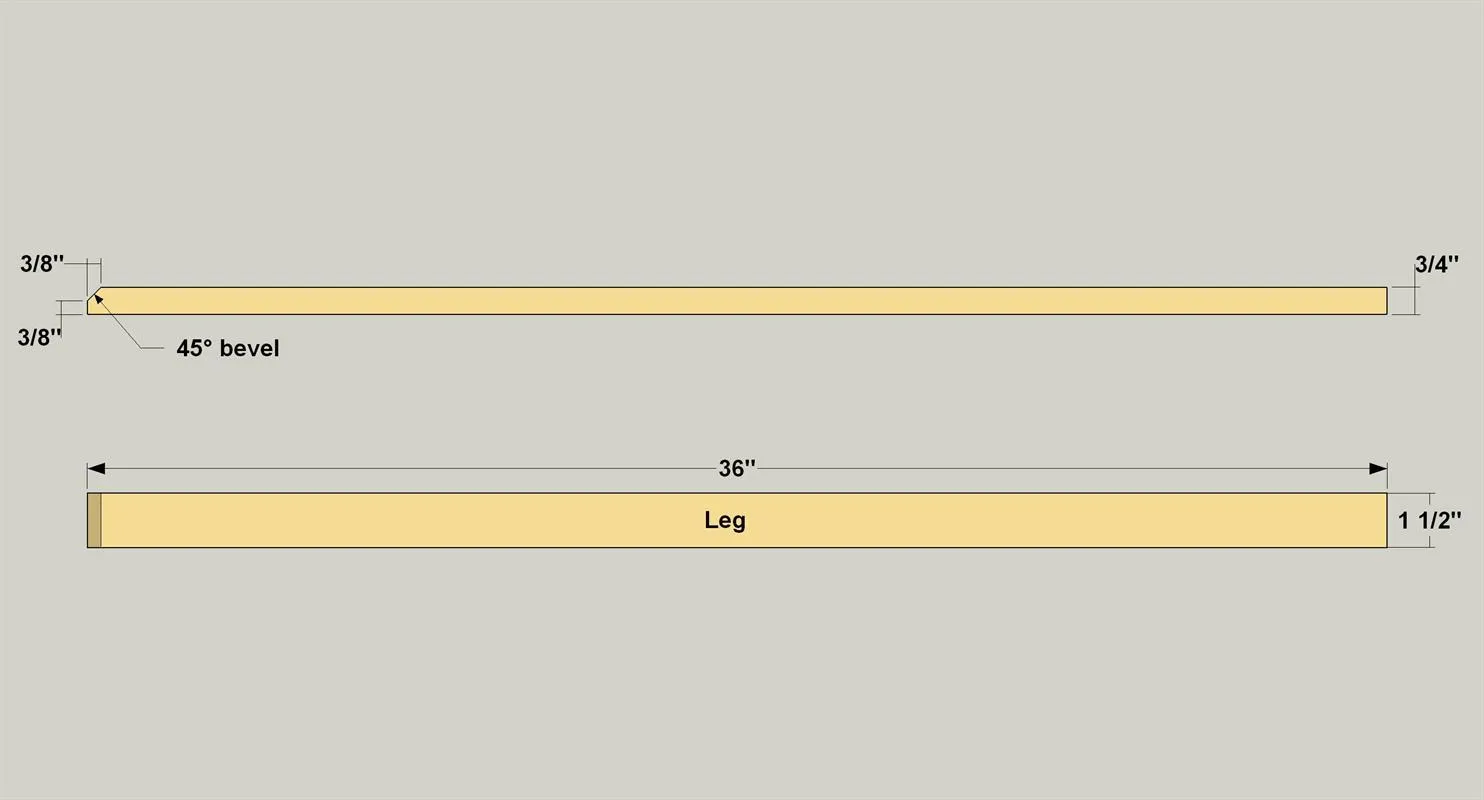
- Cut four Legs to length from 1 x 2 boards as shown in the cutting diagram.
- Cut the bevel on one end of each leg, as shown. The easiest way to do this is to set your miter saw at 45°, stand the Leg on edge against the saw fence, and then cut the bevel. Note that you’re only removing part of the end of the leg. This leaves a flat surface for the leg to stand on.
2Make Leg Fillers
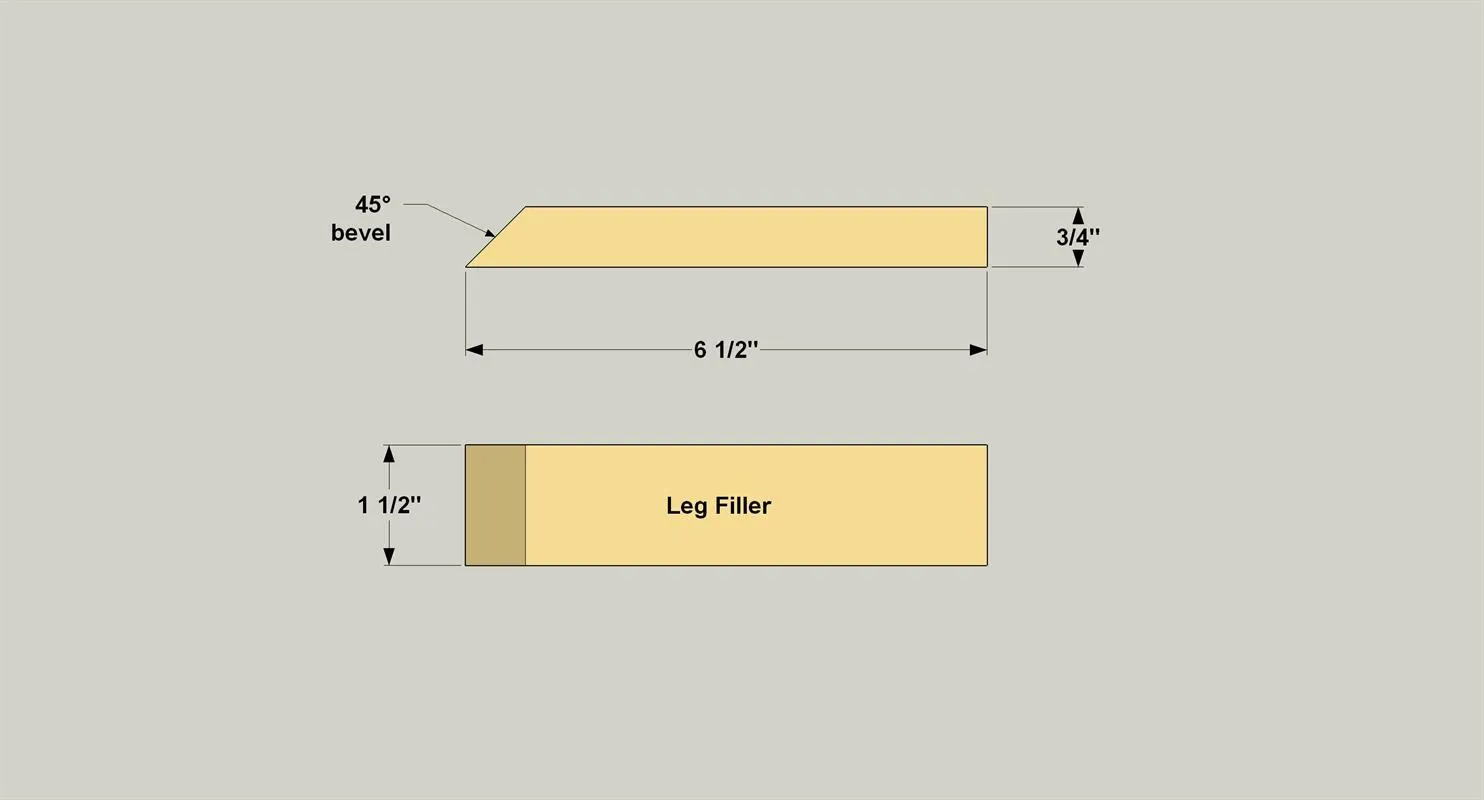
- Cut four Leg Fillers to length from 1 x 2 boards as shown in the cutting diagram.
- Cut a 45° bevel on one end of each Leg Filler as shown. The procedure is the same as you used on the Legs, but in this case the bevel is through the full thickness of the piece.
3Glue Up the Legs
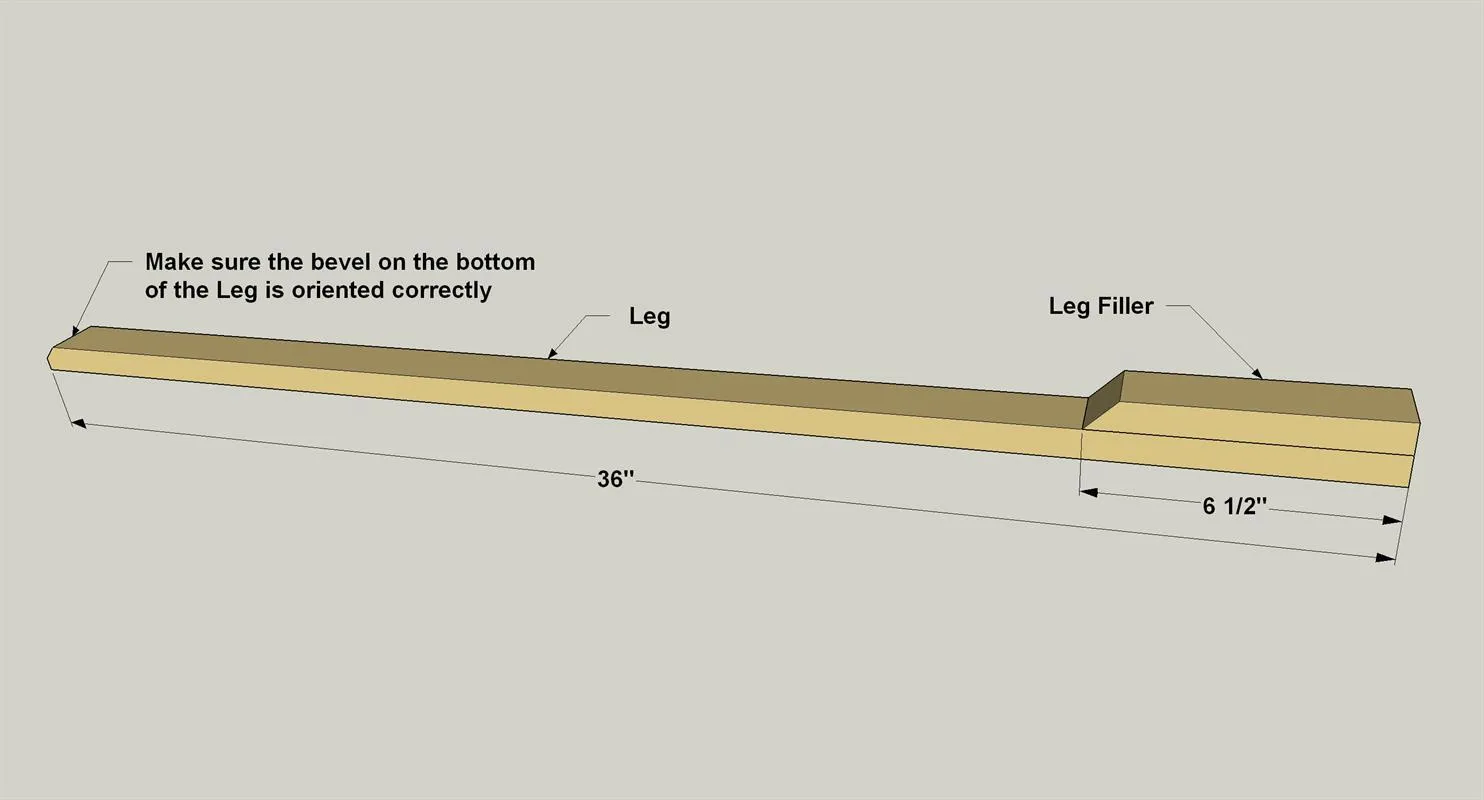
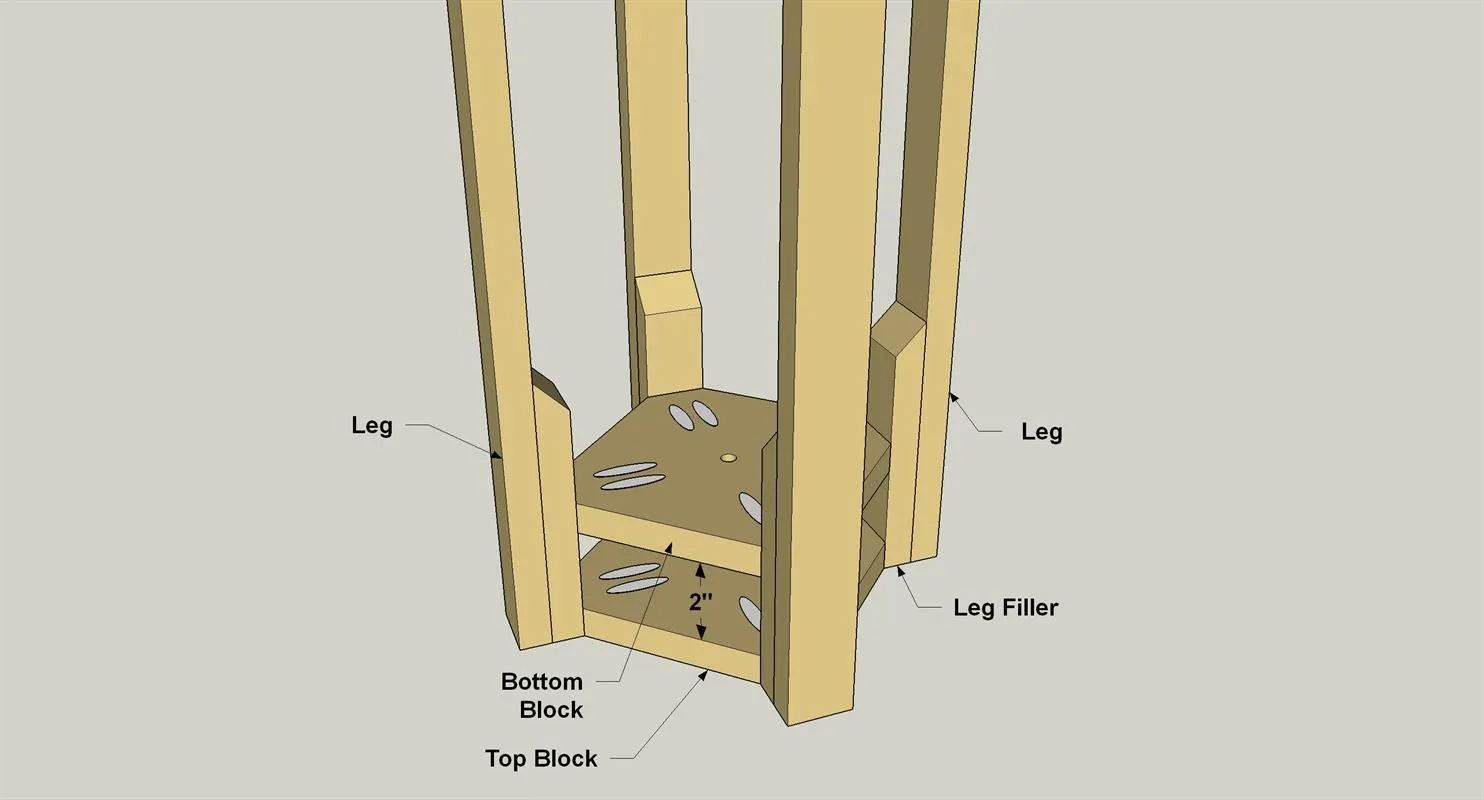
Glue and clamp one Leg Filler to the each Leg as shown. Make sure the top end and the side edges of the Filler are flush with the end and sides of the Leg.
4Make a Pair of Blocks
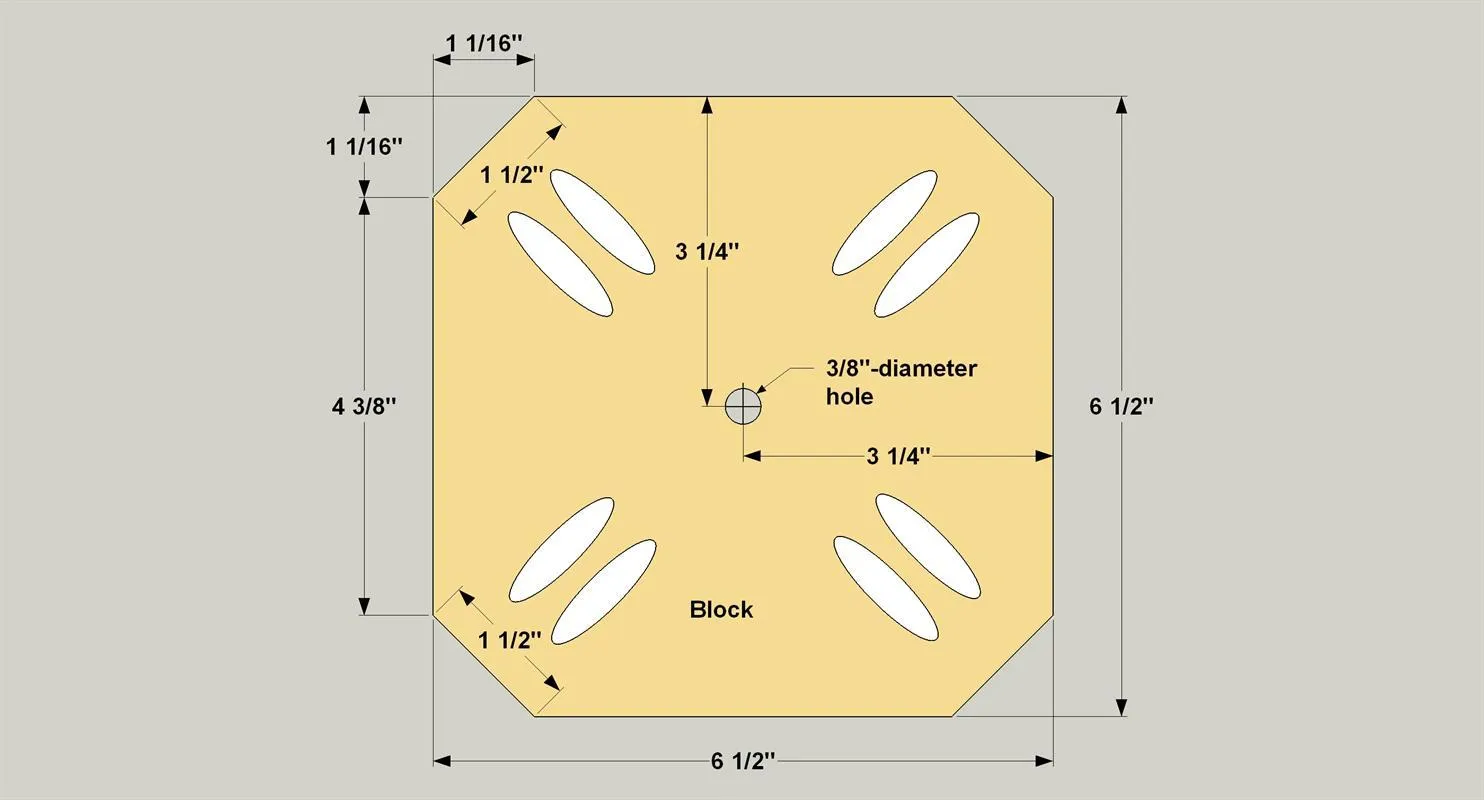
- Cut a Top Block and a Bottom Block to size from 3/4" plywood, as shown in the cutting diagram. These parts are identical.
- Trim the four corners as shown. Each mitered corner should measure the same as the width of the Legs: 1 1/2".
- Drill a 3/8" through hole in the center of each Block.
- Then drill pocket holes at the location shown.
5Join the Legs and Top Block
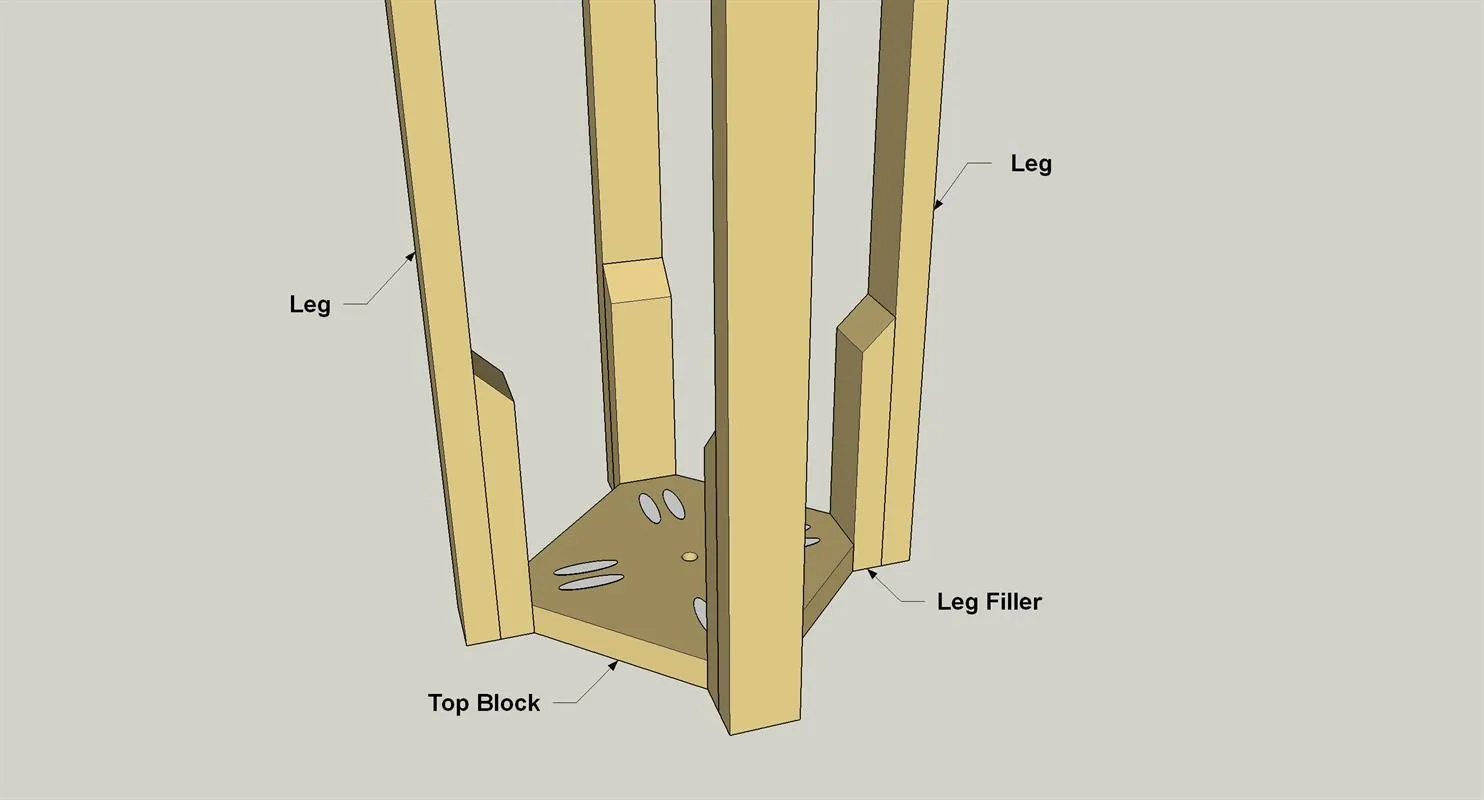
Clue and clamp two opposite legs to the Top Block, and then secure them using 1 1/4" fine-thread pocket hole screws. This is a tight space, but a simple drill attachment will make working in these tight quarters easy.
Tip: Drive Right When Space is Tight When space is tight, it can be difficult or impossible to position a drill and a long square-drive bit for driving pocket screws. For less than $25, though, you can pick up a right angle attachment that works with any drill. Combine a right angle attachment with a 3" square-drive bit, and you can drive pocket screws almost anywhere.
6Make the Leg Braces
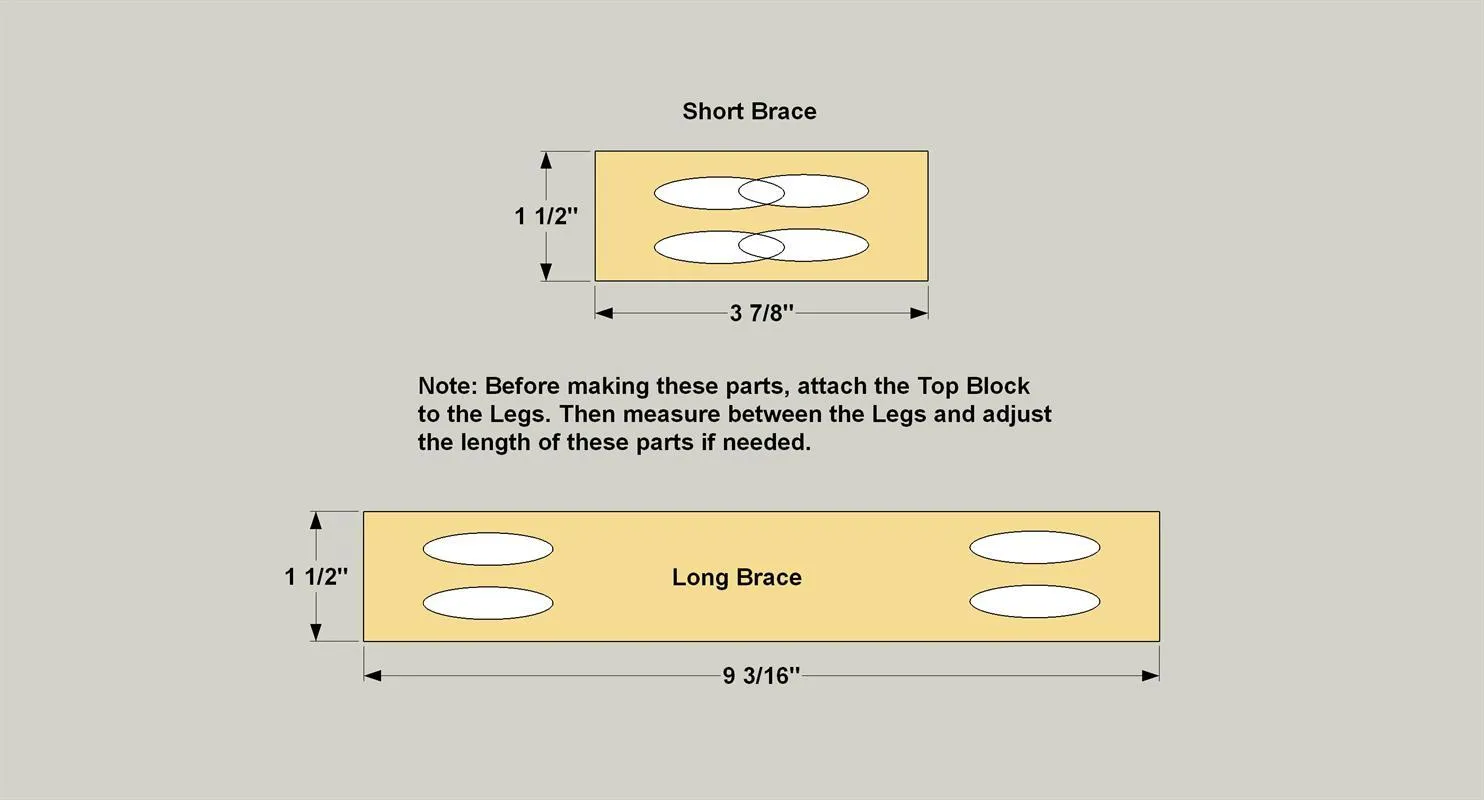
Cut one Long Leg Brace and two Short Leg Braces to length form 1x2 boards, as shown in the cutting diagram. Then, with your pocket hole jig set for 3/4" material, drill pocket holes where shown.
7Assemble the Leg Braces
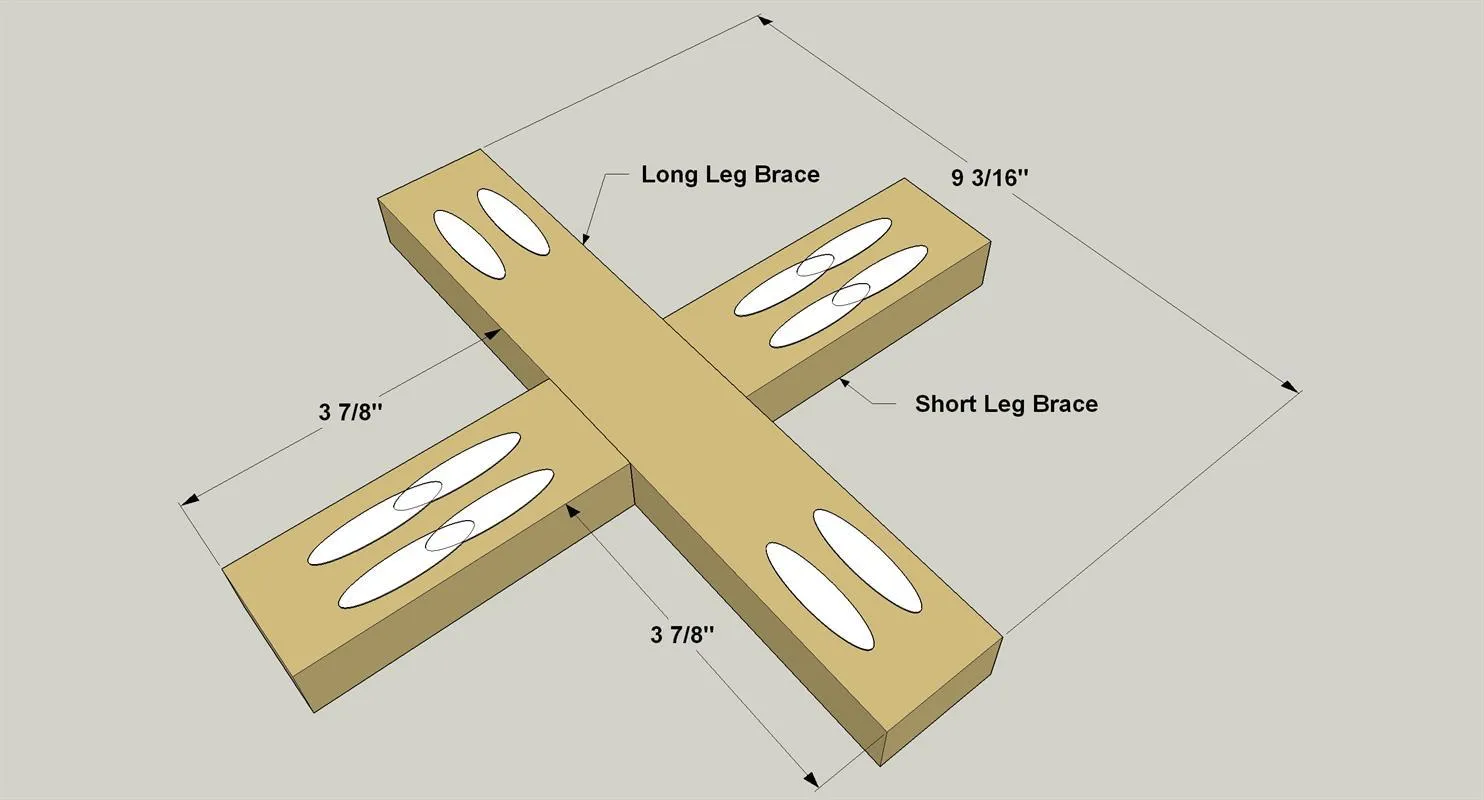
Position the two Short Leg Braces so they are centered on the length of Long Leg Brace, as shown, and secure them using 1 1/4" fine-thread pocket hole screws.
8Install the Brace Assembly
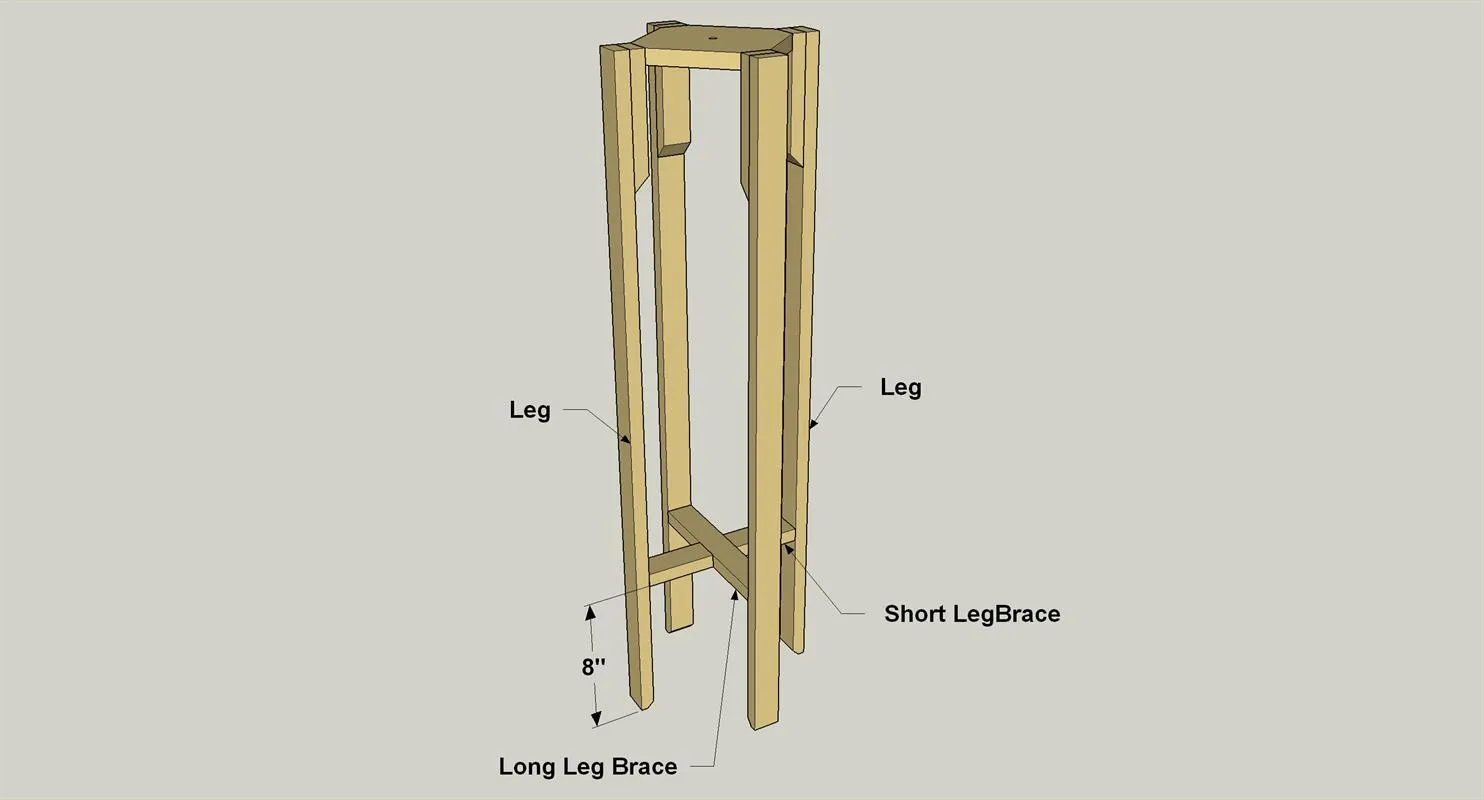
Attach the leg brace assembly to the Legs at the location shown using 1 1/4" fine-thread pocket hole screws. Once again, this is a perfect place to use a right-angle attachment.
9Install the Bottom Block
Attach the Bottom Block to the Legs, making sure to keep a 2" gap between the Bottom Block and the Top Block. Secure the Block using 1 1/4" fine-thread pocket hole screws.
10Make the Rails
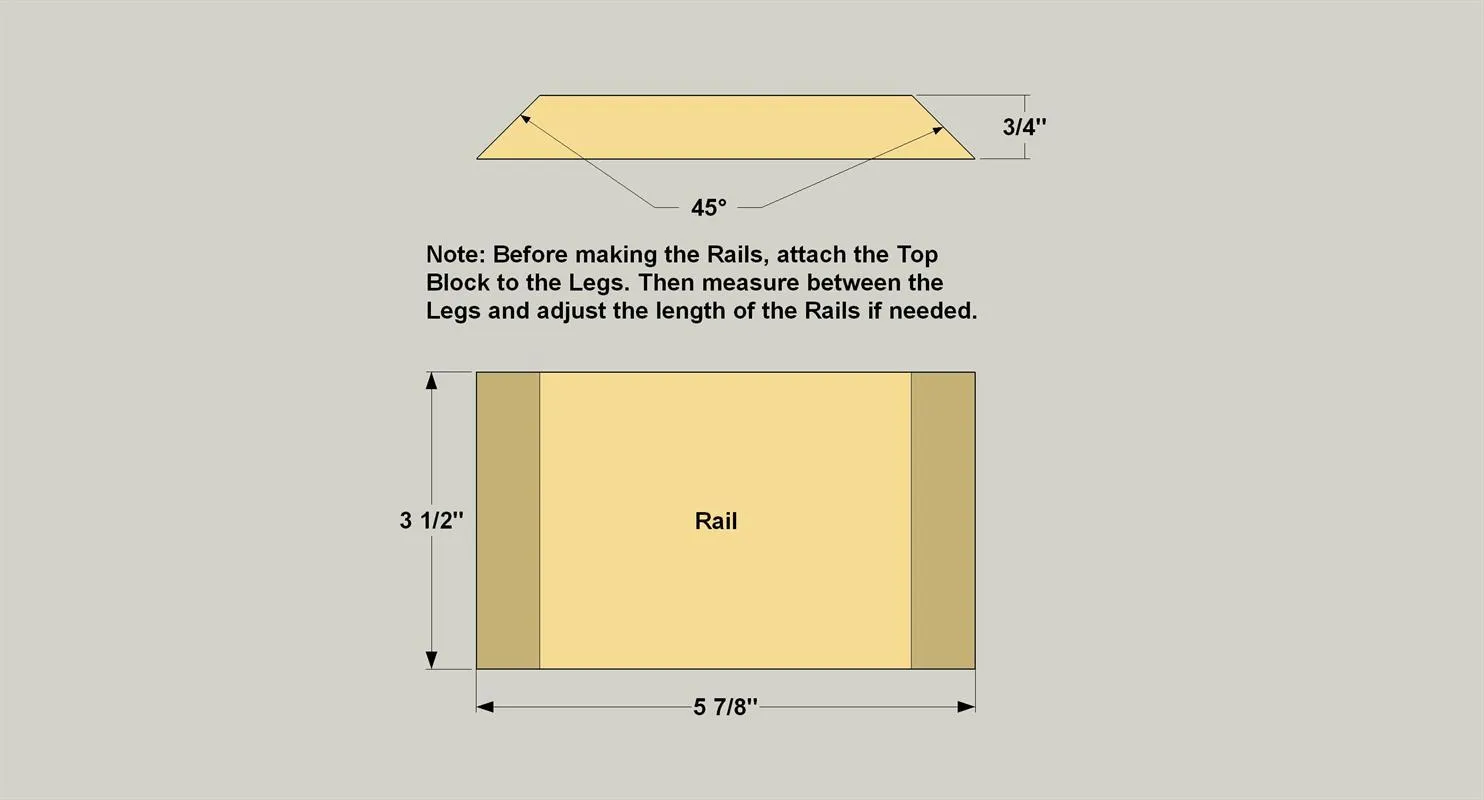
- Cut four rails from a 1x4 board, as shown in the cutting diagram. The best way to do this is to initially cut them extra-long.
- Then bevel one end at 45°. On most miter saws, you can stand the piece on edge and rotate the blade to cut a 45° miter. If the Rail is too wide to stand on your saw, lay it flat and then tilt the head to a 45° bevel to make your cuts. Hold a Rail in position on the table base and double check the exact length required.
- Then cut it and test the fit. You’re better off to cut a little long and then make skim cuts until it fits exactly.
- Mark that Rail and its location, and then work around fitting each Rail. That way, even if the Legs aren’t all positioned exactly the same, you'll end up with tight-fitting rails.
11Add the Rails
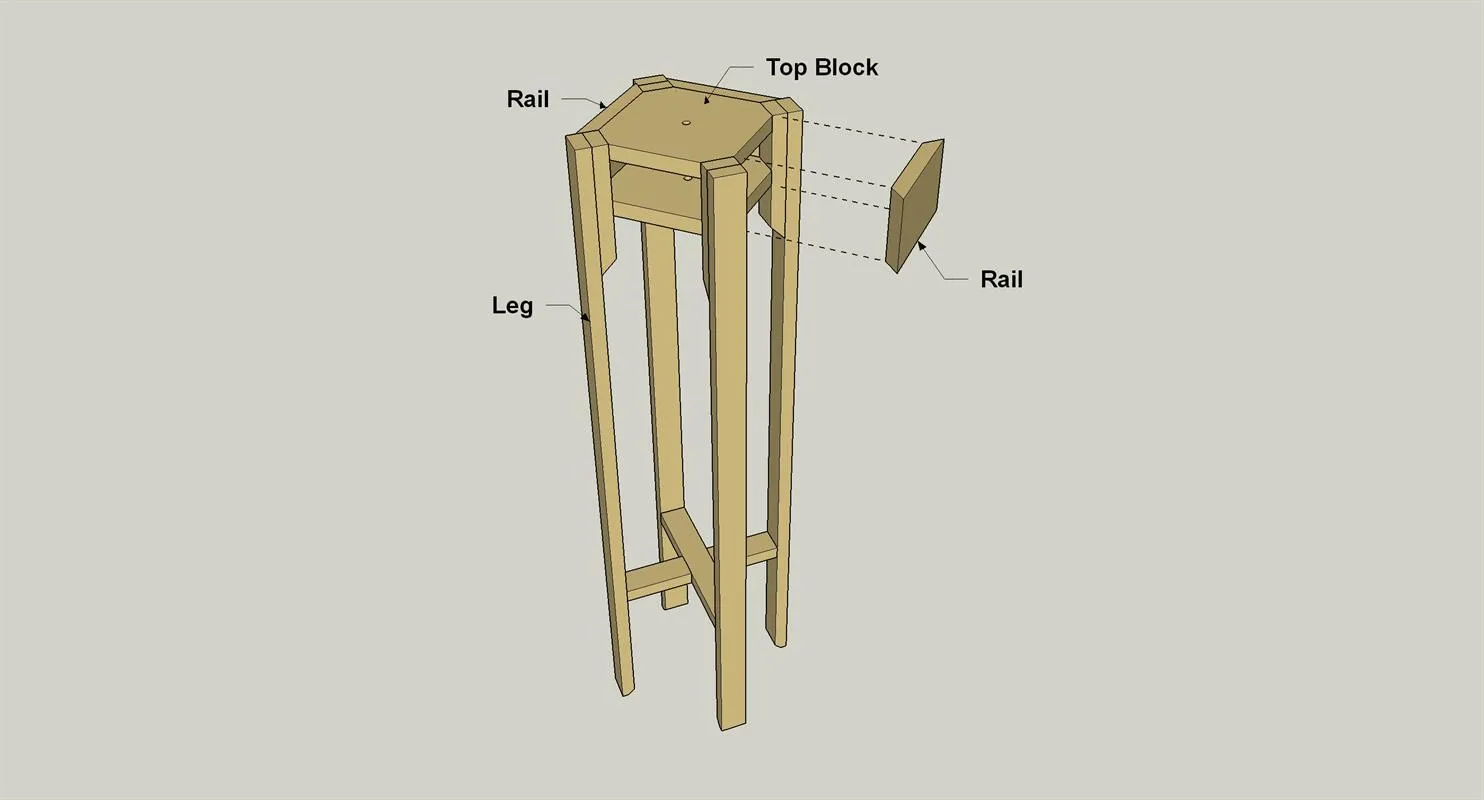
- Once you have the Rails all fitted, attach you can attach them.
- Spread glue on the edges of the Blocks on opposite sides of the base assembly.
- Then clamp these two Rails in place.
- Once the glue sets dries enough to hold—usually about 20 minutes—you can repeat the process to attach the other two Rails.
12Finish Up the Base
Give your lamp base a final sanding, and then finish it with your favorite stain. We used gray gel stain from General Finishes. After the finish dries, thread in the lamp nipple in to the blocks so it is flush to the lower face of the Bottom Block. Then you’re ready to move on to making the shade.
13Begin Building the Shade
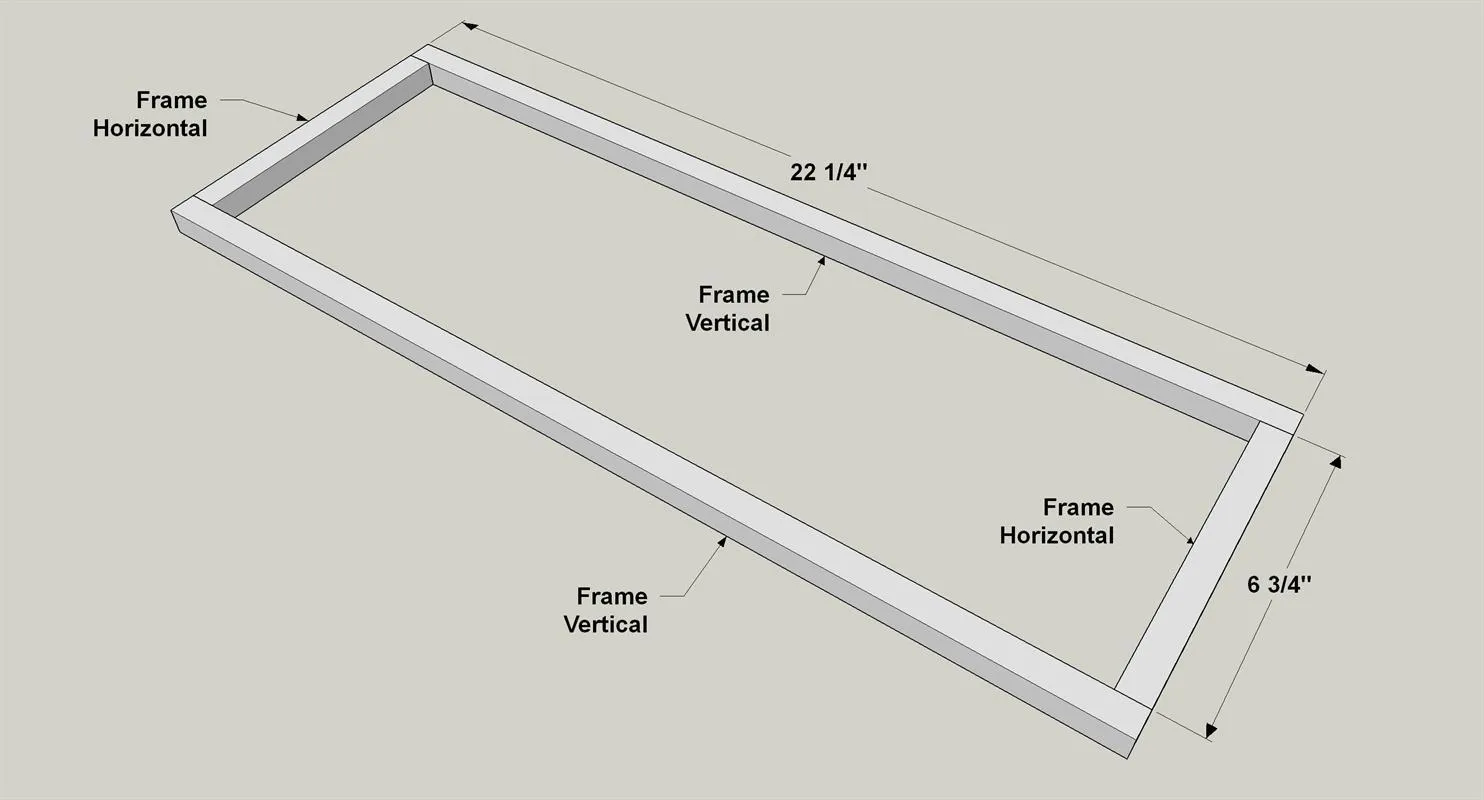
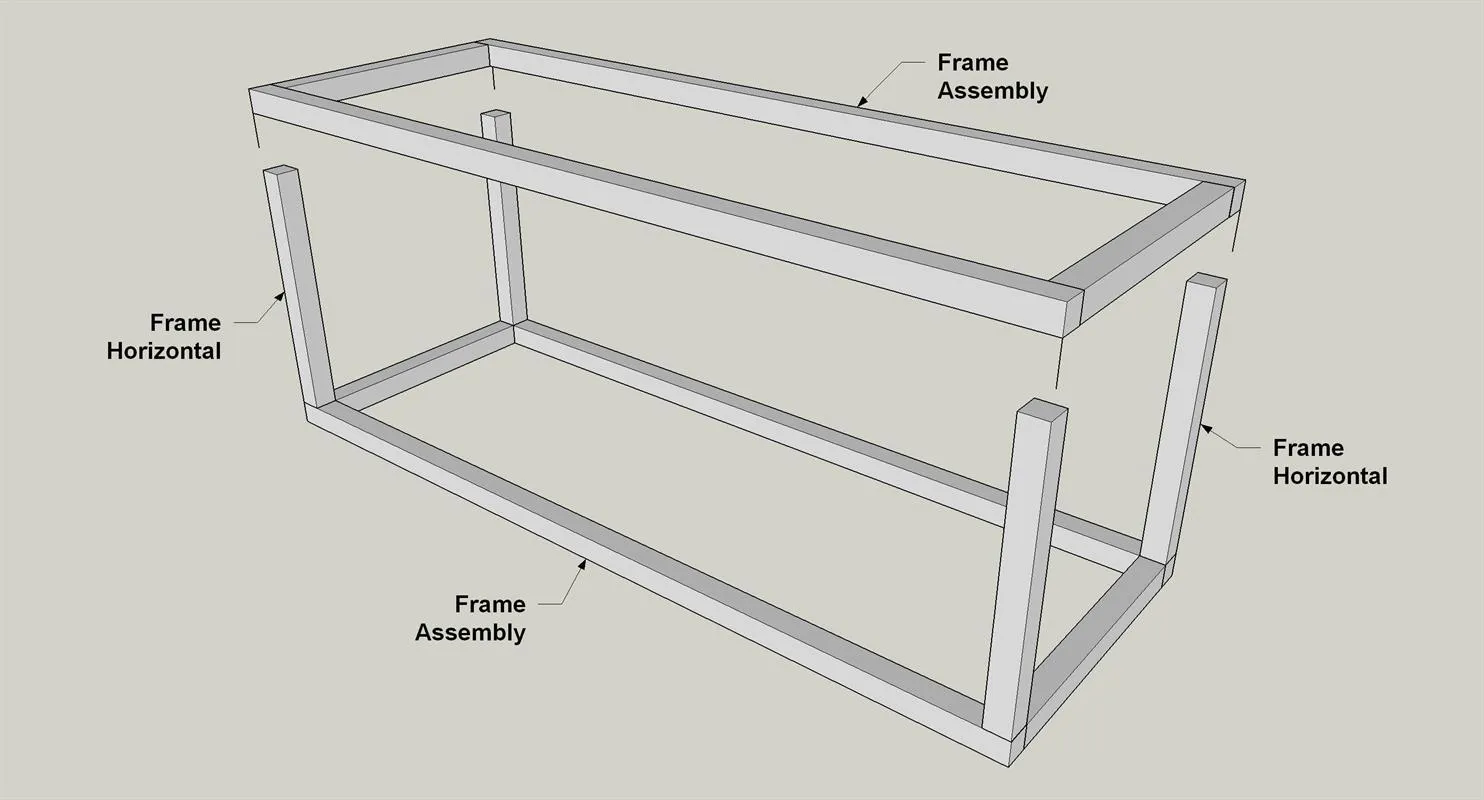
- Cut four Frame Verticals and eight Frame Horizontals to length from 5/8" square dowels, as shown in the cutting diagram.
- Glue and clamp two Frame Horizontals to two Frame Verticals as shown, and clamp them together. Use a square to make sure that the frame side assembly is square.
- Repeat this to create another frame side assembly.
14Bring the Frame Together
Now you can connect the two frame sides by gluing the remaining four Frame Horizontals in place as shown. Once again, use a square to double-check the frame.
15Make Shade Braces
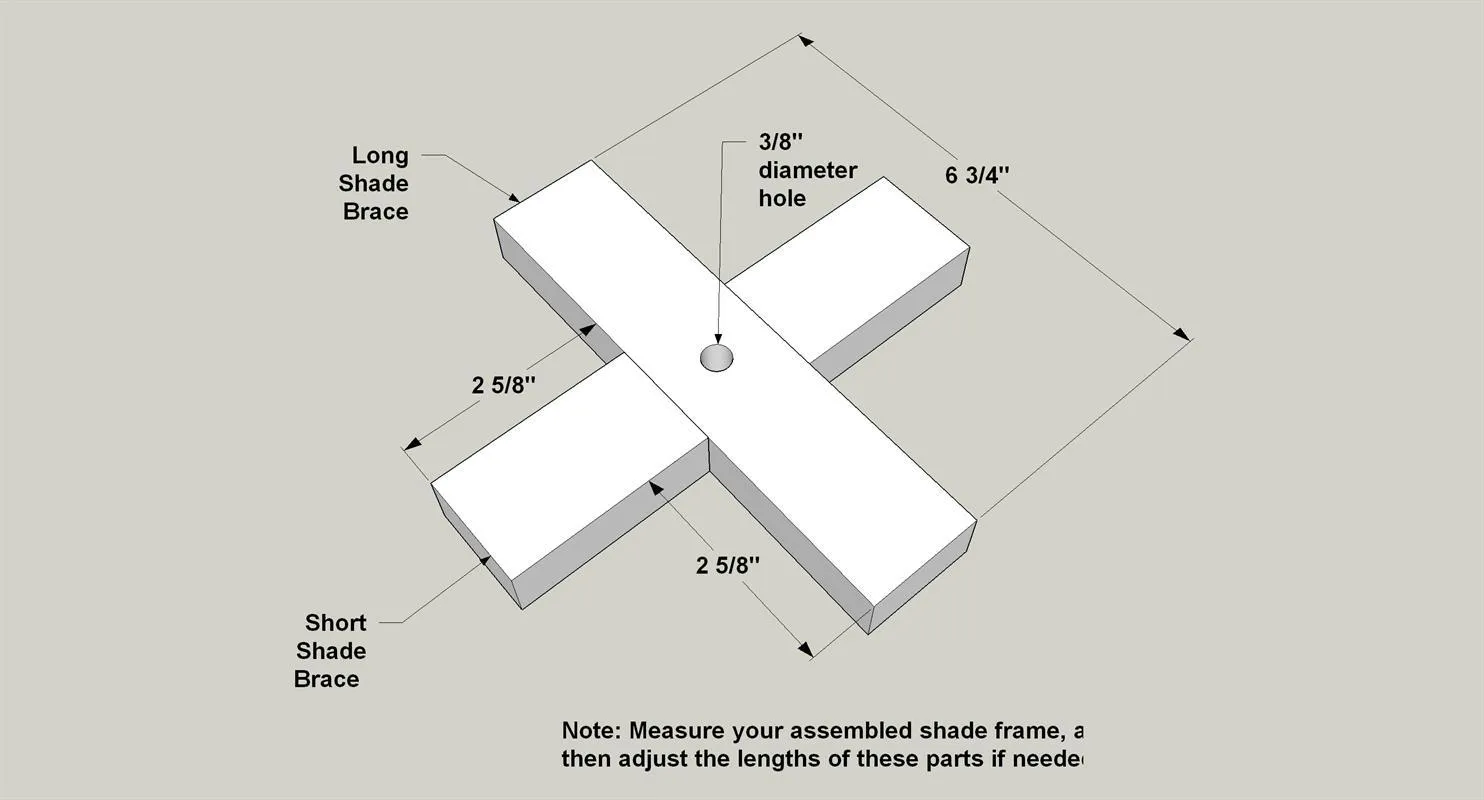
- Cut two Short Shade Braces and one Long Shade Brace form 1 x 2 boards as shown in the cutting diagram.
- Drill a 3/8" hole centered in the Long Shade Brace, then glue the three pieces together, as shown, with the Short Braces centered on the length of the Long Brace.
- Clamp the assembly until the glue sets.
16Install the Frame Brace
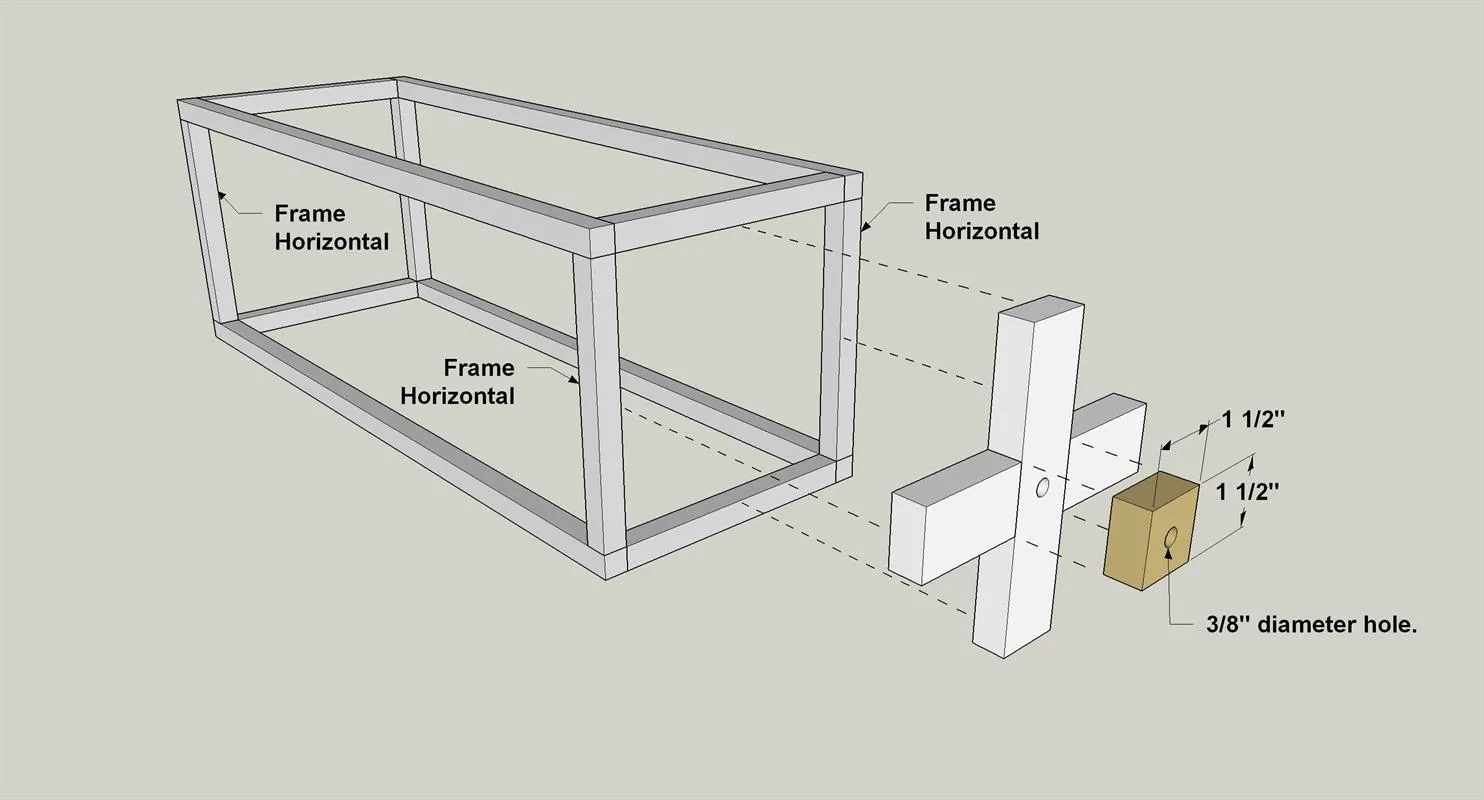
- Cut a Spacer Block to size from 1 x 2 board and Drill a 3/8" hole centered on the board.
- Glue the Spacer to the frame brace assembly, as shown, so the holes are aligned.
- Then glue the Frame Brace into the Shade Frame so that the bottom of the Brace is flush with the bottom of the Frame Horizontals.
17Finish Up the Lamp
- Sand the frame lightly, and then paint it with an off-white spray paint. When the Frame is dry, apply permanent double-stick tape (made for fabric) to one side of the frame at a time.
- Lay the Frame on the diffuser film and carefully trim the film to fit with a sharp utility knife. Do this for all four sides. Mount the shade by threading it onto the lamp nipple in the base.
- Then wire and install your light fixture according to the instructions.
Tags
- Decor
- Intermediate
Reviews & builds
No reviews yet
Sign in to review this plan or share your build.
No reviews yet. Be the first to build this.