Notch
NotchFloating Shelf with Hidden Storage
Step-by-step build — 12 steps. Also available as a print sheet.
1Cut the Wall Box Pieces
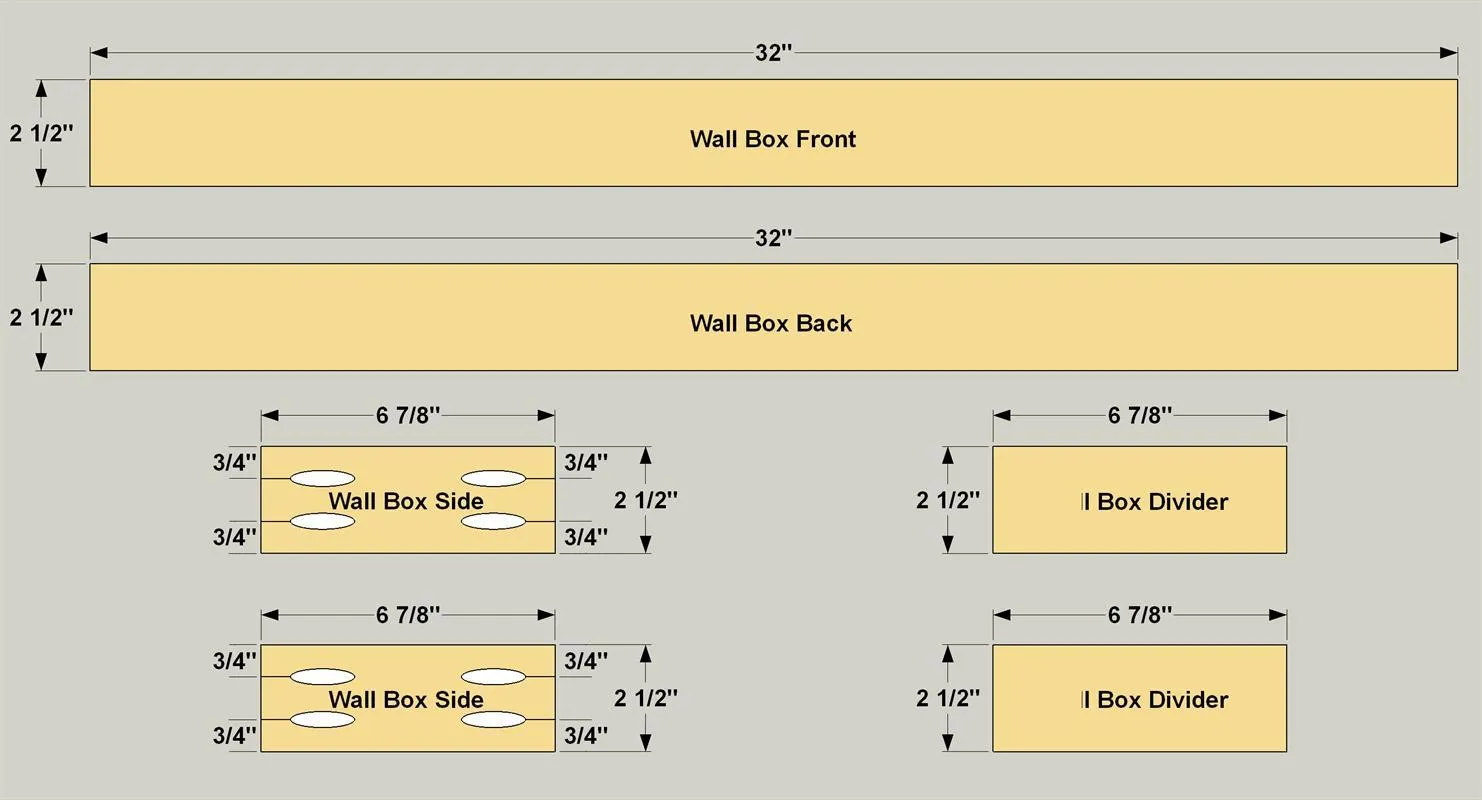
Cut one Wall Box Front, one Wall Box Back, two Wall Box Sides, and two Wall Box Dividers from a 1x3 board, as shown in the cutting diagram. We used maple. Poplar would be another good choice that costs slightly less. With your pocket-hole jig set up for 3/4" material, drill pocket holes where shown in the Wall Box Sides.
2Assemble the Outer Wall Box
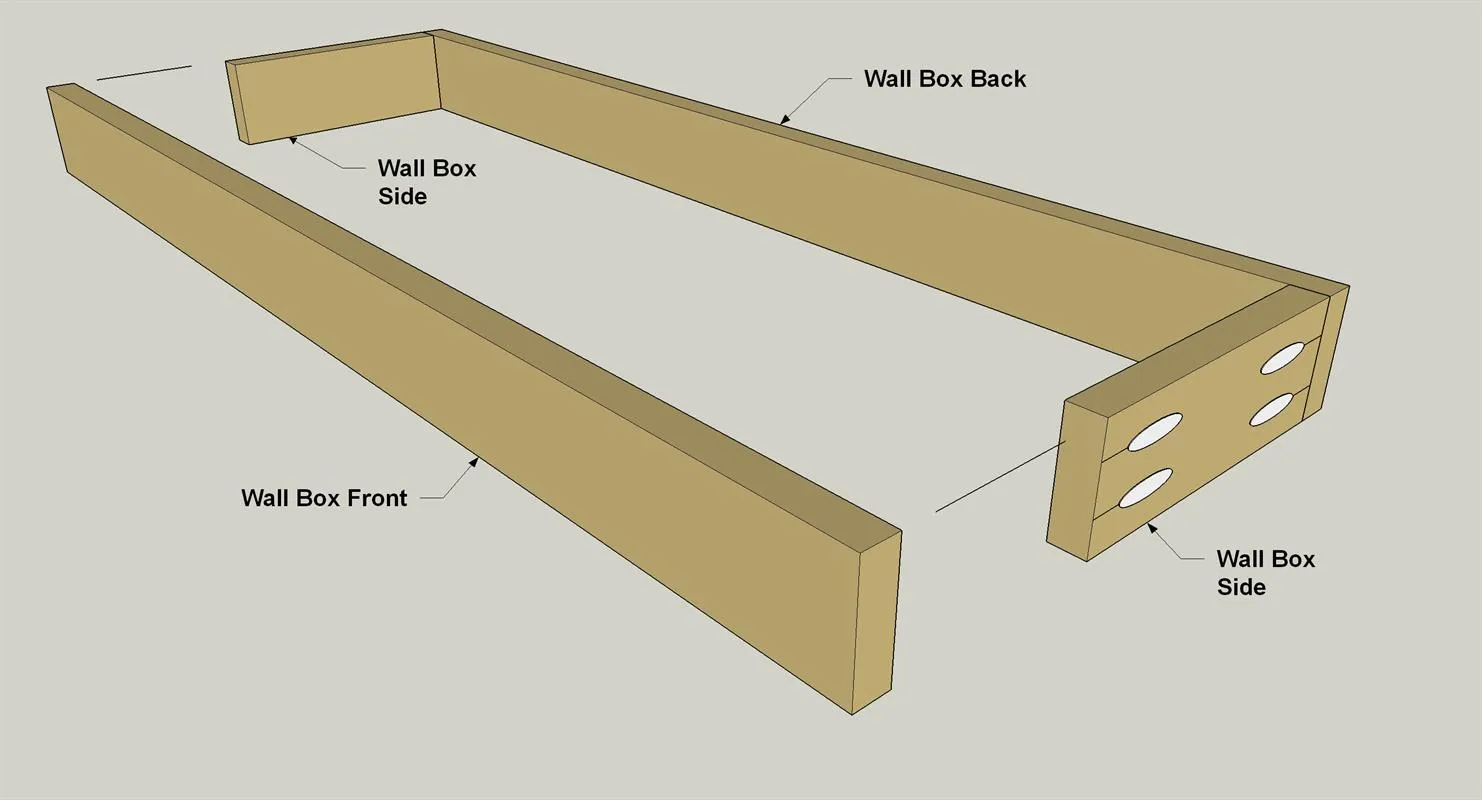
Assemble the Wall Box Front, Back and Sides as shown. Use glue and 1 1/4" pocket-hole screws—fine-thread for hardwoods like maple or poplar.
3Add a Pair of Dividers
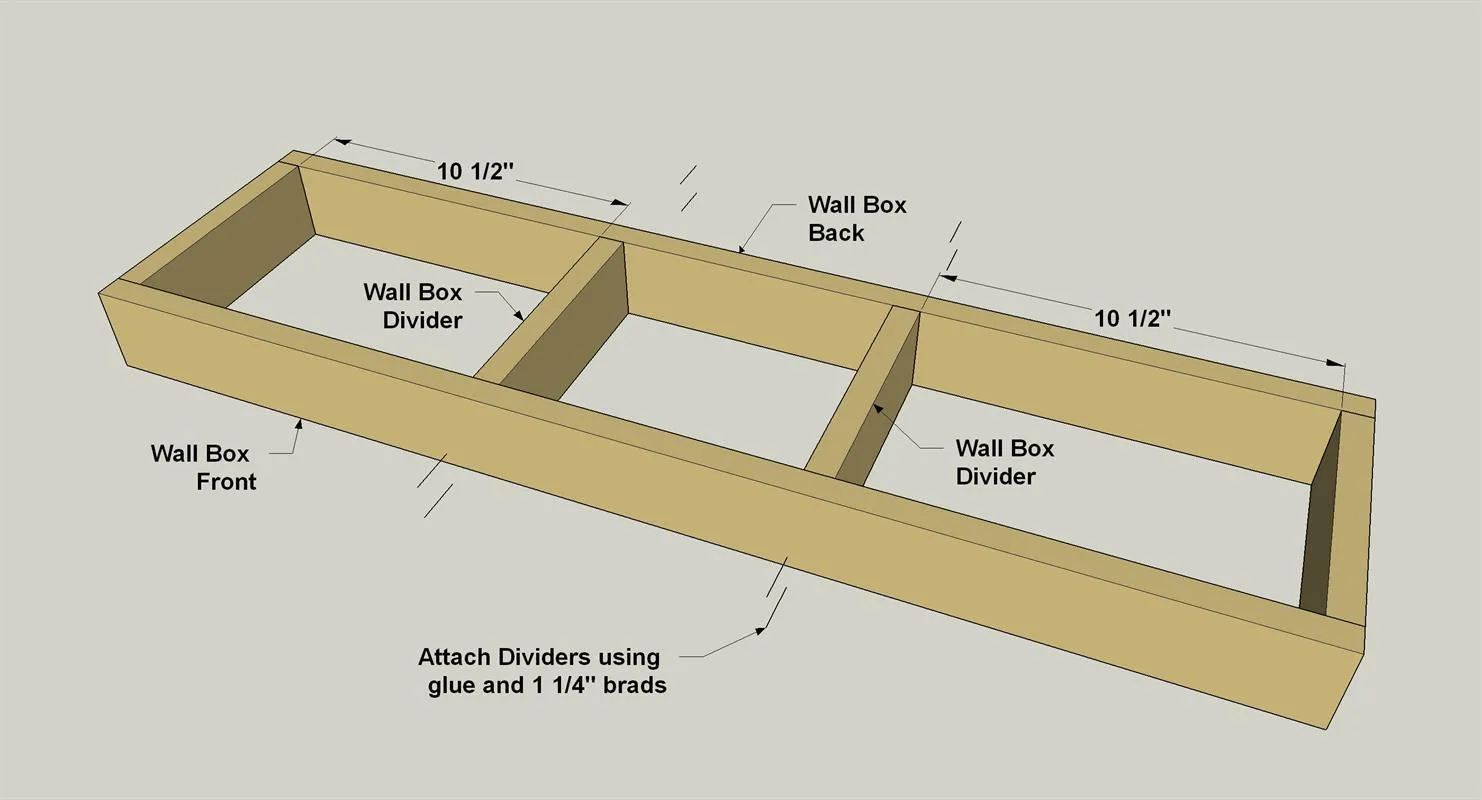
Position the Wall Box Dividers, as shown, and then attach them using wood glue and 1 1/4" brad nails.
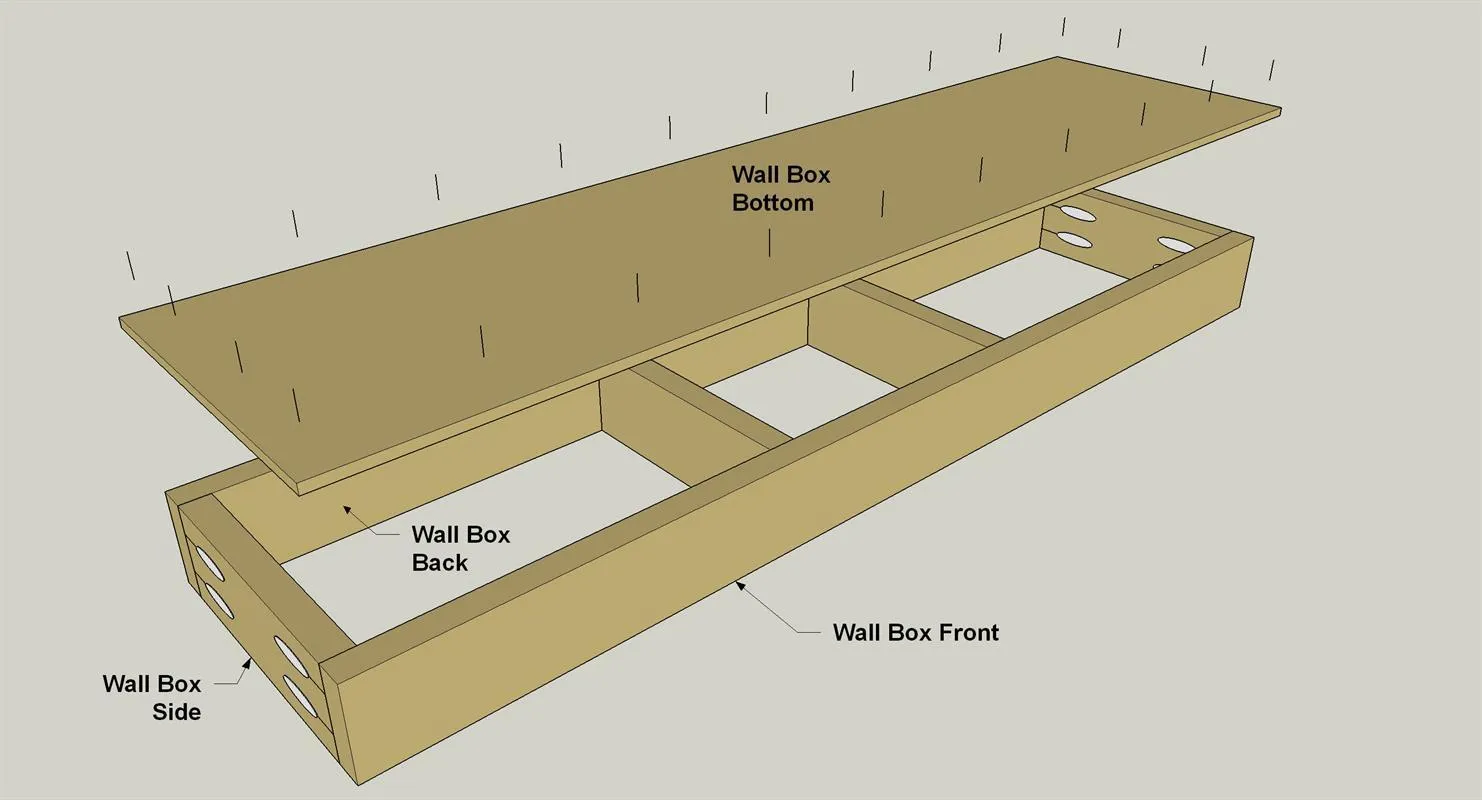
4Add a Wall Box Bottom
- Cut the Wall Box Bottom to size from a piece of 1/4" plywood, as shown in the cutting diagram.
- Spread glue on the lower edges of the wall box assembly, and then attach the Wall Box Bottom. Use clamps or tape to hold the bottom in position as you drive in 5/8"-long brad nails, as shown.
5Create Shelf Lid Cleats
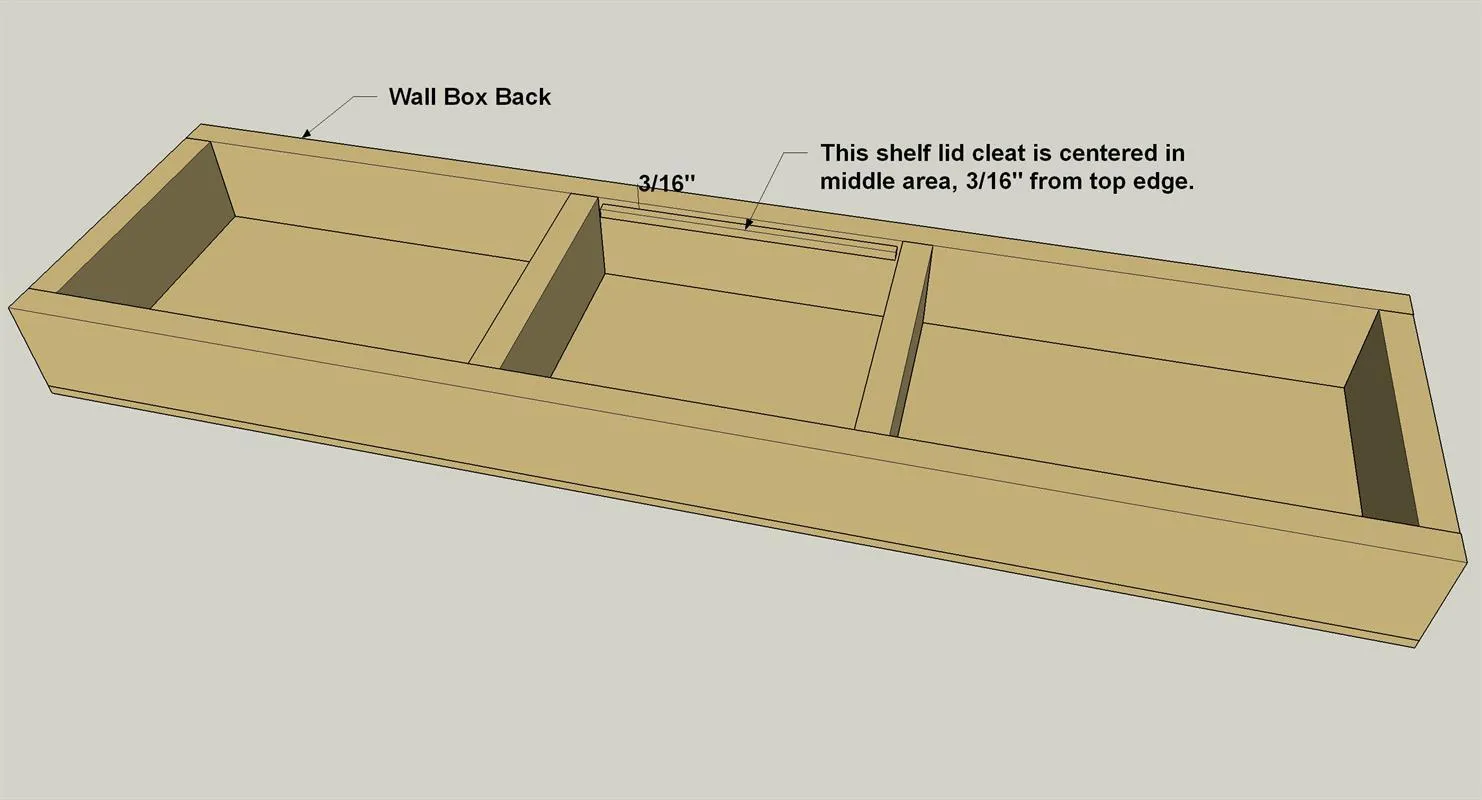
- Cut three shelf lid cleats from a 1/4" square dowel, as shown in the cutting diagram.
- Position one of the Shelf Lid Cleats inside the wall box assembly, as shown.
- Lay out the position where the Cleat needs to be installed, taking care to make sure it’s positioned 3/16" from the upper edge of the Wall Box Back, as shown. This is important because the Shelf Lid will rest on this cleat, holding it at the same height as the rest of the Shelf Top.
- Once you have the position of the cleat marked, spread glue on the cleat, and then clamp it in place until the glue dries.
6Create the Shelf Aprons
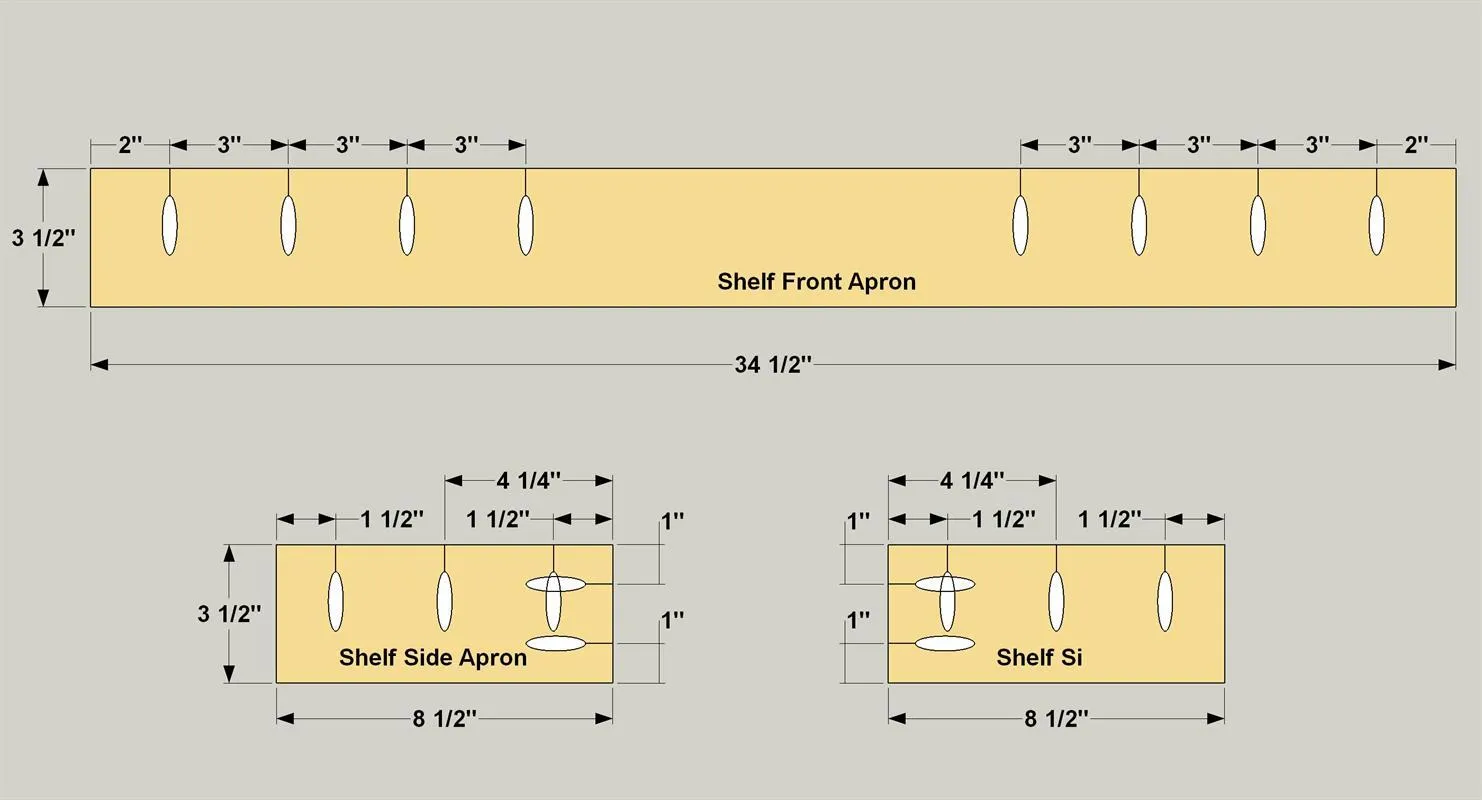
Cut two Shelf Side Aprons and one Shelf Front Apron from a 1x4 board, as shown in the cutting diagram. With your pocket-hole jig set up for 3/4" material, drill pocket holes as shown. We made our Aprons (and the Shelf Top parts) from cherry. If it’s not available in dimensional sizes in your area, you could choose another hardwood, such as oak or maple. You could also use poplar, which can be stained to mimic the look of cherry or walnut.
7Assemble the Shelf Aprons
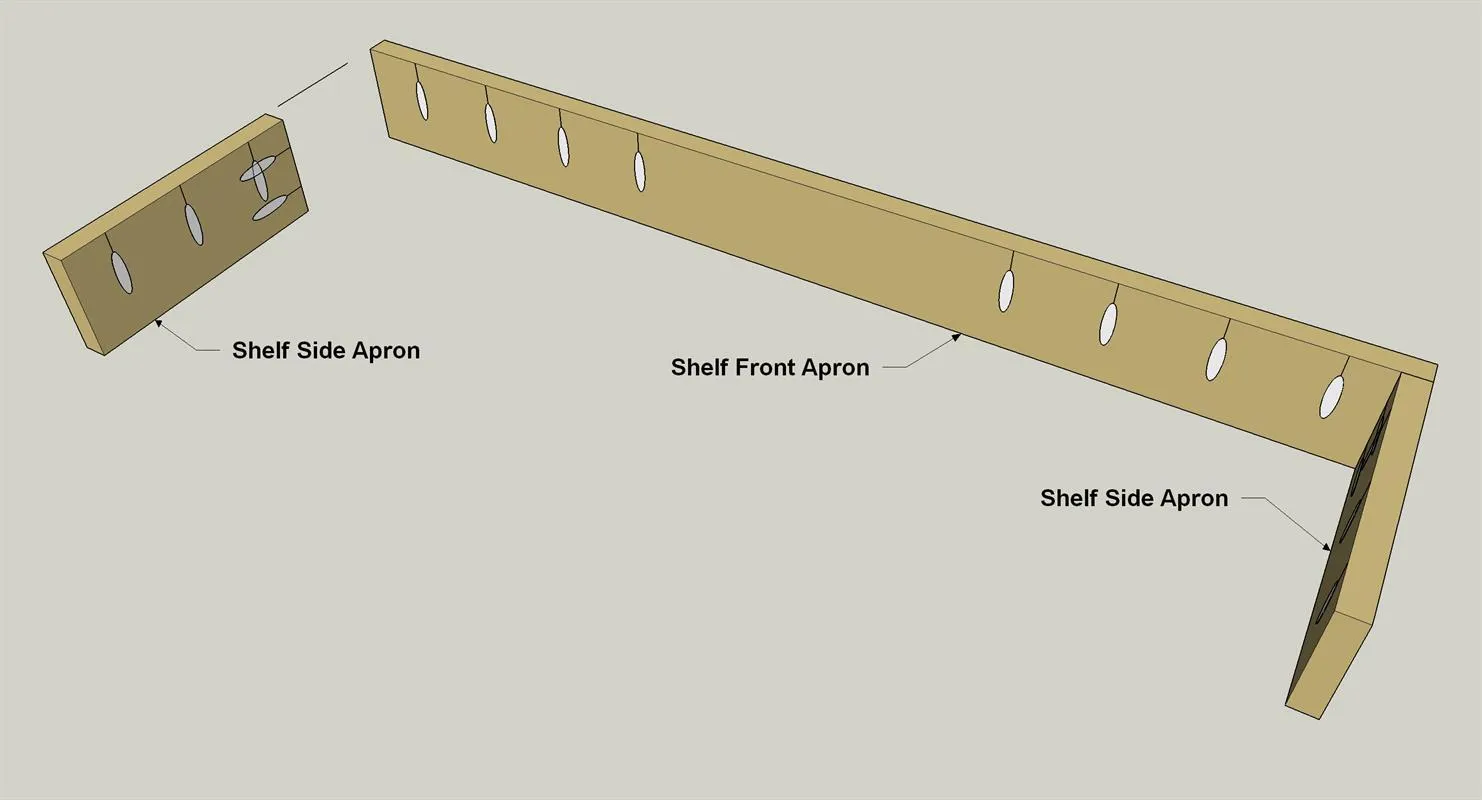
Assemble the Wall Shelf Apron using wood glue and 1 1/4" fine-thread pocket-hole screws as shown.
8Create the Shelf Top Pieces
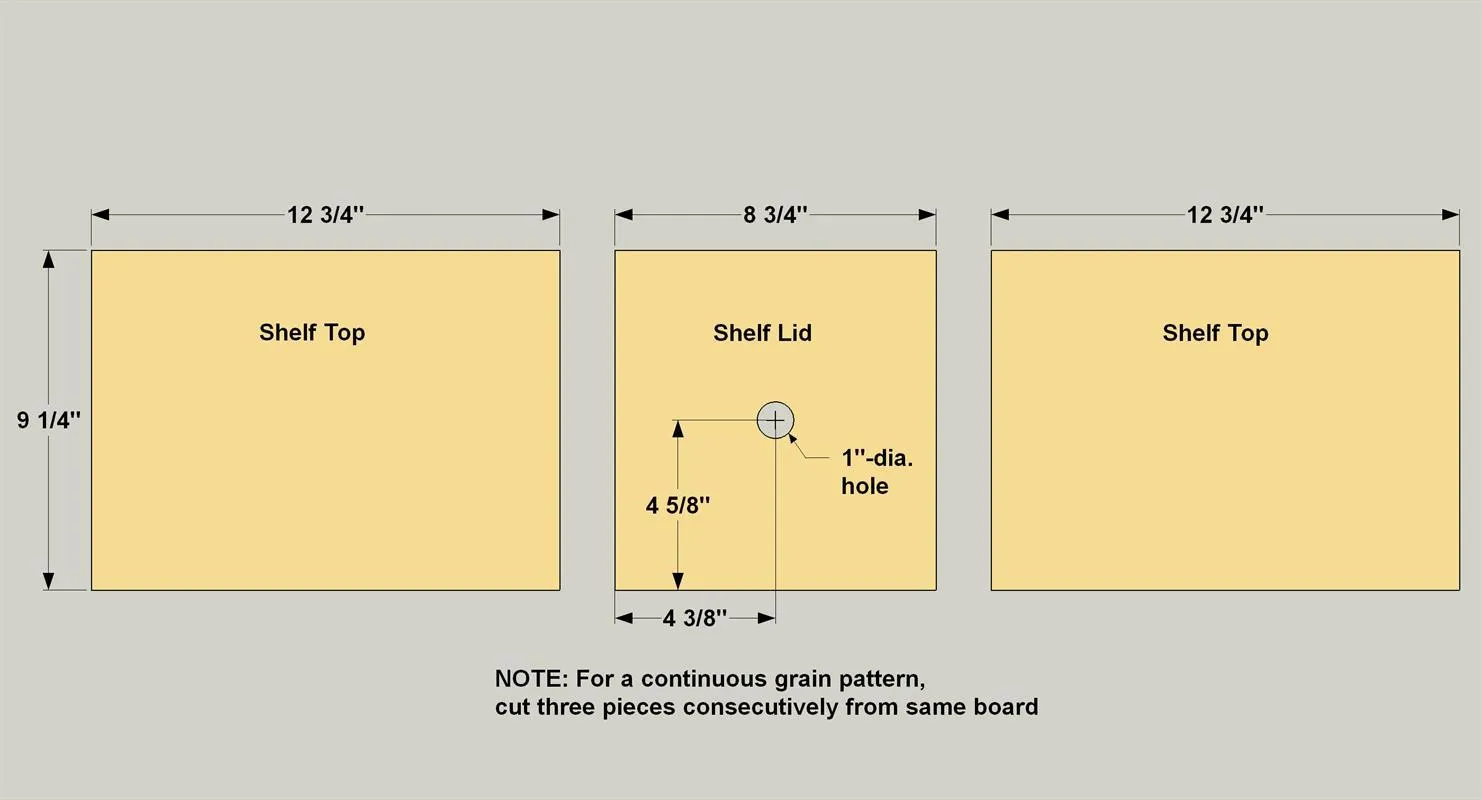
Now it’s time to cut tow Shelf Tops and one Shelf Lid to length from a 1x10 board, as shown in the cutting diagram. Notice how they’re cut—in the same sequence that they’ll be positioned on the final shelf. That way, when the shelf is done, the grain will flow continuously from one piece to the next. Make sure to keep these pieces oriented correctly as you move through the rest of the project to preserve this look. After cutting the parts, drill a 1" hole in the center of the Shelf Lid. A Forstner-style bit works better than a simple spade bit, because the Forstner creates a smoother result.
9Attach the Tops to the Aprons
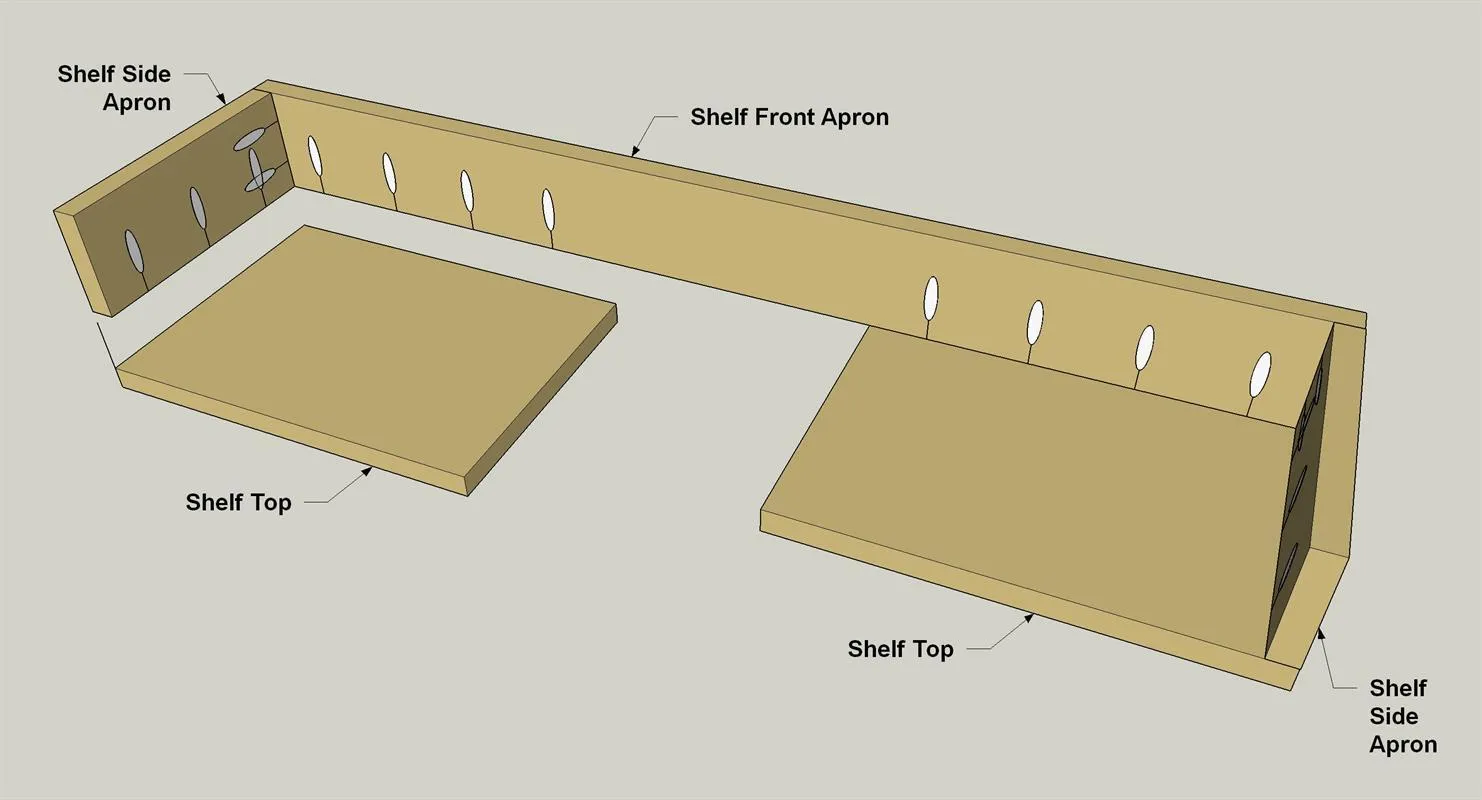
Lay the two Shelf Tops Face down, making sure you have the pieces oriented correctly for that continuous grain appearance. Attach the shelf apron assembly using wood glue and 1 1/4" fine-thread pocket-hole screws, as shown.
10Attach the Remaining Lid Cleats
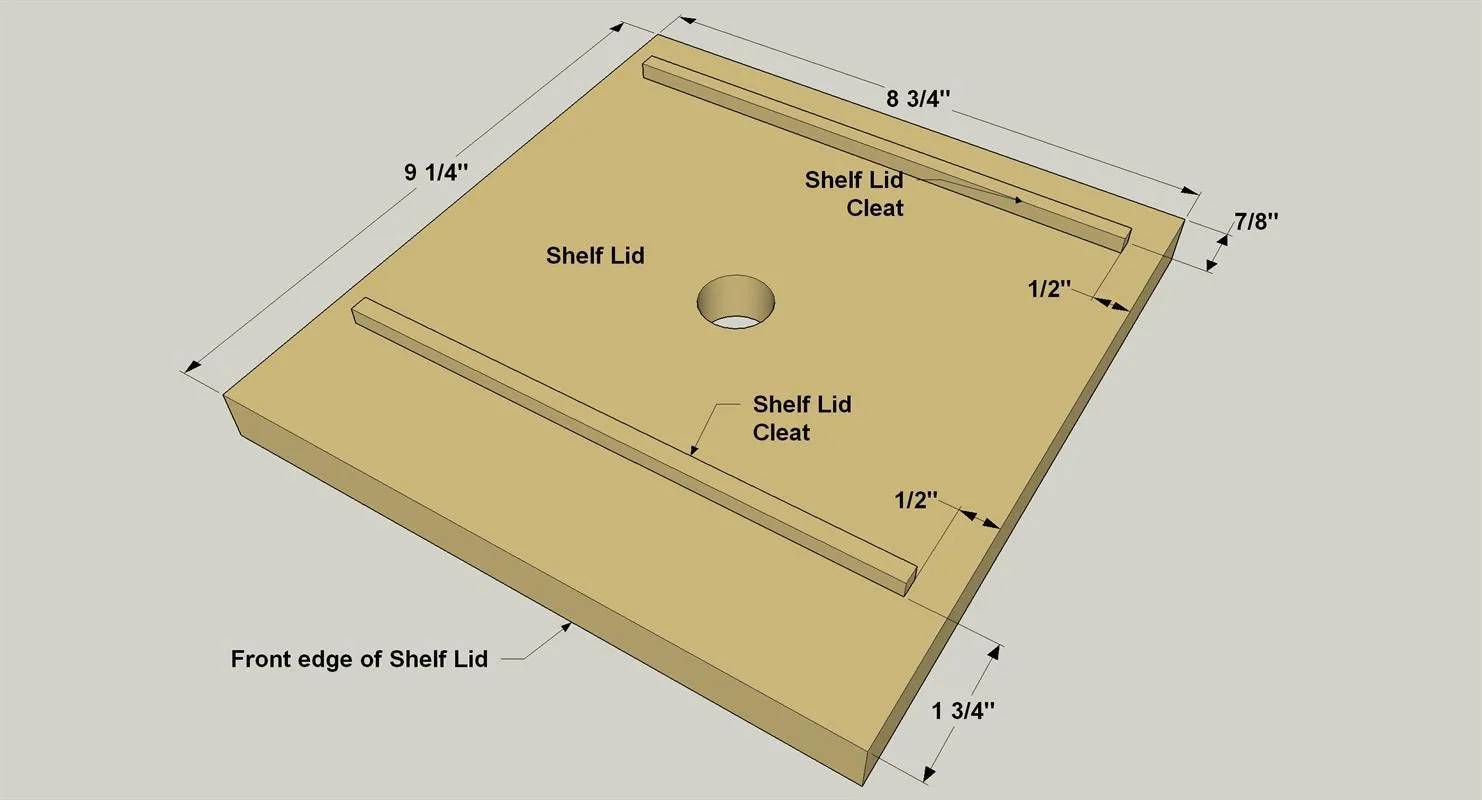
- Attach the two remaining Shelf Lid Cleats to the underside of the Shelf Lid as shown. Again, make sure the grain on the lid is oriented correctly.
- Glue the Cleats in position, and hold them in place with clamps or weights until the glue dries. with wood glue and clamps. Make certain Shelf Lid grain is going in the correct direction. Before you move on to adding the drawer slides, this is a good time to give everything a final sanding, and then apply the finish or stain of your choice. We used a clear wipe-on oil finish.
11Attach the Drawer Slides
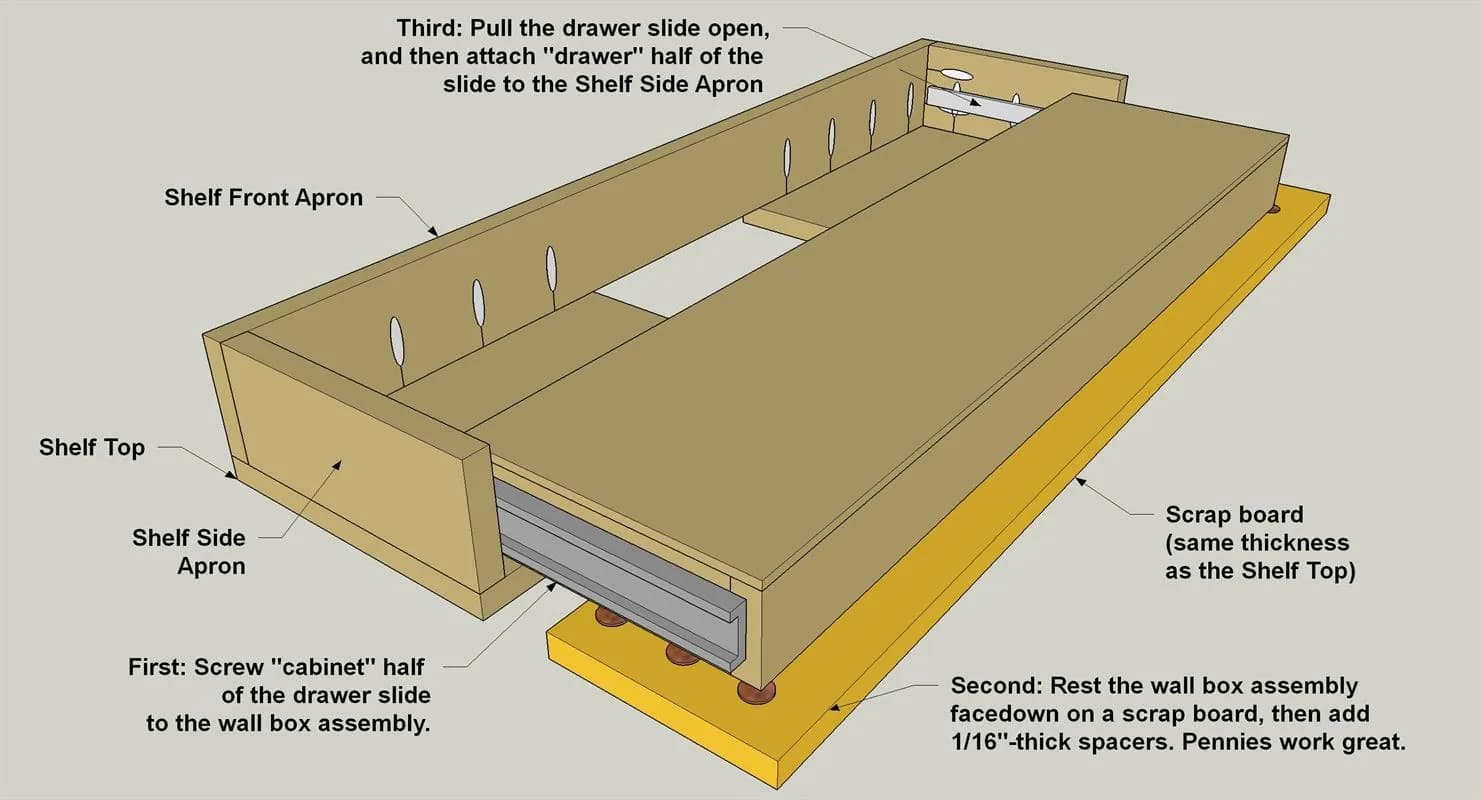
- Following the manufacturer’s instructions and the illustration here, attach the drawer slides. You will attach the “cabinet” half of each side to the wall box assembly first.
- Then lay the shelf top assembly facedown, as show.
- Place the wall box assembly on a 3/4"-thick board and align it with the shelf top.
- Then, use spacers to slightly raise the wall box assembly—pennies work great. This creates a small gap that will keep the shelf top from dragging on the wall box when you slide it open.
- Pull the “drawer” half of each slide into place, and attach them. Most slides have horizontal slots for the screws. That way, you can close the assembly, check the fits, and then make slight adjustments if needed.
12Attach Wall Box to Wall
- Separate the shelf top assembly from the wall box (most slides can be separated after installation).
- Now decide on the location for your shelf, and then locate the wall studs.
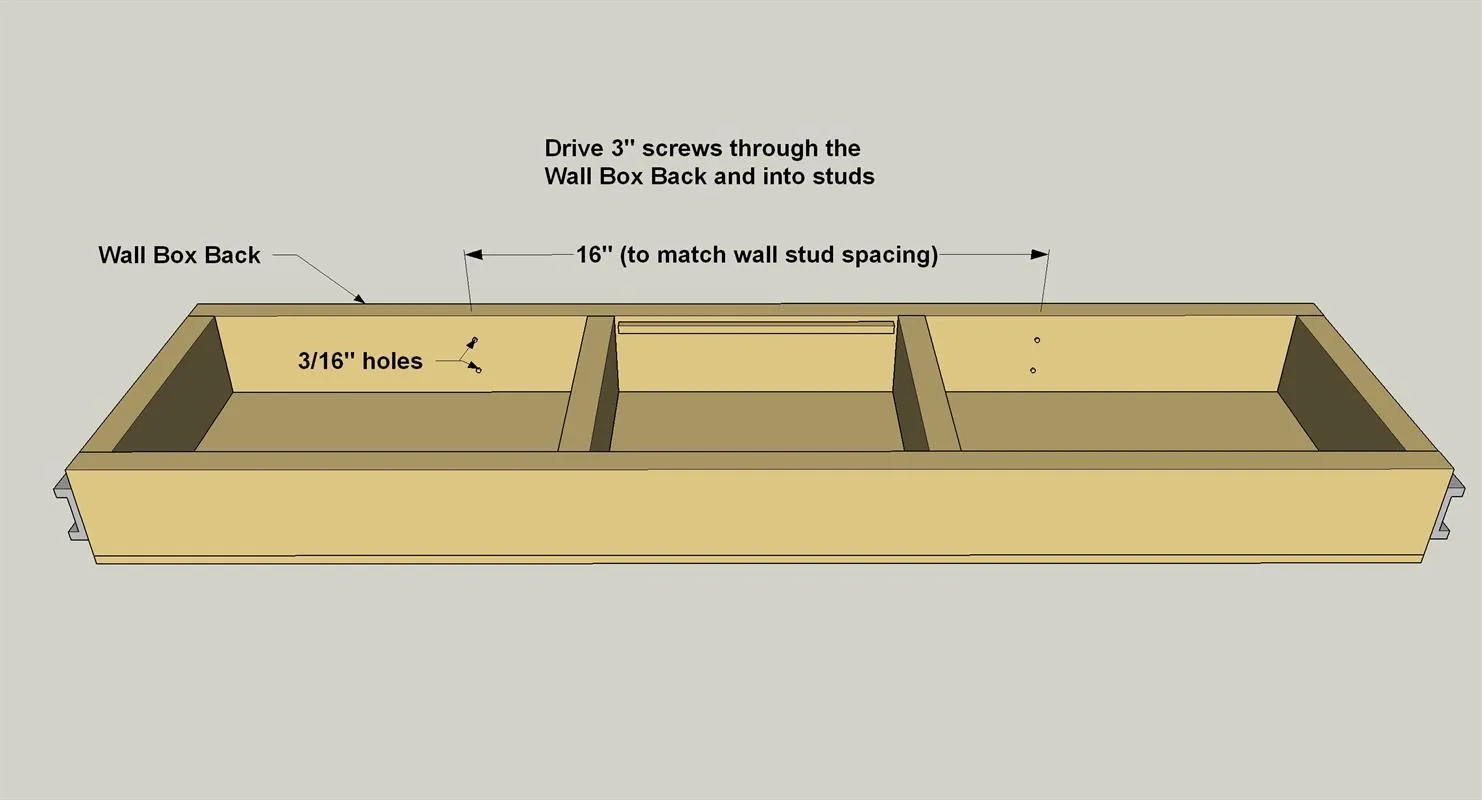
- Once you’ve done that, lay out where you need to drill holes in the Wall Box Back, as show.
- Then position the wall box on the wall aligned with the studs. Make sure it sits level, and drive two 3" wood screws into each stud. You may need a right angle attachment for your drill, or need to use a stubby screwdriver.
- Once the wall box is secure, you can slide the shelf assembly back in place, and you’re all set to use and enjoy your new shelf. Whether you choose to show off the shelf’s “secrets” is up to you!