 Notch
Notch- Difficulty
- Intermediate
- Time
- 4.3–8.3 hours
- Cost
- $$$
About this build
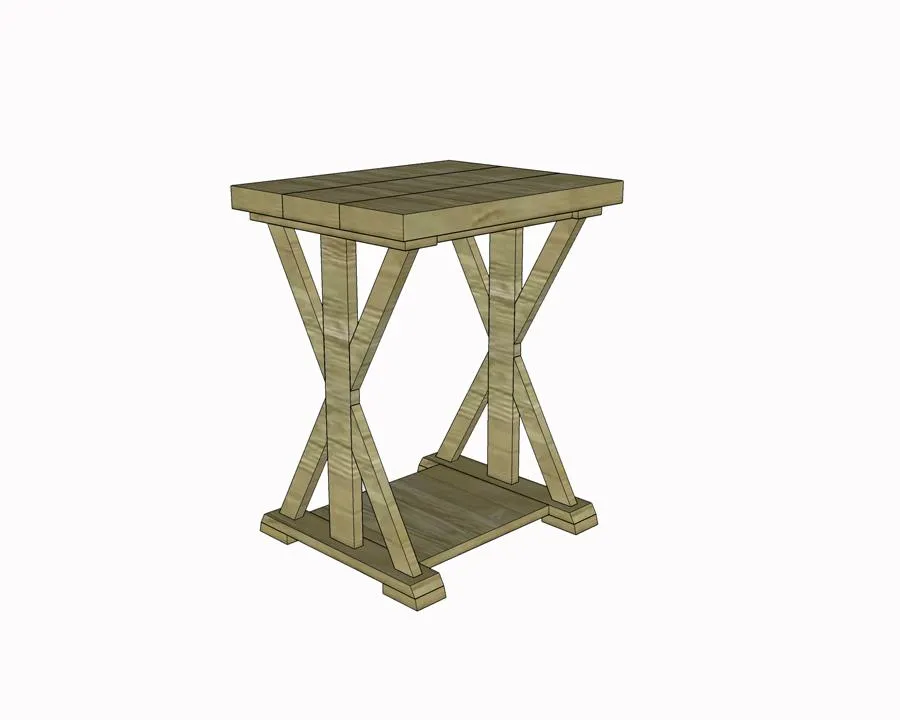
A simple farmhouse end table with sturdy X supports on both sides plus a lower shelf will add style and function alongside a sofa for $30 in materials. Dimensions 24 3/4″ tall x 20″ deep x 16″ wide.
Tools
Essential
- Brad Nailer
- Drill / Driver
- Miter Saw
- Pocket Hole Jig
- Random Orbit Sander
Optional / nice to have
- Bar / Pipe Clamps
- Tape Measure
Materials
| Item | Qty |
|---|---|
| Board, 1x2 96" | 1 board |
| Board, 1x3 96" | 2 board |
| Board, 1x12 24" | 1 board |
| Board, 2x6 72" | 1 board |
| 1 1/2" pocket hole screws | 14 each |
| 2 1/2" pocket hole screws | 10 each |
| 2" wood screws | 4 each |
| 220 grit sandpaper | 1 each |
| Wood filler | 1 each |
| Minwax Oil Based Stain - Special Walnut | 1 each |
| Valspar Oil Based Stain - Sunbleached | 1 each |
| Minwax Wipe-On Poly | 1 each |
| Wood glue | 1 each |
| 1 1/4" nails, 18 gauge | 32 each |
Overall cost: $$$. Lumber prices vary by region, species, and season, so we give a band rather than a figure we would only be pretending to know.
Cut list
| Part | Qty | T × W × L |
|---|---|---|
| Angle Supports | 8 | 3/4" × 1 1/2" × 12" |
| Base leg support | 2 | 3/4" × 2 1/2" × 16" |
| Legs | 2 | 3/4" × 2 1/2" × 21" |
| Top leg support | 2 | 3/4" × 2 1/2" × 15" |
| Feet | 4 | 3/4" × 2 1/2" × 3" |
| Table top support | 2 | 3/4" × 2 1/2" × 13" |
| Plank table top | 3 | 3/4" × 5 1/2" × 20" |
| Bottom shelf | 1 | 3/4" × 11 1/4" × 13" |
What to buy
Buy 6 boards at 8 ft.
3/4" × 11 1/4"
1 board
3/4" × 5 1/2"
1 board
3/4" × 2 1/2"
2 boards
3/4" × 1 1/2"
2 boards
Assumes 8 ft stock, a 1/8" saw kerf, and buying each part at its own width. Change the board size or kerf on the full board plan →
Instructions
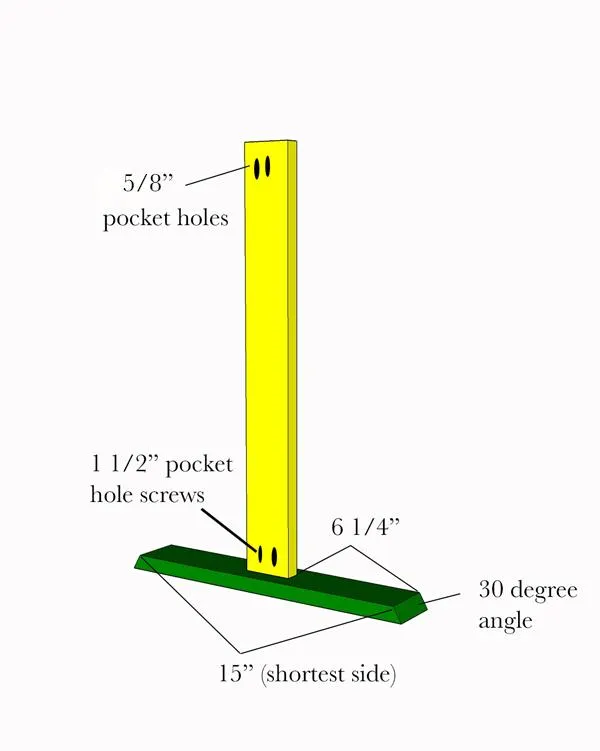
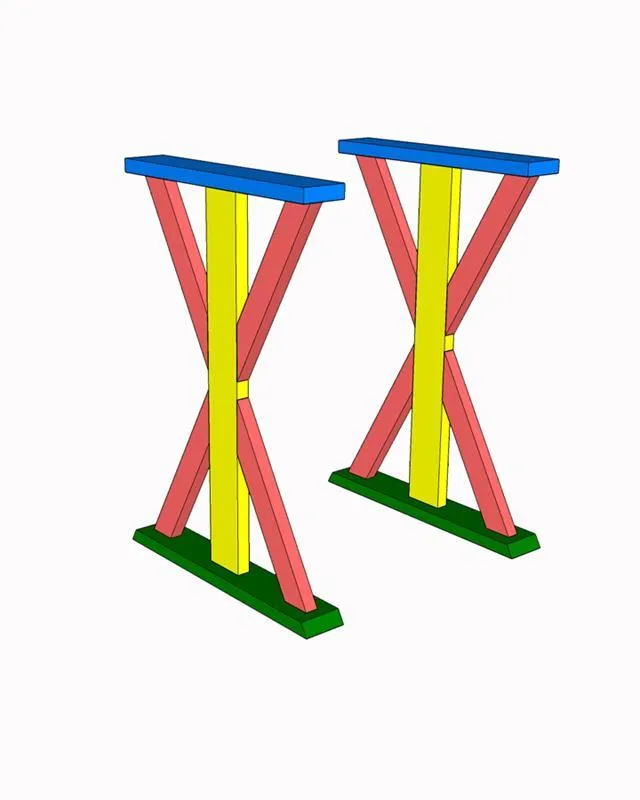
1Attach Leg to Base
Drill 2- 5/8" pocket holes on both ends of the 21" long 1x3. On one of the base leg supports, measure and mark 6 1/4" from both ends of the short side. Between those two marks, measure and mark and 7/8" from each side of the width. This will indicate where the leg will need to be attached, completely centered in both directions. Use 1 1/2" pocket hole screws and wood glue to attach the leg to the base leg support with the longest side of the leg support facing down.
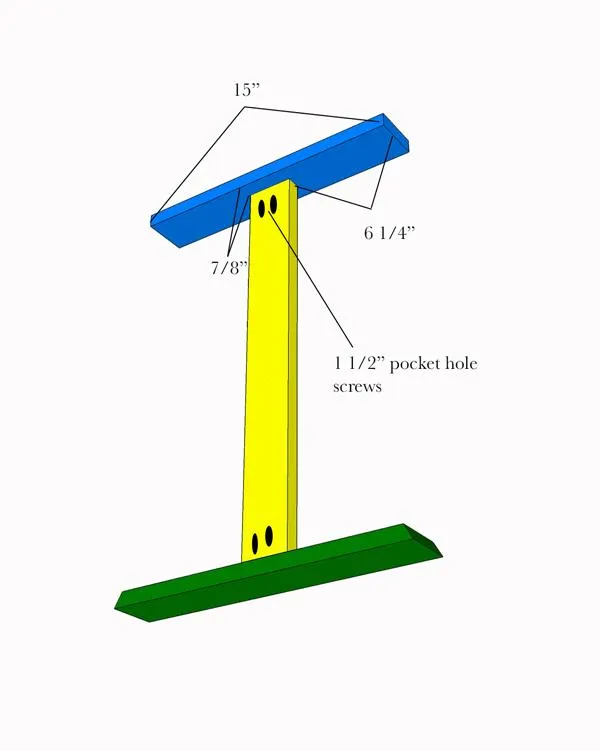
2Attach Leg to Top Support
Measure and mark the 15" 1x3 in the same way as was done with the base leg support in step 1. Attach the leg using 1 1/2" pocket hole screws and wood glue.
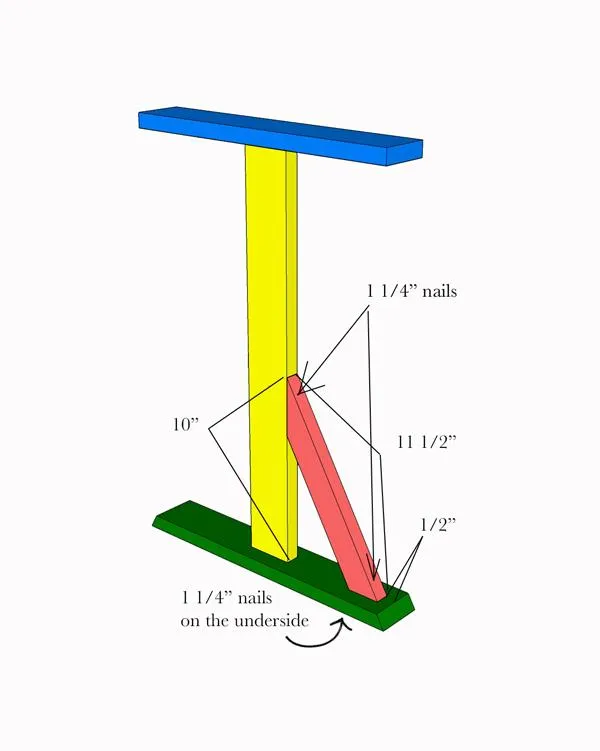
3Attach Angle Support
- Mark 10" up from the base on the leg.
- Mark 1/2" centered, from the top end of the base leg support going inward.
- Place one of the angle supports so that the 62 degree cut end hits at about the 10" height and the 28 degree cut end hits centered at 1/2" from the angled edge of the base leg support. Using wood glue and 1 1/4" nails, shoot 2 nails into each end of the angled support, so that it is driving in at an angle. Drive a couple nails on the underside of the base leg support going into the angled support on the other side.
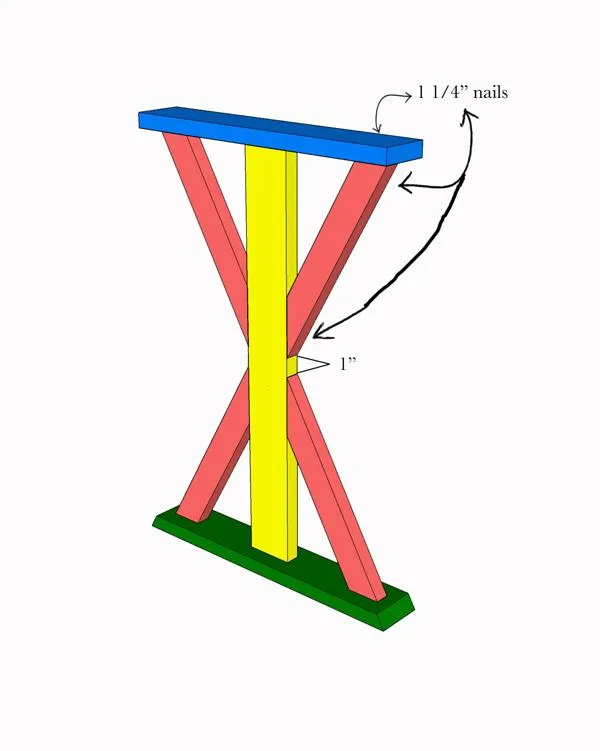
4Attach Remaining Angle Supports
Attach the rest of the angle supports, starting at the base, and then at the top, flipping it over as you attach the angle supports to the leg top support, so that you are always driving the nails at a downward angle.
5Make Other Leg + Supports
Repeat steps 1-4 for the other leg.
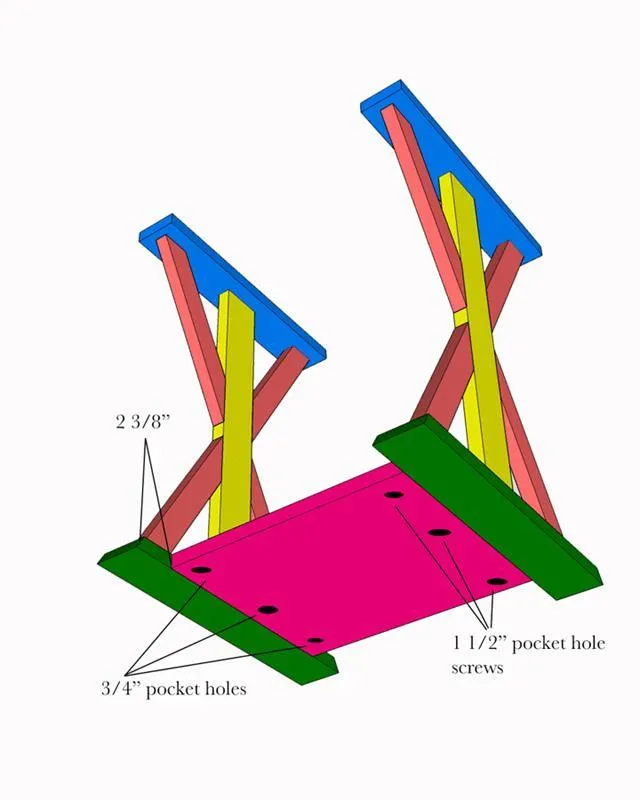
6Attach Bottom Shelf
- Drill 3- 3/4" pocket holes along the width (the 11 1/4" side) of the 1x12.
- Attach the 1x12 bottom shelf centered, to both leg base supports using 1 1/2" pocket hole screws and wood glue. Make sure there the shelf ends are attaching at 2 3/8" from either end of the long side of the leg base. *Tip: In order to get an exact fit, I placed each leg + supports over a sawhorse and used a right angle clamp in the center hole, to keep the shelf in place while I attached the adjacent sides.
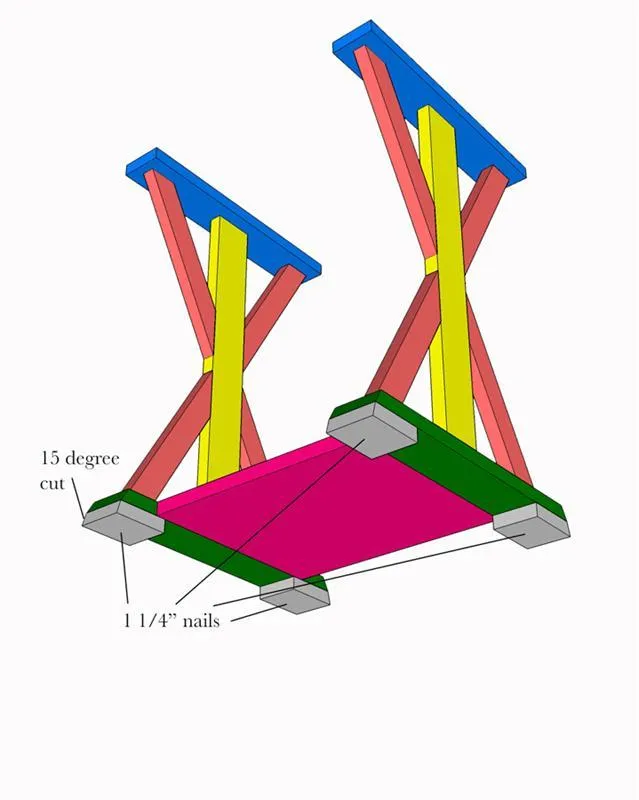
7Attach Feet
Attach all 4 feet to each end of the leg bases by using wood glue and 1 1/4" nails with the nail gun. Make sure the 15 degree cut side is facing out, just below the 30 degree cut side of the leg base.
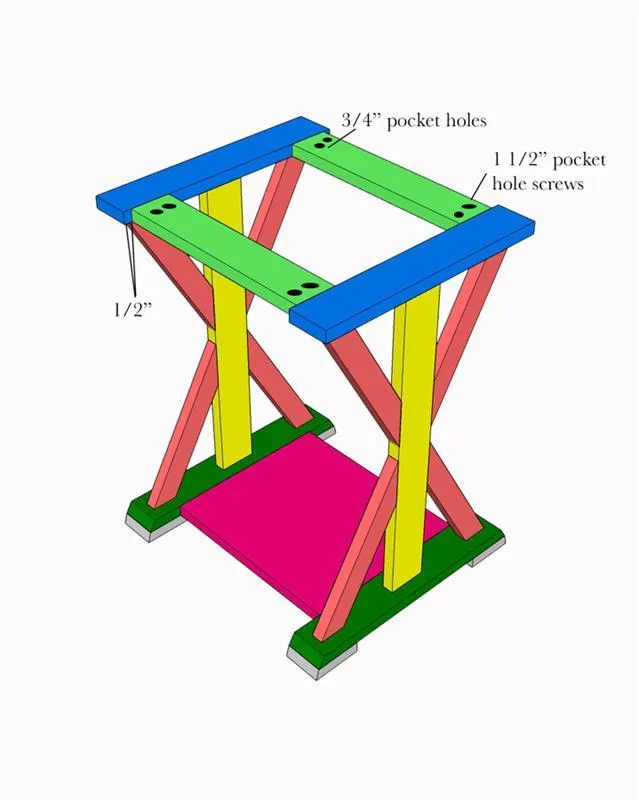
8Attach Table Top Supports
Drill 2- 3/4" pocket holes in both ends of the 13" 1x3s. Attach them between the top of the leg top supports, 1/2" from the ends, using wood glue and 1 1/2" pocket hole screws.
9Make Planked Table Top
Drill 5- 1 1/2" pocket holes on one side of 2 of the 1x6s. Using clamps and wood glue, drive 2 1/2" pocket hole screws from the outer two 1x6s into the center board, making sure the planks are flush and flat to the ground when attaching the screws.
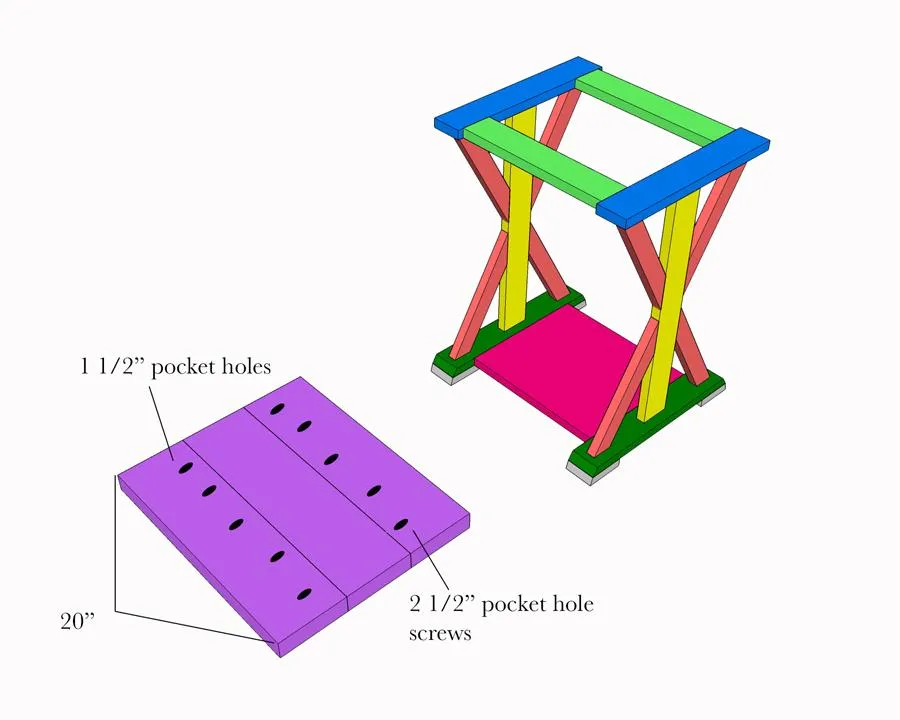
10Attach Planked Top to Supports
Place the legs and table top supports upside down on top of the planked table top (pocket hole screws facing up as you attach everything together). Drive 4- 2" wood screws from the the 13" long table top supports, down to the planked 2x6s, one screw for each corner. You might have to pre-drill your holes, depending on the type of wood screw you are using. If you have self-tapping screws, then you won't need to pre-drill holes.
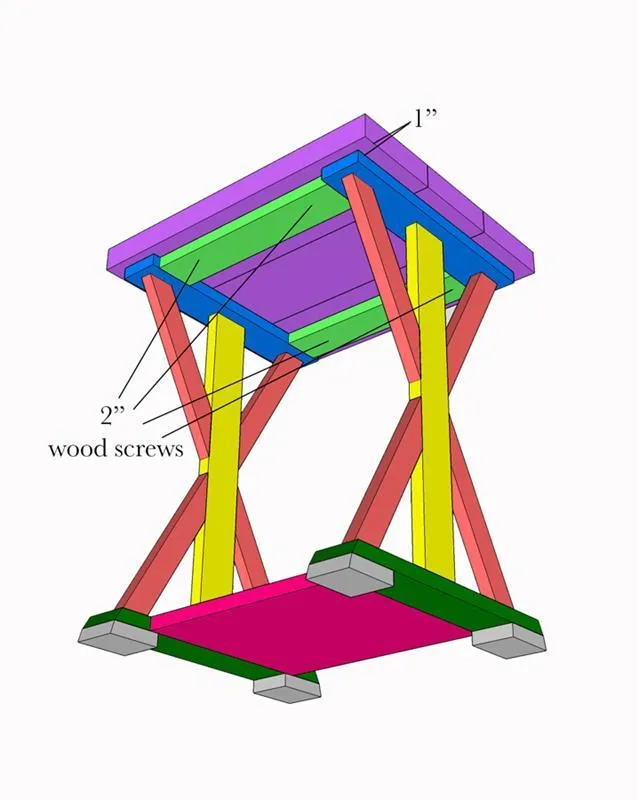
11Fill Holes, Sand, & Stain
- Fill all cracks, knots, and nail holes with wood filler. Let dry completely, and sand the entire surface of the table with 220 grit sandpaper using an orbital sander.
- Stain the wood to your choice or if you would like to achieve the same look as pictured in the final product, stain the wood first with Minwax Special Walnut. After about 10 minutes, wipe on Valspar Sunbleached stain, making sure to quickly remove excess. Let the stain dry completely before using a polyurethane top coat like Minwax Wipe-On Poly in Satin.
Tags
- End Tables
- Intermediate
Reviews & builds
No reviews yet
Sign in to review this plan or share your build.
No reviews yet. Be the first to build this.