 Notch
Notch- Difficulty
- Easy
- Time
- 5.3–10.3 hours
- Cost
- $$$
About this build
This handsome bench is ready to take on multiple duties. It’s rugged enough to serve as a great potting bench. It’s also handsome enough to be a great serving bench on your deck or patio. However you use it, you’ll get great looks, a big benchtop surface, and lots of storage space on shelves—all in a super-strong design that will last for years and look great, even in the elements outdoors.
Tools
Essential
- Drill / Driver
- Jigsaw
- Miter Saw
- Pocket Hole Jig
- Random Orbit Sander
Optional / nice to have
- Bar / Pipe Clamps
- Tape Measure
Materials
| Item | Qty |
|---|---|
| Cedar Board, 4x4 x 96" | 3 board |
| Cedar Board, 2x4 x 96" | 5 board |
| Cedar Decking, 5/4x6 x 96" | 7 board |
| 2 1/2" Kreg XL Pocket-Hole Screws | 84 each |
| 4" Kreg XL Pocket-Hole Screws | 16 each |
| 1 1/2" Kreg Blue-Kote™ Pocket-Hole Screws | 141 each |
| Exterior Wood Glue | 1 each |
| Gray Semi-Transparent Deck Stain | 1 each |
| Natural Cedar Transparent Deck Stain | 1 each |
Overall cost: $$$. Lumber prices vary by region, species, and season, so we give a band rather than a figure we would only be pretending to know.
Cut list
| Part | Qty | T × W × L |
|---|---|---|
| Front Leg | 2 | 3" × 3" × 34" |
| Rear Leg | 2 | 3" × 3" × 60" |
| Upper End Rail | 2 | 3" × 3" × 18" |
| Lower End Rail | 2 | 3" × 3" × 18" |
| Top Rail | 2 | 1" × 3" × 39" |
| Top Support | 1 | 1" × 3" × 22" |
| Lower Shelf Rail | 2 | 1" × 3" × 18" |
| Lower Upright | 4 | 1" × 3" × 11" |
| Shelf Board | 8 | 1" × 5" × 39" |
| Shelf Back | 4 | 1" × 3" × 39" |
| Top Board | 4 | 1" × 5" × 47" |
| Rear Top Board | 1 | 1" × 5" × 47" |
| Upper Upright | 2 | 1" × 3" × 22" |
| Upper Shelf Rail | 4 | 1" × 3" × 8" |
What to buy
Buy 15 boards at 8 ft.
3" × 3"
3 boards
1" × 5"
7 boards
1" × 3"
5 boards
Assumes 8 ft stock, a 1/8" saw kerf, and buying each part at its own width. Change the board size or kerf on the full board plan →
Instructions
1Make the Legs
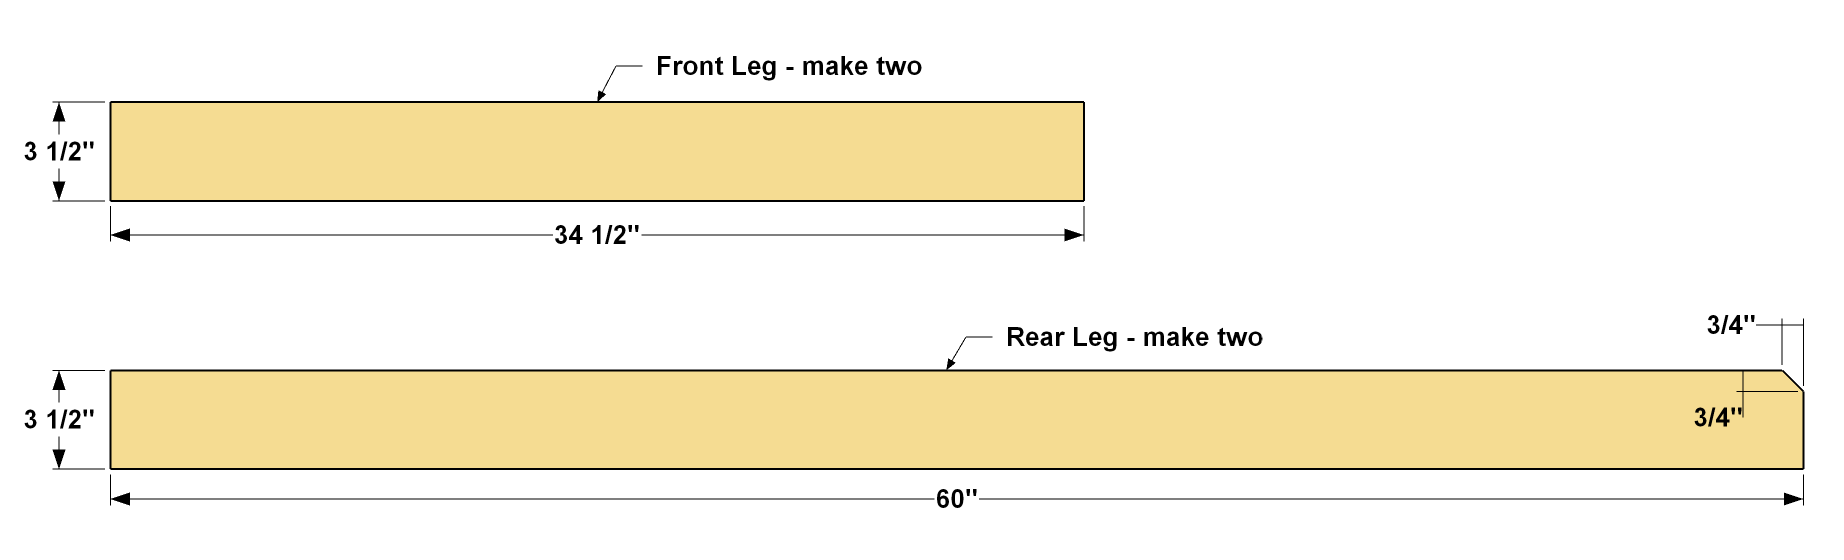
Start by cutting two Front Legs and two Rear Legs to length from 4x4 cedar boards, as shown in the cutting diagram. For a decorative touch, you can add the small chamfer detail to the upper end or the rear legs, lie we did. Just mark the cut, set your miter saw to 45°, and then trim off that one corner. When done, sand these Legs smooth.
2Make the End Rails
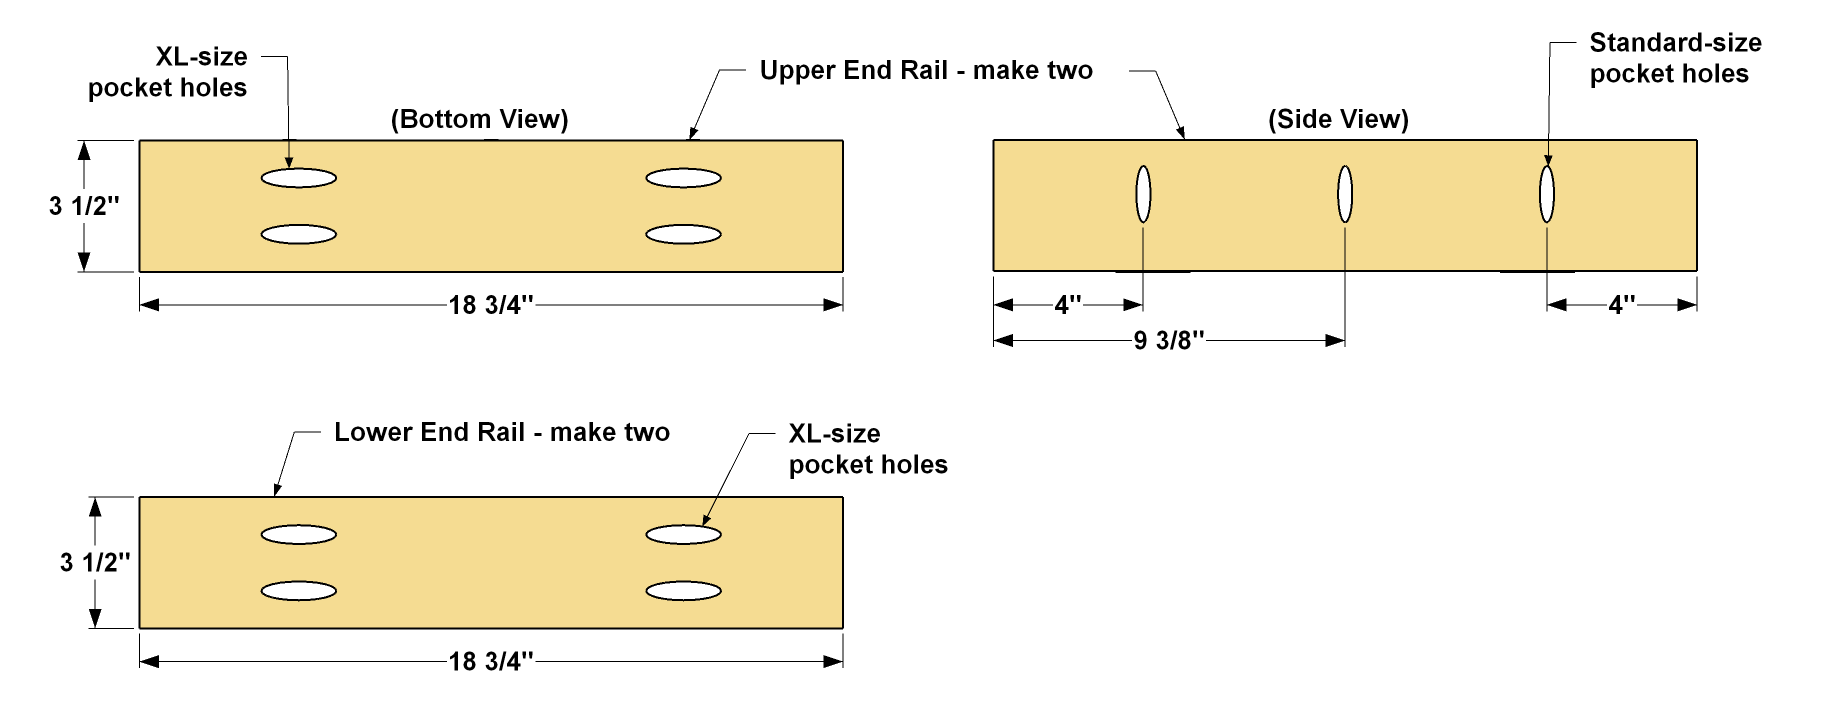
- Cut four End Rails to length from a cedar 4x4, as shown in the cutting diagram.
- Now you can set up your Pocket-Hole Jig XL to drill pocket holes at the ends.
- Set the jig sliders and the stop collar on the bit to the 3 1/2" setting.
- Clamp the jig to an end so it’s roughly centered, and then drill the two holes.
- Then repeat this process at each end of all four parts.
- Now you can set two of the rails aside. They’ll be the Lower End Rails. In the other two, which will be the Upper End Rails, you need to drill standard-size pocket holes along one edge that will be used to hold the bench top in place later.
- Set your standard Kreg Pocket-Hole Jig and drill bit for 3/4"-thick material, and then drill pocket holes, where shown, along one edge of each Upper End Rail.
- Then you can sand the Upper and Lower End Rails smooth.
3Assemble the bench ends
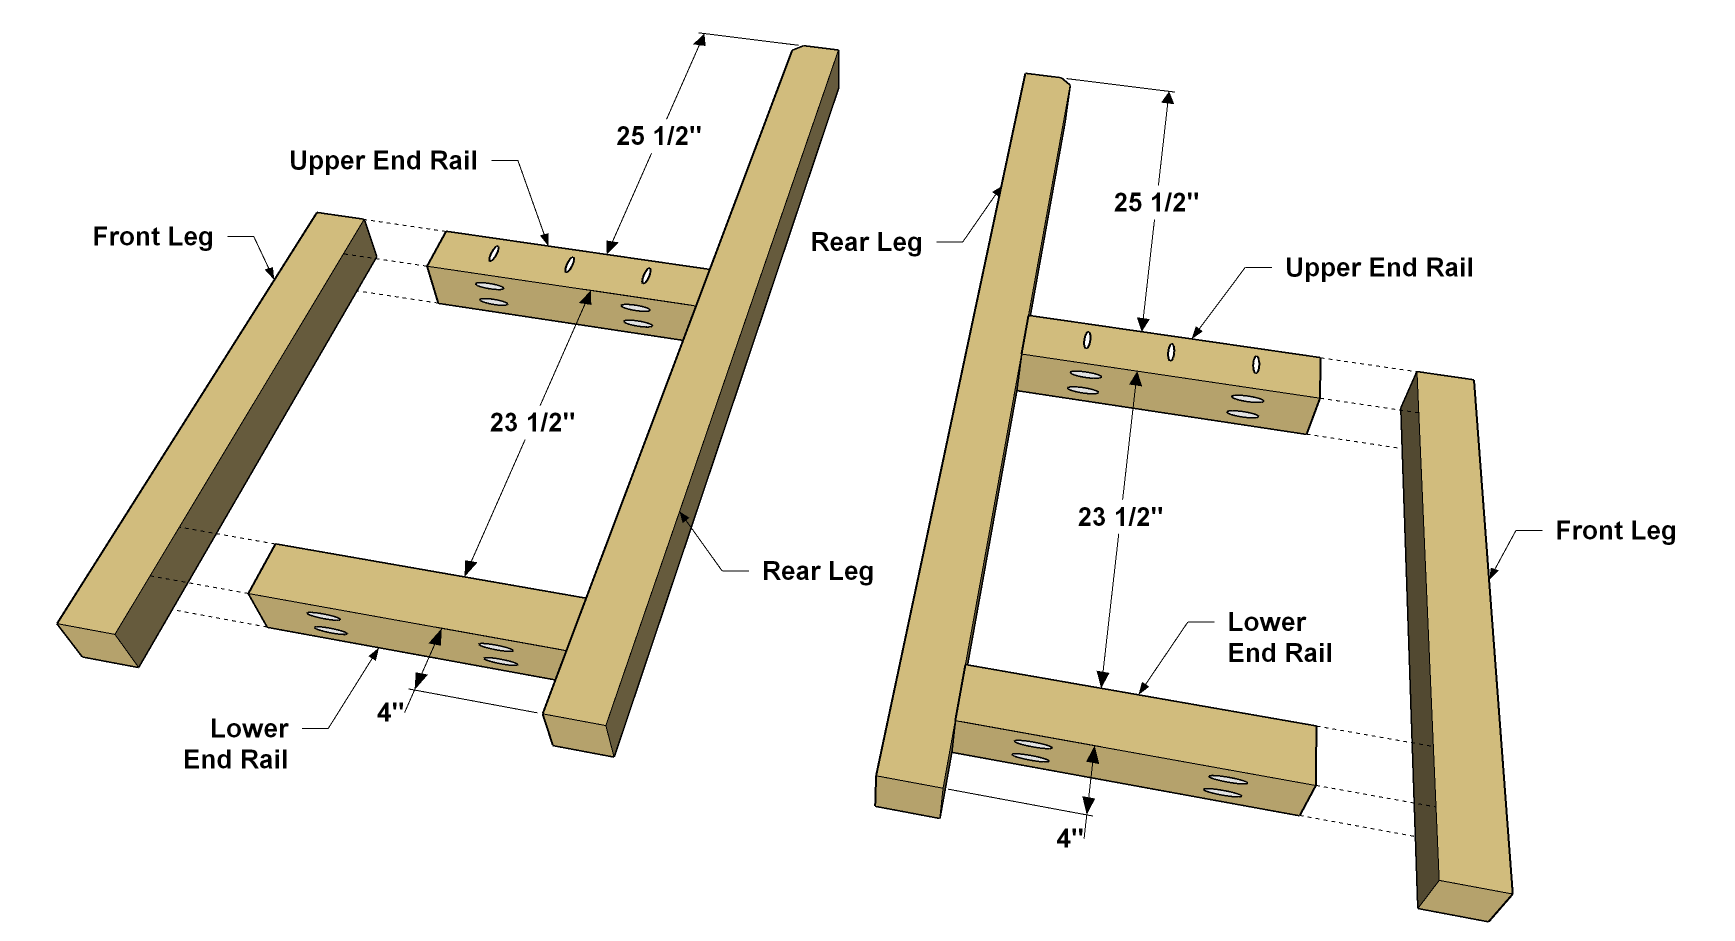
- Next, create a pair of end assemblies by joining the End Rails to the Legs, as shown. Make sure that you have the Upper End rails at the top, and that they are positioned correctly top create two mirror-image assemblies that have the pocket-holes along the edges of the Upper End Rails oriented toward the inside of the bench.
- Spread exterior glue on the ends of the Rails, clamp them in position between the Legs, and then attach the Rails to the Legs using 4"-long Kreg XL Pocket-Hole Screws.
4Make the Lower Shelf Rails and Uprights
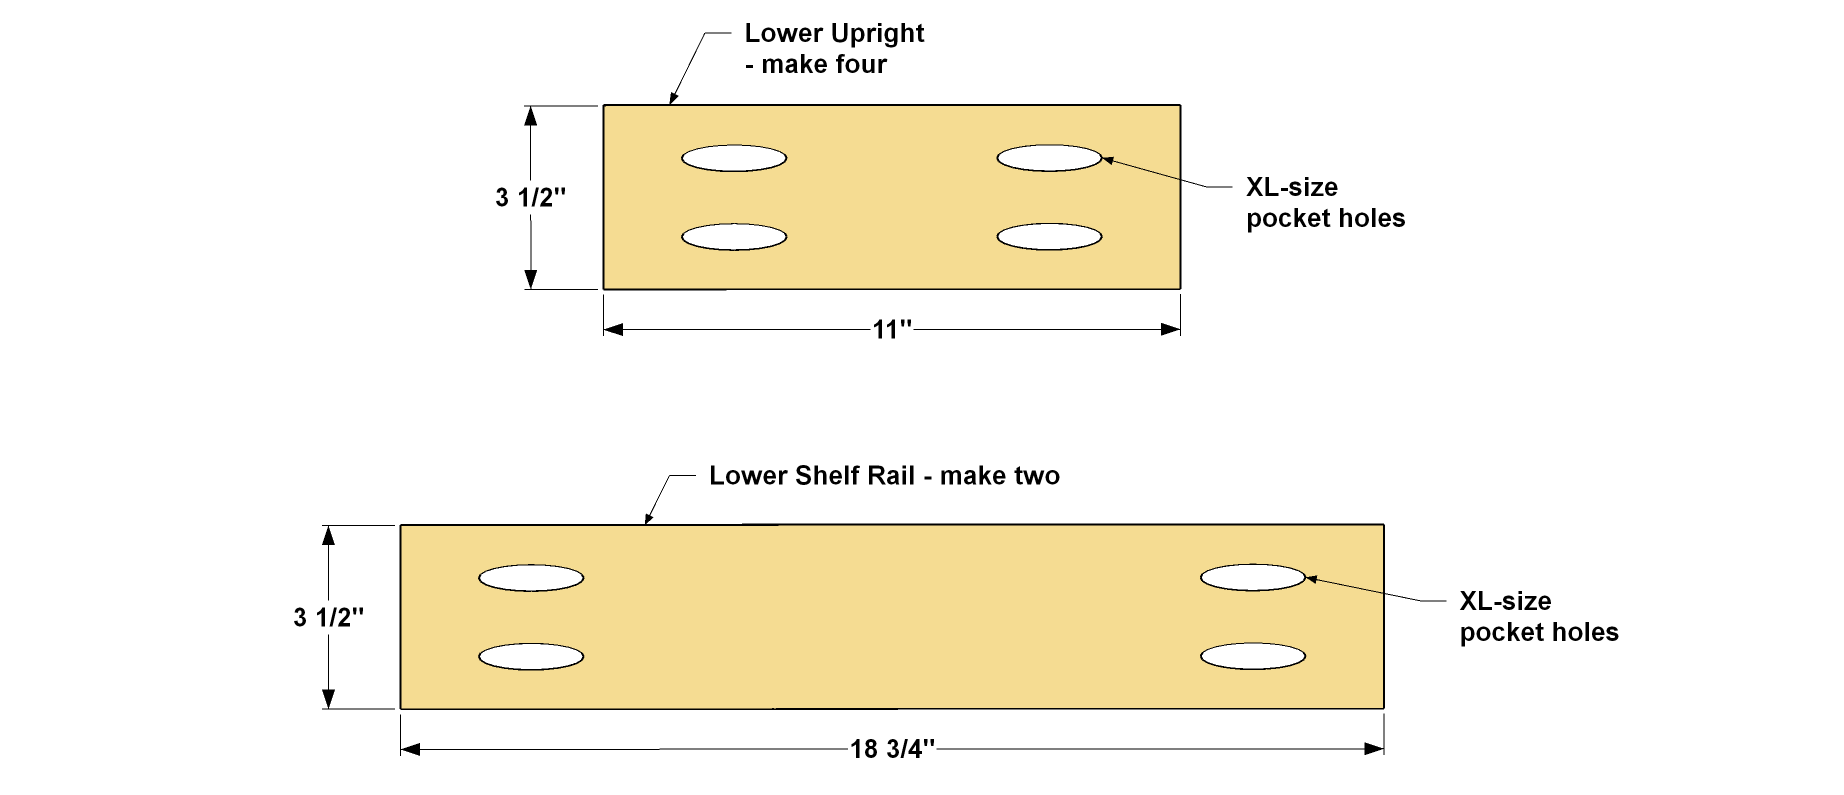
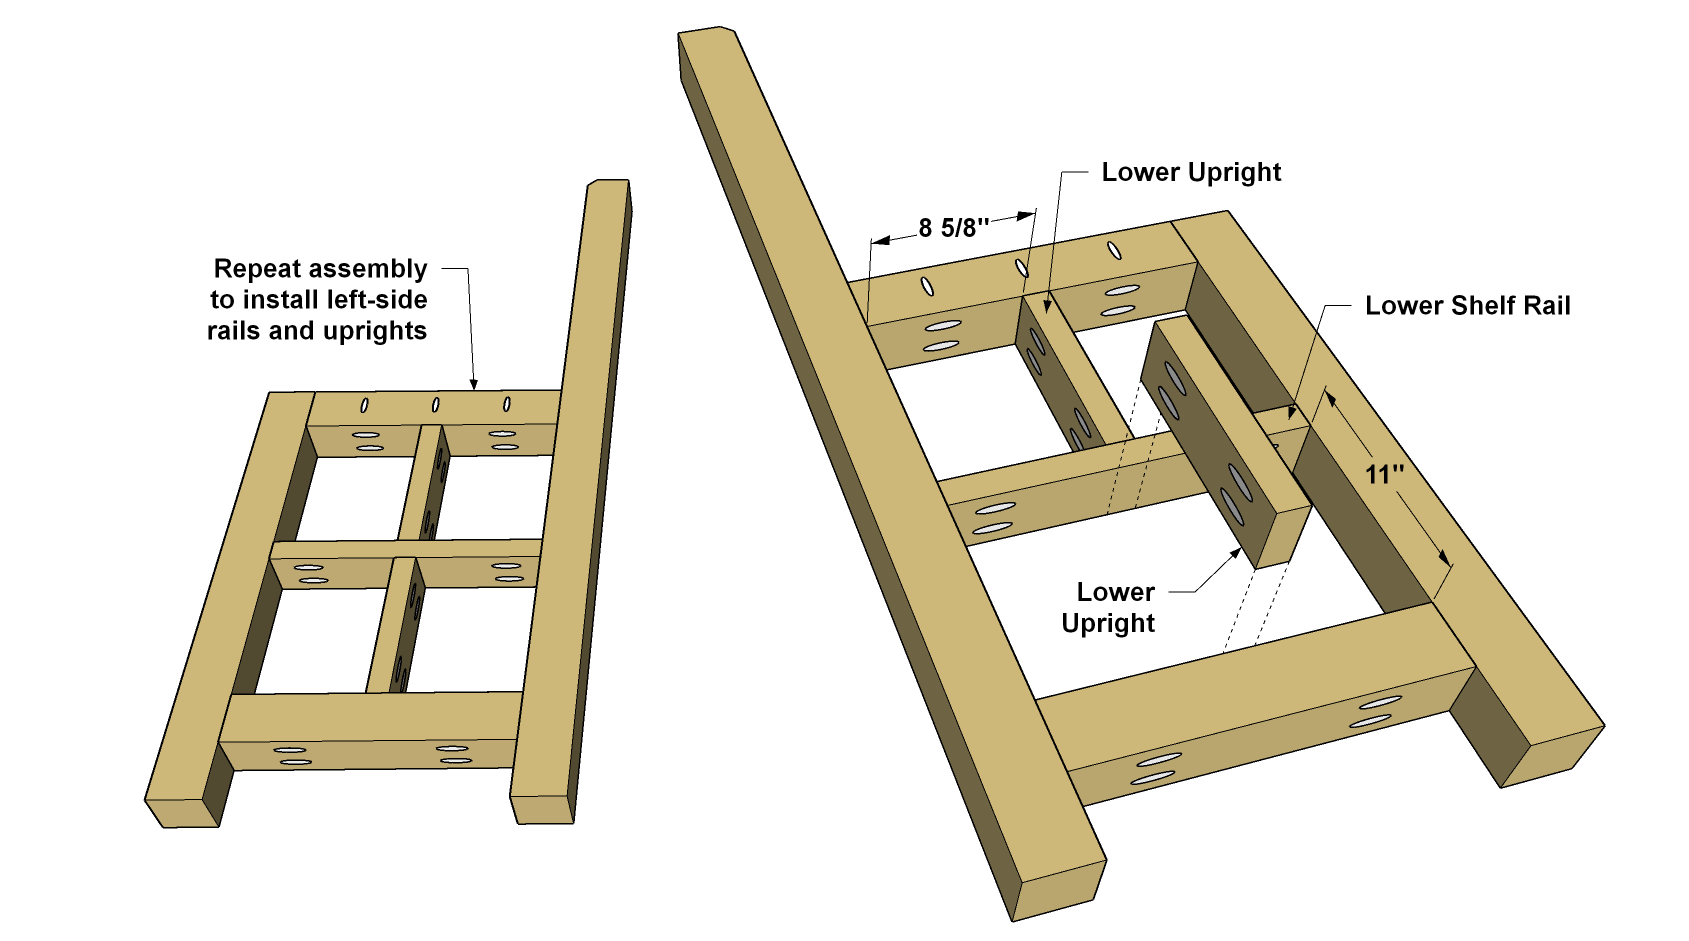
- Cut two Lower Shelf Rails and four Lower Uprights to length from 2x4 boards, as shown in the cutting diagram.
- Then you can drill pocket holes in the ends of all of these parts. Use the XL Pocket-Hole Jig, once again, but be sure to first set the jig sliders and the drill bit to the 1 1/2" settings to match the 2x4 thickness. After drilling the holes, sand these parts smooth.
5Attach the Lower Shelf Rails and Uprights
- Attach the Lower Shelf Rails between the Legs, as shown. An easy way to ensure they are centered is to use the Uprights as spacers.
- Spread glue on the ends of the Each Lower Shelf Rail, and then attach it to the legs using 2 1/2"-long XL Pocket-Hole Screws.
- Then you glue and screw the Lower Uprights in place using 2 1/2"-long XL Pocket-Hole Screws, as well. Because these pieces are short, you won’t be able to get the standard XL Driver Bit and a drill in place. You’ll need a right-angle attachment, like the Kreg 90° Pocket-Hole Driver, for your drill as well as a short 3"-long #3 square-drive bit, which you can pick up in any hardware store.
6Make the Top Rails and Top Support
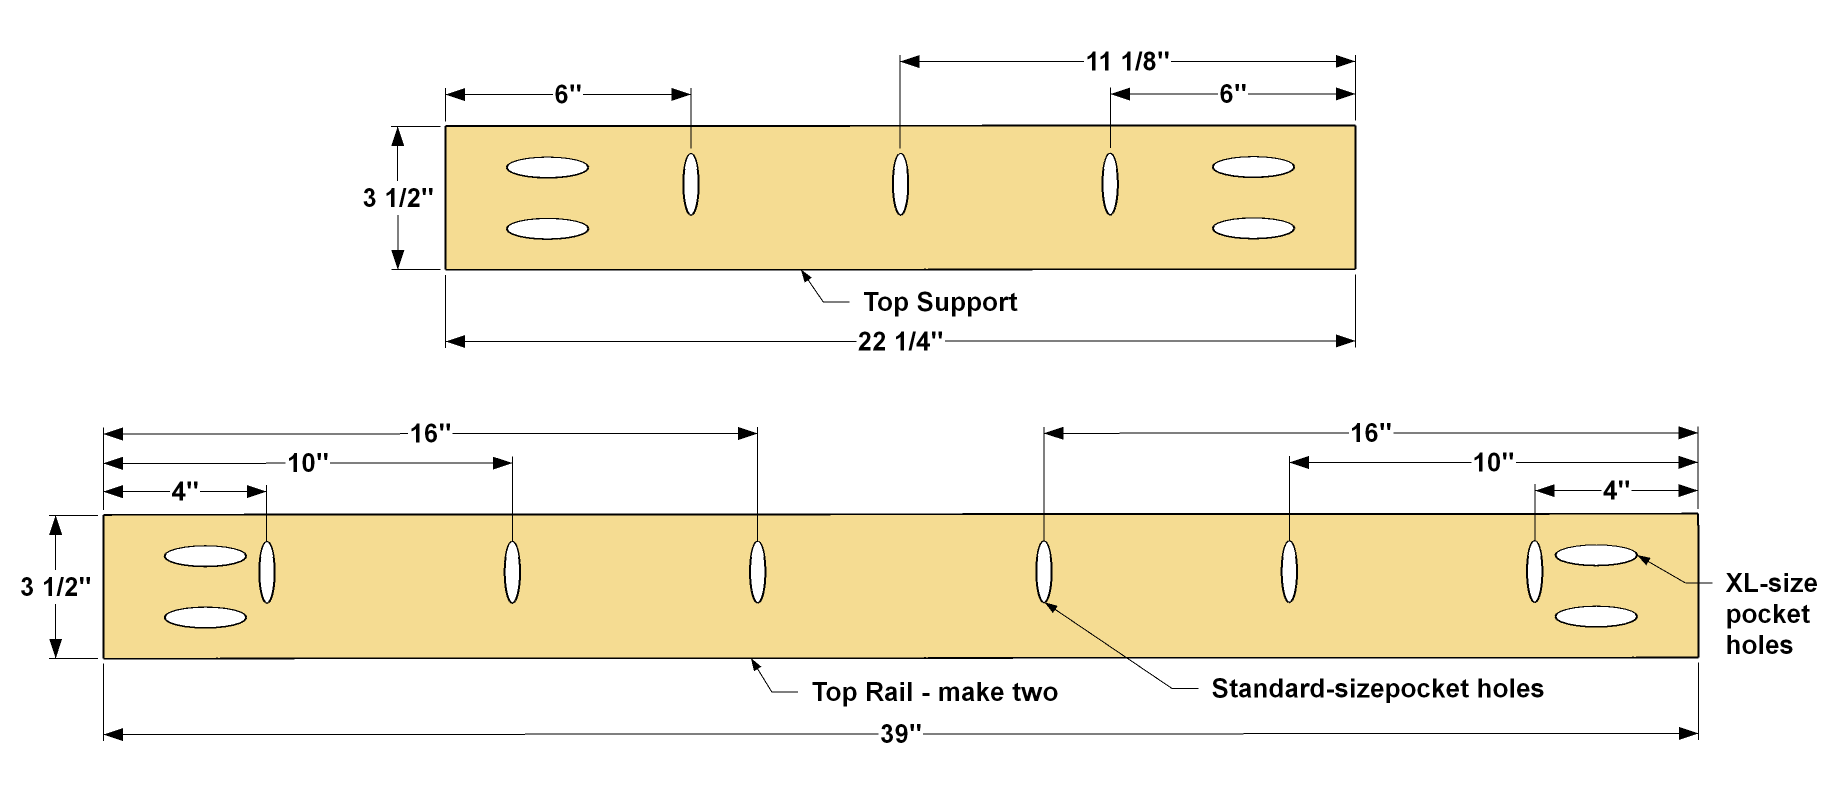
- Cut two Top Rails and a Top Support to length from 2x4 boards, as shown in the cutting diagram.
- Then you can drill pocket holes in the ends of all three. Use the XL Pocket-Hole Jig, once again, but be sure to first set the jig sliders and the drill bit to the 1 1/2" settings to match the 2x4 thickness. After you drill those holes, you’ll want to drill standard pocket holes along one edge of each piece, as shown.
- Once again, these pocket holes will allow you to secure the bench top later. You won’t need to change the setup on your standard pocket-hole jig. It should still be set for 3/4" thickness from Step 2.
- Drill these pocket holes where shown, and then sand the Top Rails and Top Support smooth.
7Attach the Top Rails and Top Support
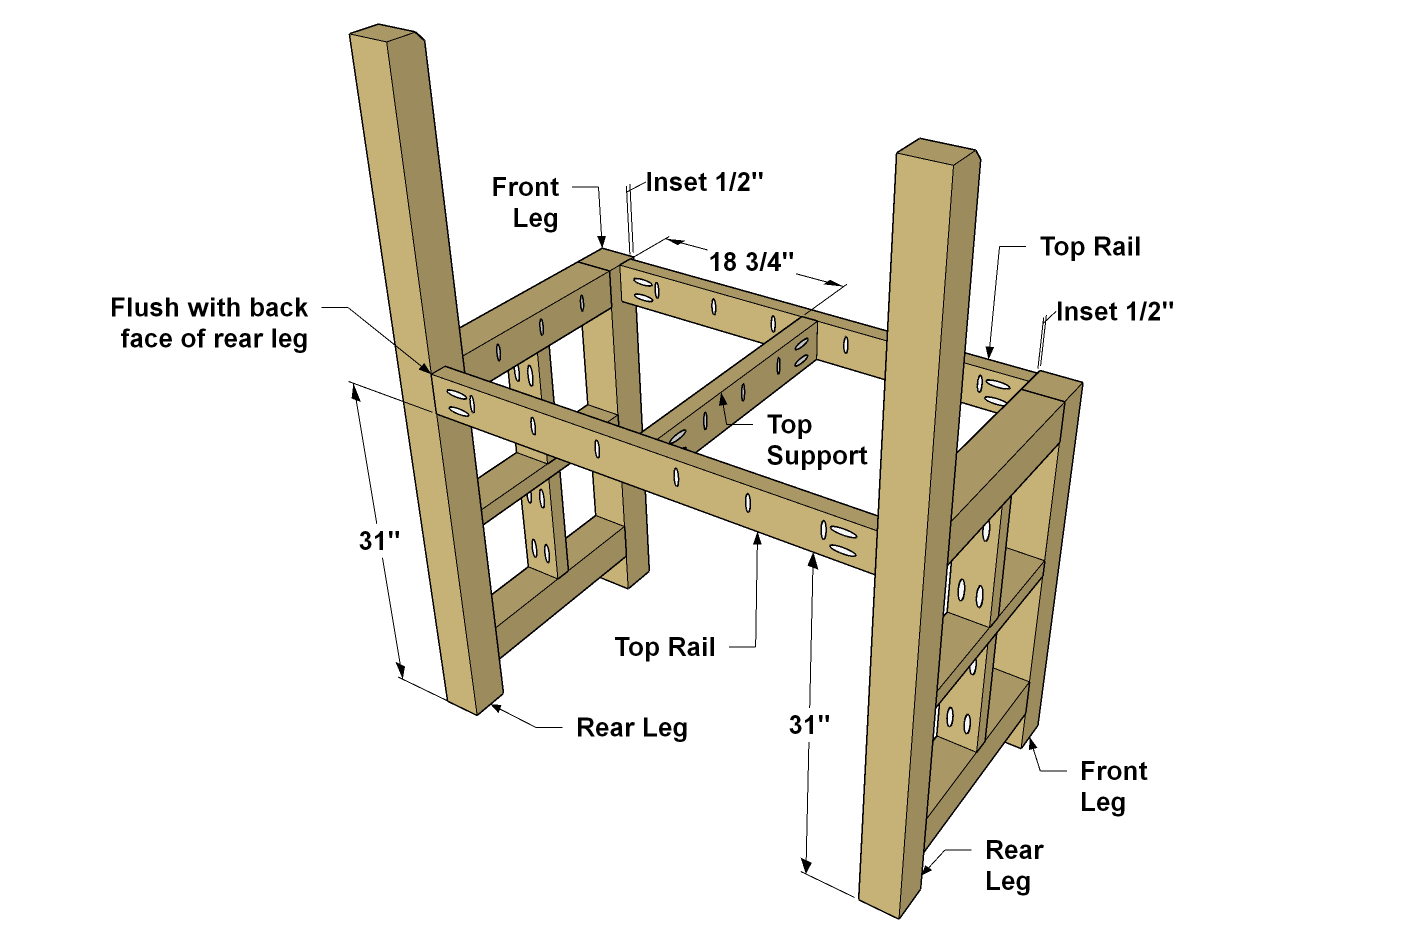
- Now you can attach the Top Rails and Top supports to the end assemblies.
- Start with the Top Support that goes between the Rear Legs. It should align with the Upper End Rails and be flush with the rear face of the Legs, as shown. Make sure the pocket holes along the edge are pointing upward, and then use glue and 2 1/2"-long XL Pocket-Hole Screws to hold attach this Top Rail. You can use the Top Support to help position the Top Rail between the Front Legs. Again, double check its orientation before you glue and screw it in place.
- Finally, attach the Top Support. If you want to give your bench the two-tone look like we did. This is a good time to stain the bench base. We used a semi-transparent gray deck stain. If you plan to have your bench all one color, you can wait until it’s completely assembled.
8Make the Shelves
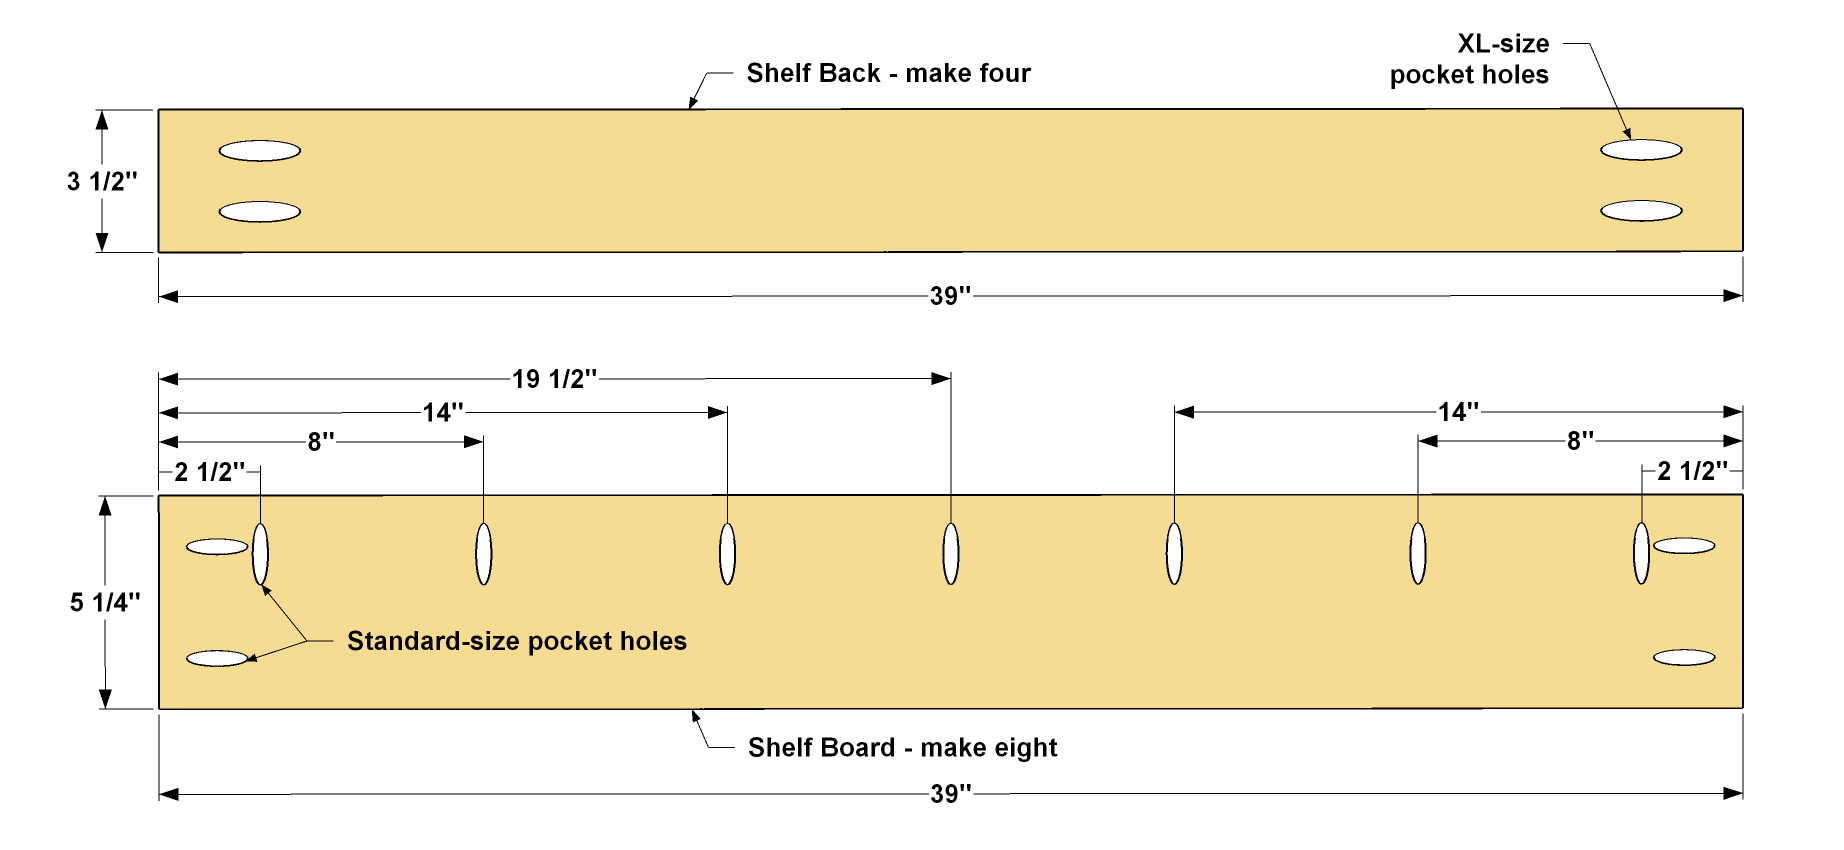
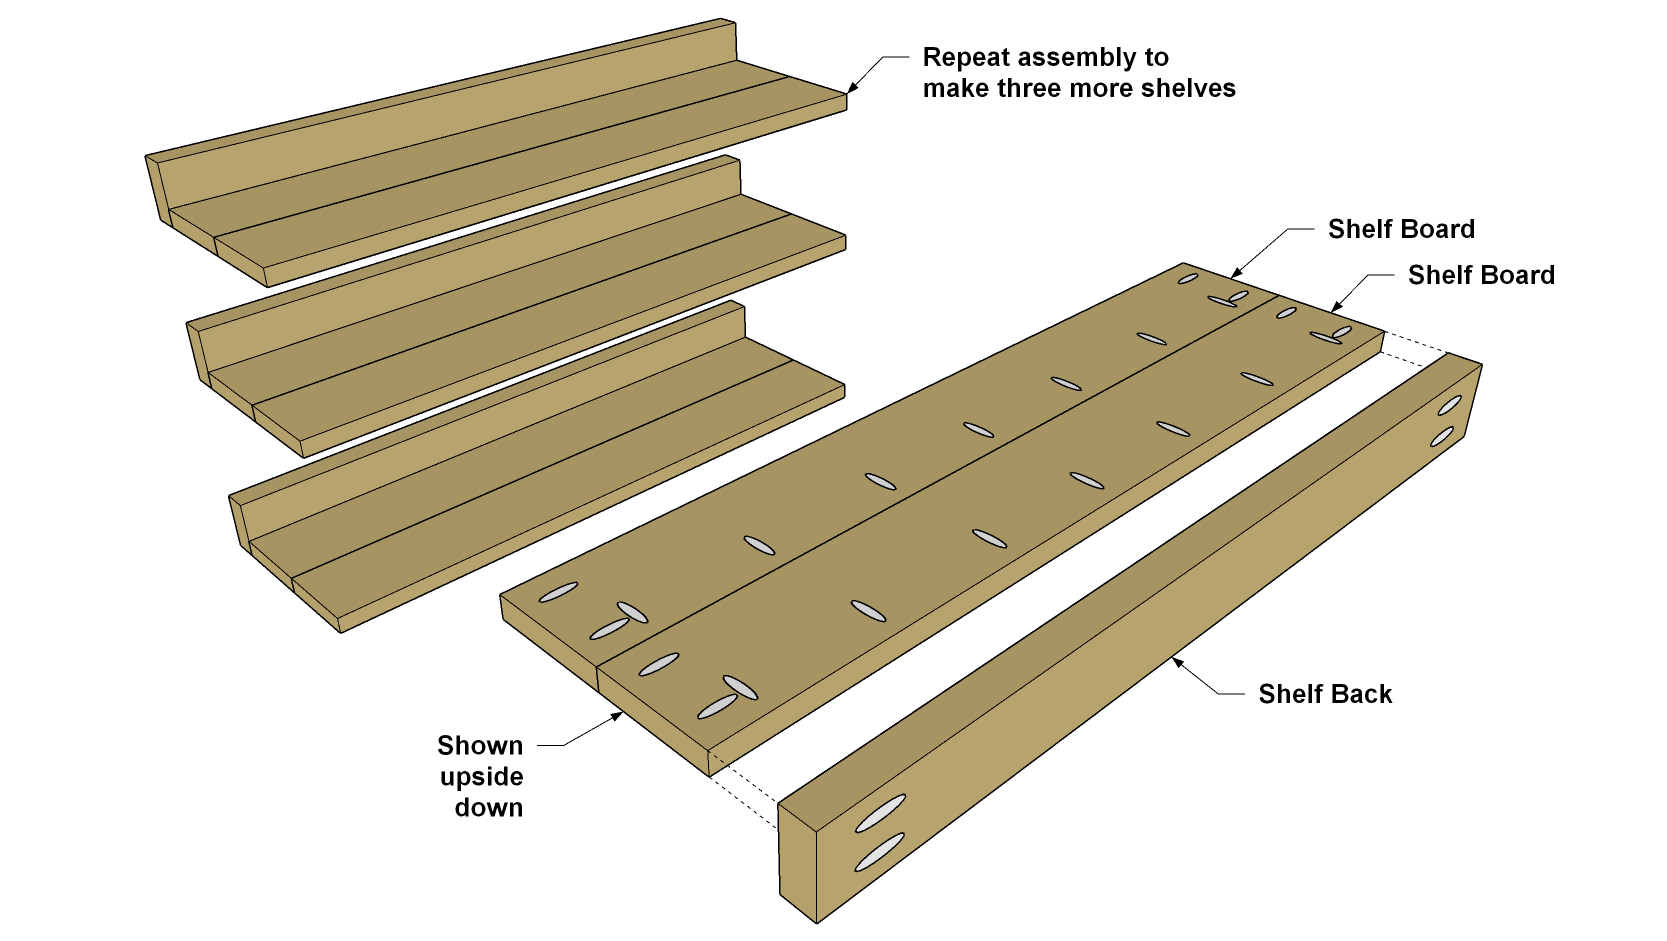
- Next, make the Shelves. There are four total, and they’re all identical. So, cut eight Shelf Boards to length from 5/4x6 cedar boards, as shown in the cutting diagram.
- Now you can drill pocket holes, as shown, using your standard Kreg Pocket-Hole Jig. Make sure the jig and drill bit are still set for 3/4" material.
- Now cut four Shelf Backs to length from 2x4 boards.
- Then drill XL pocket holes in the ends using the XL Pocket-Hole Jig.
- Sand these, as well.
9Assemble the Shelves
If you want to give your bench the two-tone look like we did, you’ll want to stain the shelf backs and apply clear finish to the Shelf Boards before assembly. For the shelf boards, we used a semitransparent deck stain in a “natural cedar” color. Then you can assemble the shelves, as shown, using glue and 1 1/2" Kreg Blue-Kote™ Pocket-Hole Screws.
10Attach the Lower Shelves
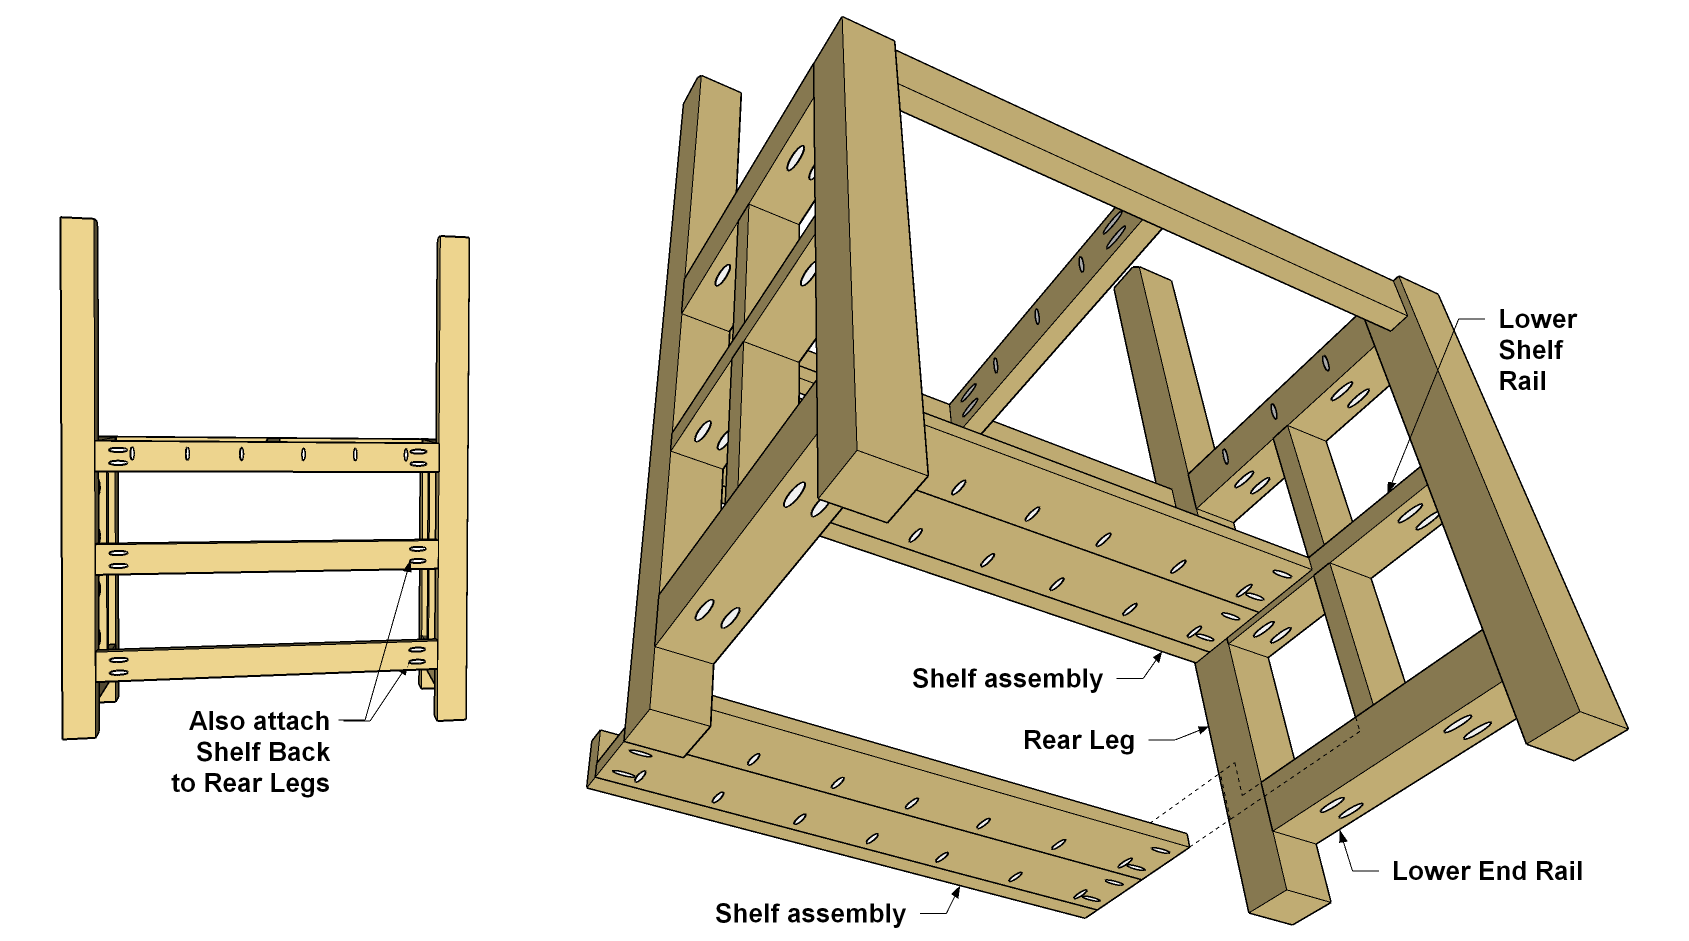
The lower shelves can go in next. They get mounted flush with the upper face of the Lower Shelf Rail and aligned with the back face of the Lower Uprights, as shown. Use glue and 1 1/2" Blue-Kote™ Pocket-Hole Screws to attach the shelves to the Lower Shelf Rails. Then attach the Shelf Backs to the Rear Legs using 2 1/2"-long XL Pocket-Hole Screws.
11Make the Top Boards
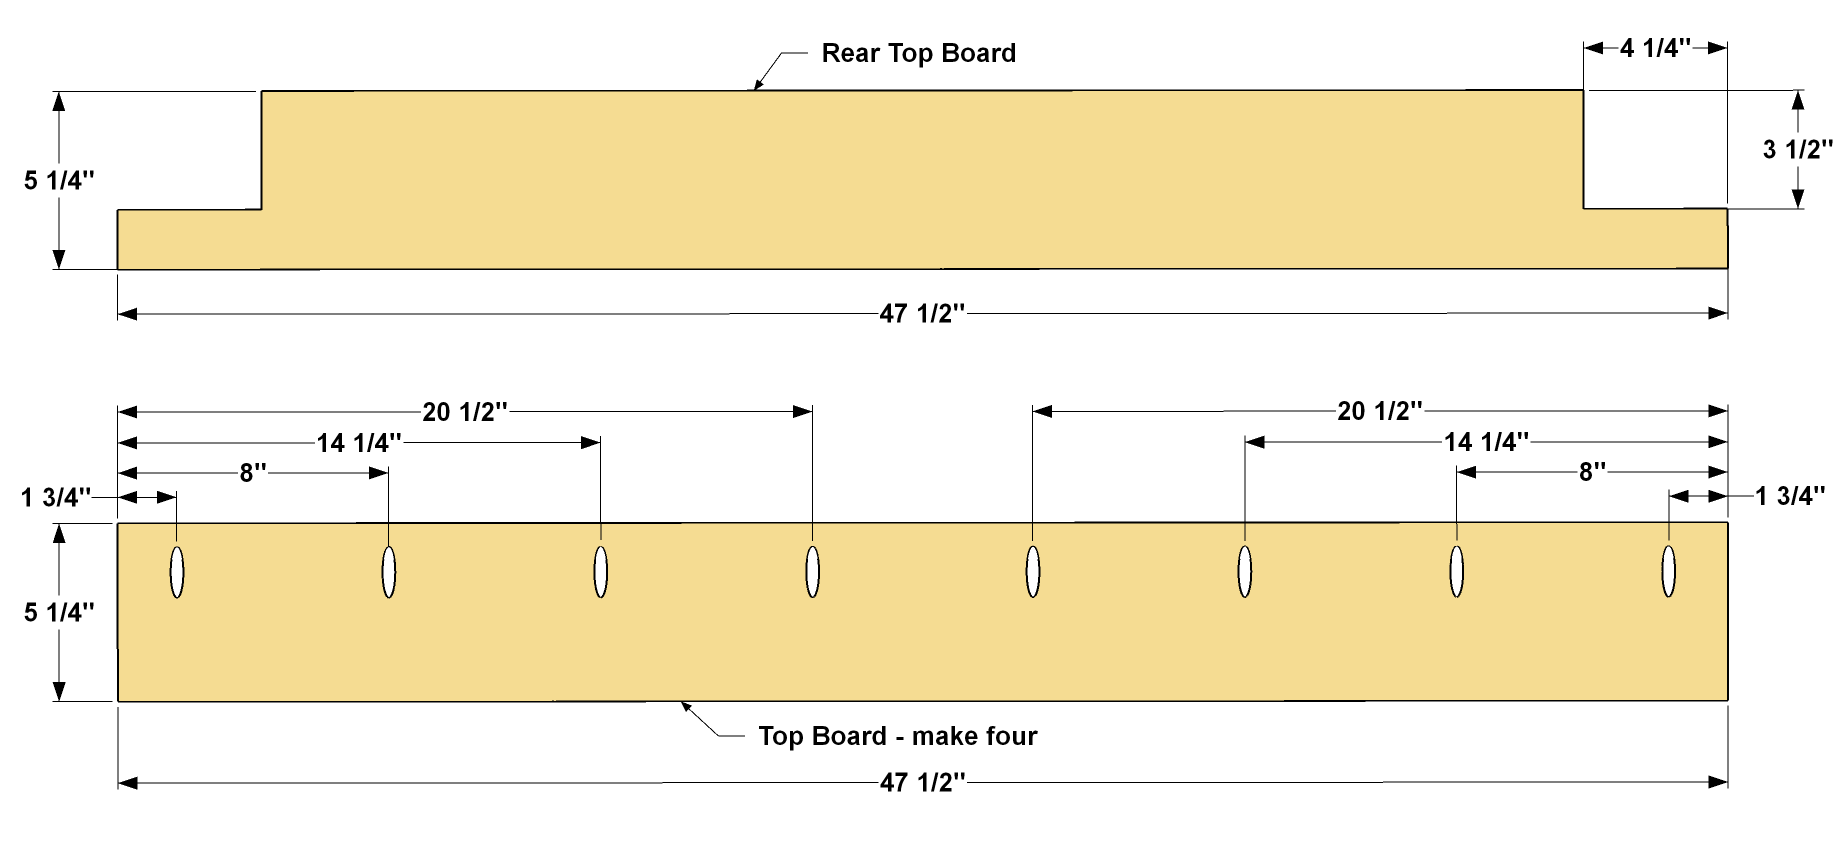
Cut five boards to length from 1x6 cedar to make the top. In one of the five, cut notches at the ends, as shown. Just mark each notch, and then cut them using a jig saw. In the other four boards, drill standard pocket-holes, as shown.
12Assemble the Top
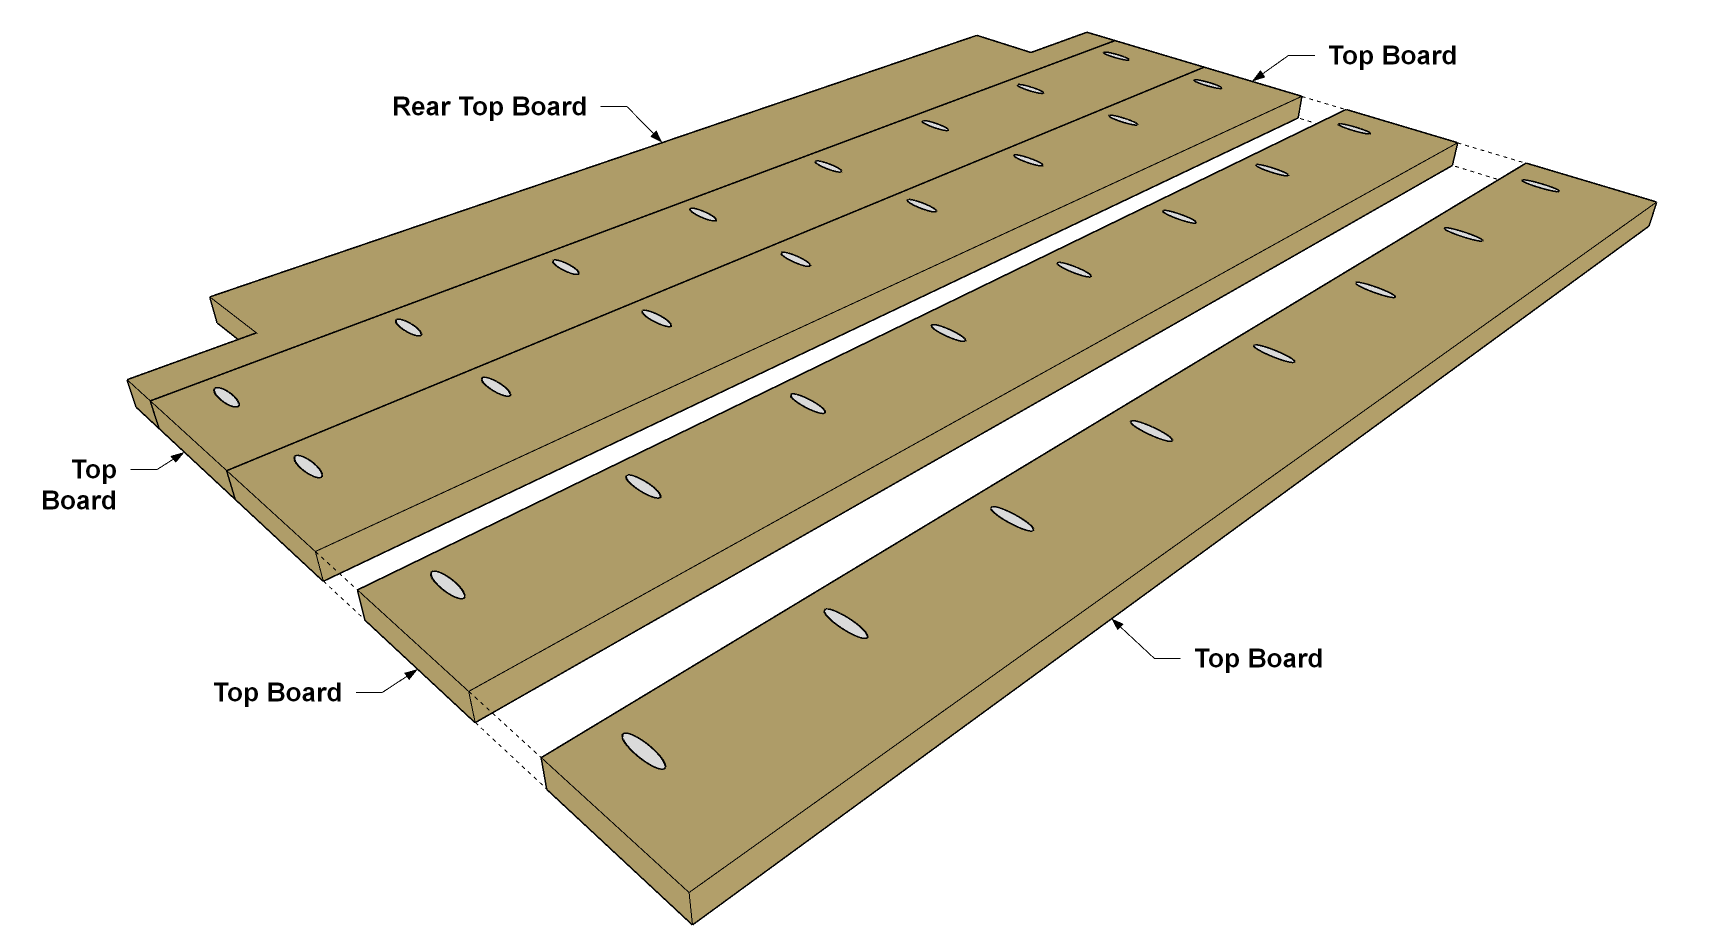
- Lay out the top boards, and then join them together using glue and 1 1/2" Blue-Kote™ Pocket-Hole Screws.
- Once the glue dries, sand the upper face of the bench top smooth.
- Then apply natural cedar deck stain to the top.
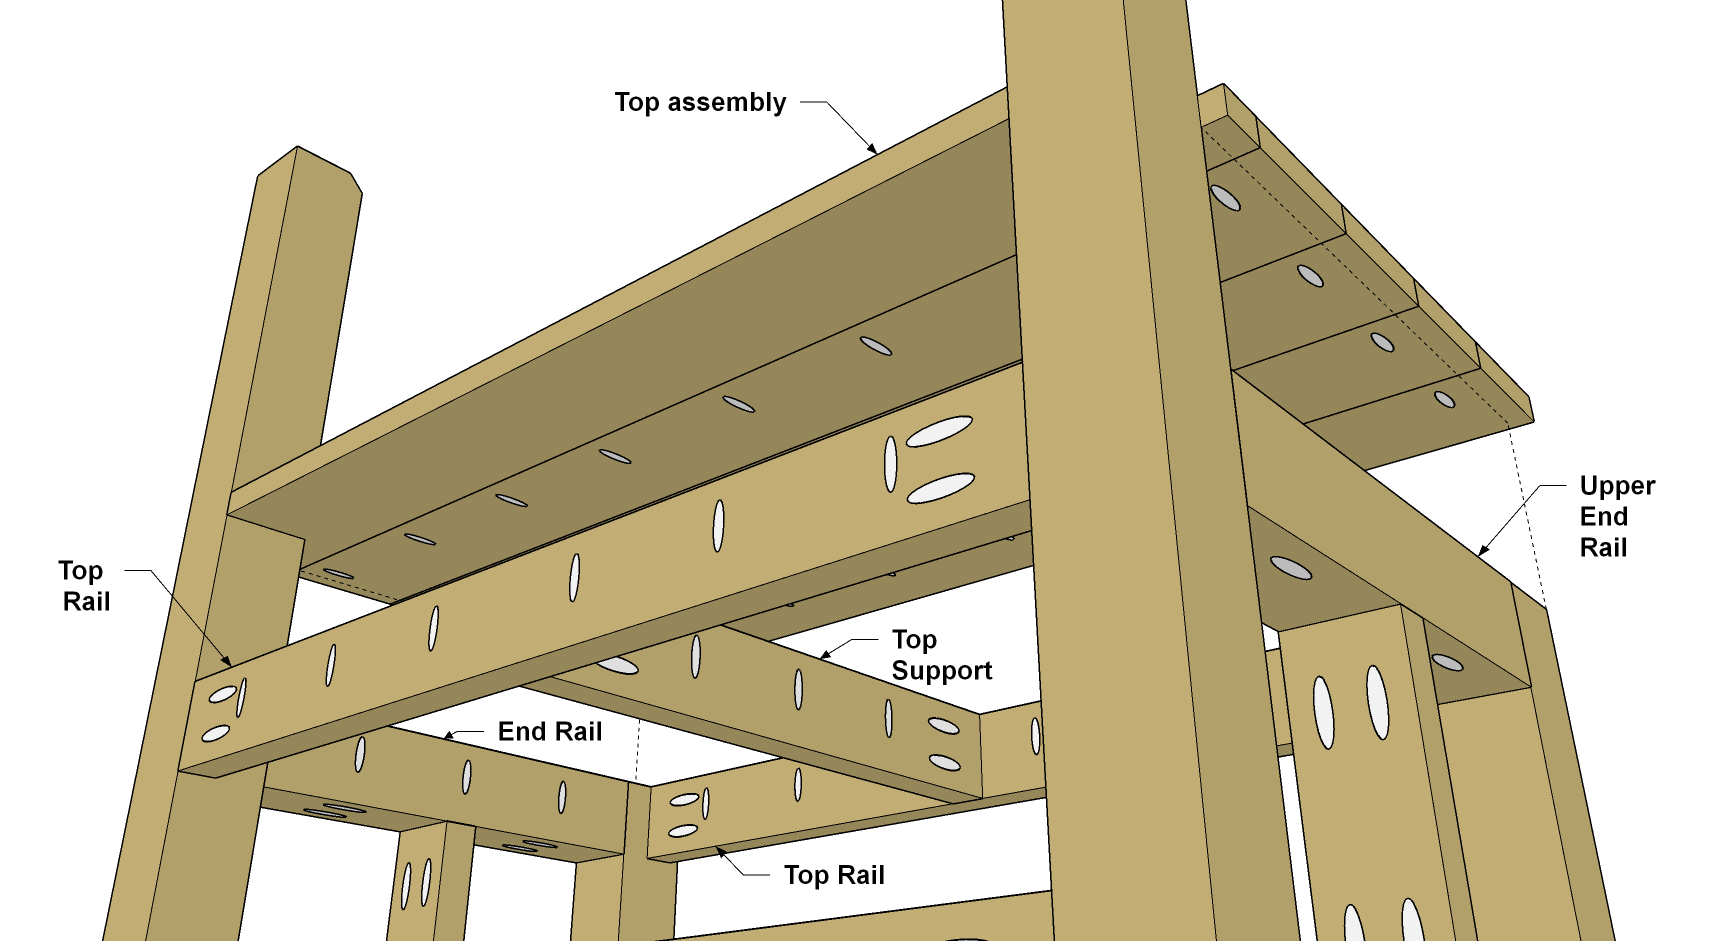
13Attach the Top
- Now you can attach the top to the bench base. In this case, don’t use glue. Just position the top so the notches fit around the Rear Legs, then make sure that it overhangs equally across the front of the bench.
- Now attach the top from underneath using 1 1/4" Blue-Kote™ Pocket-Hole Screws in the Top Rails, Top Support, and the Upper End Rails.
14Make Upper Uprights and Shelf Supports
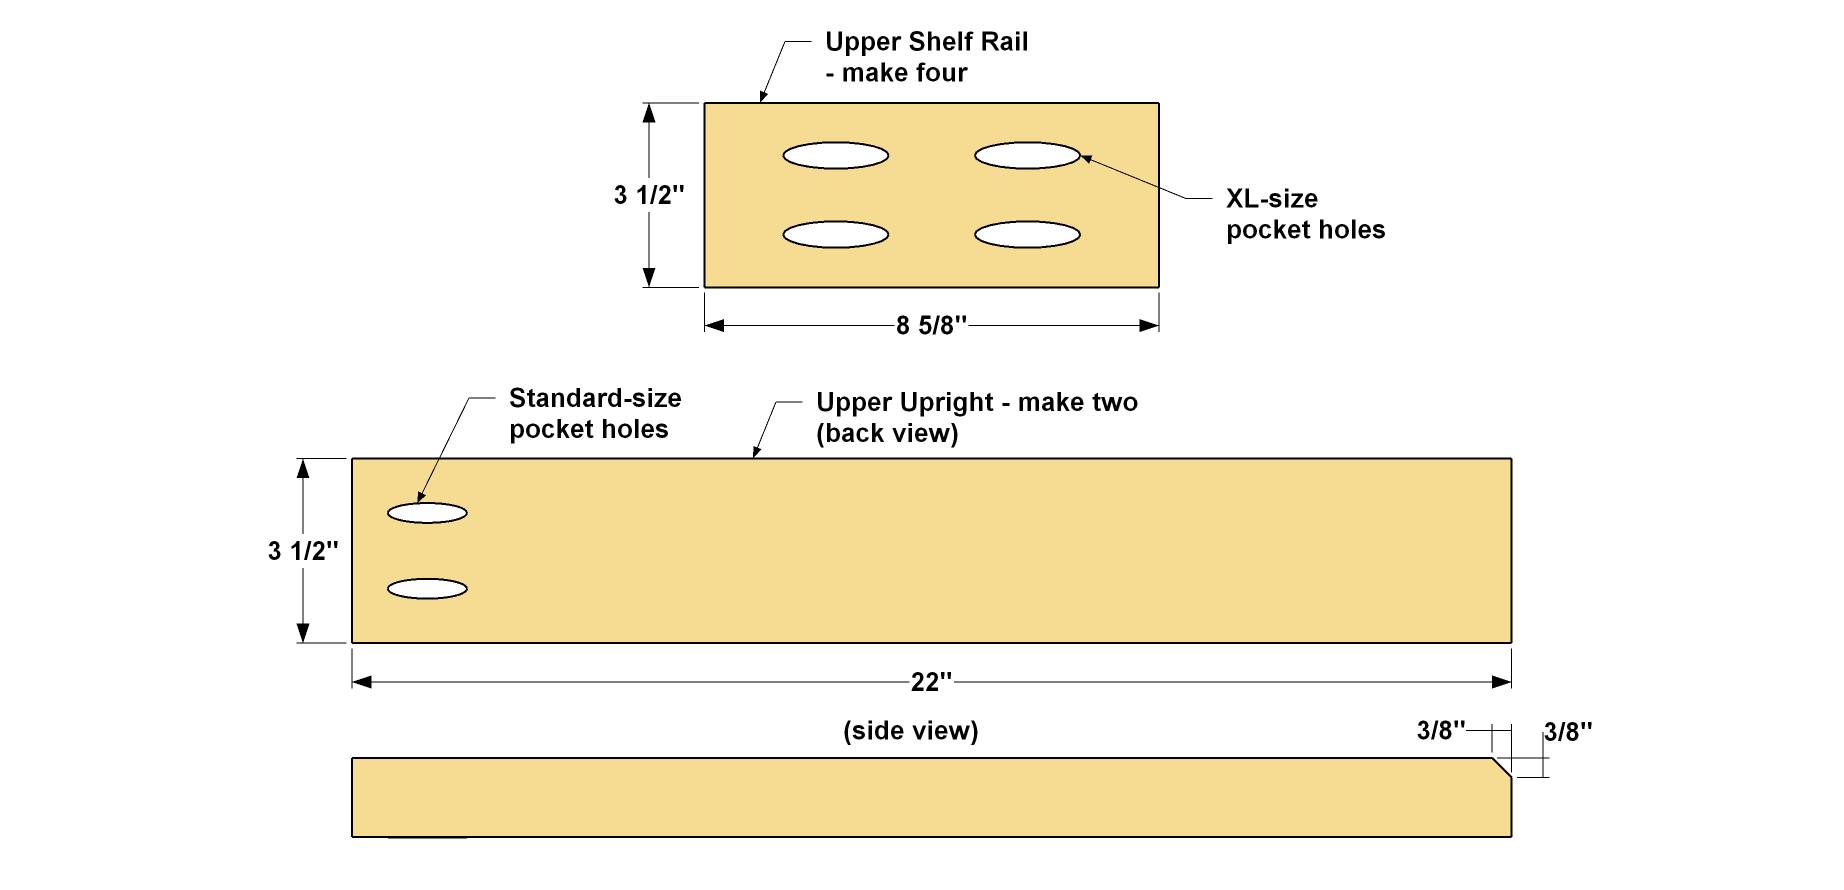
- Cut Four Upper Shelf Supports to length from a 2x4, as shown in the cutting diagram.
- Then drill XL pocket holes in the ends, as shown.
- Now cut two Upper Uprights to length, and then cut the decorative 45° notch on one end.
- Next, drill a pair of standard pocket holes where show in one end of each Upper Upright. After that, you can sand and stain these pieces.
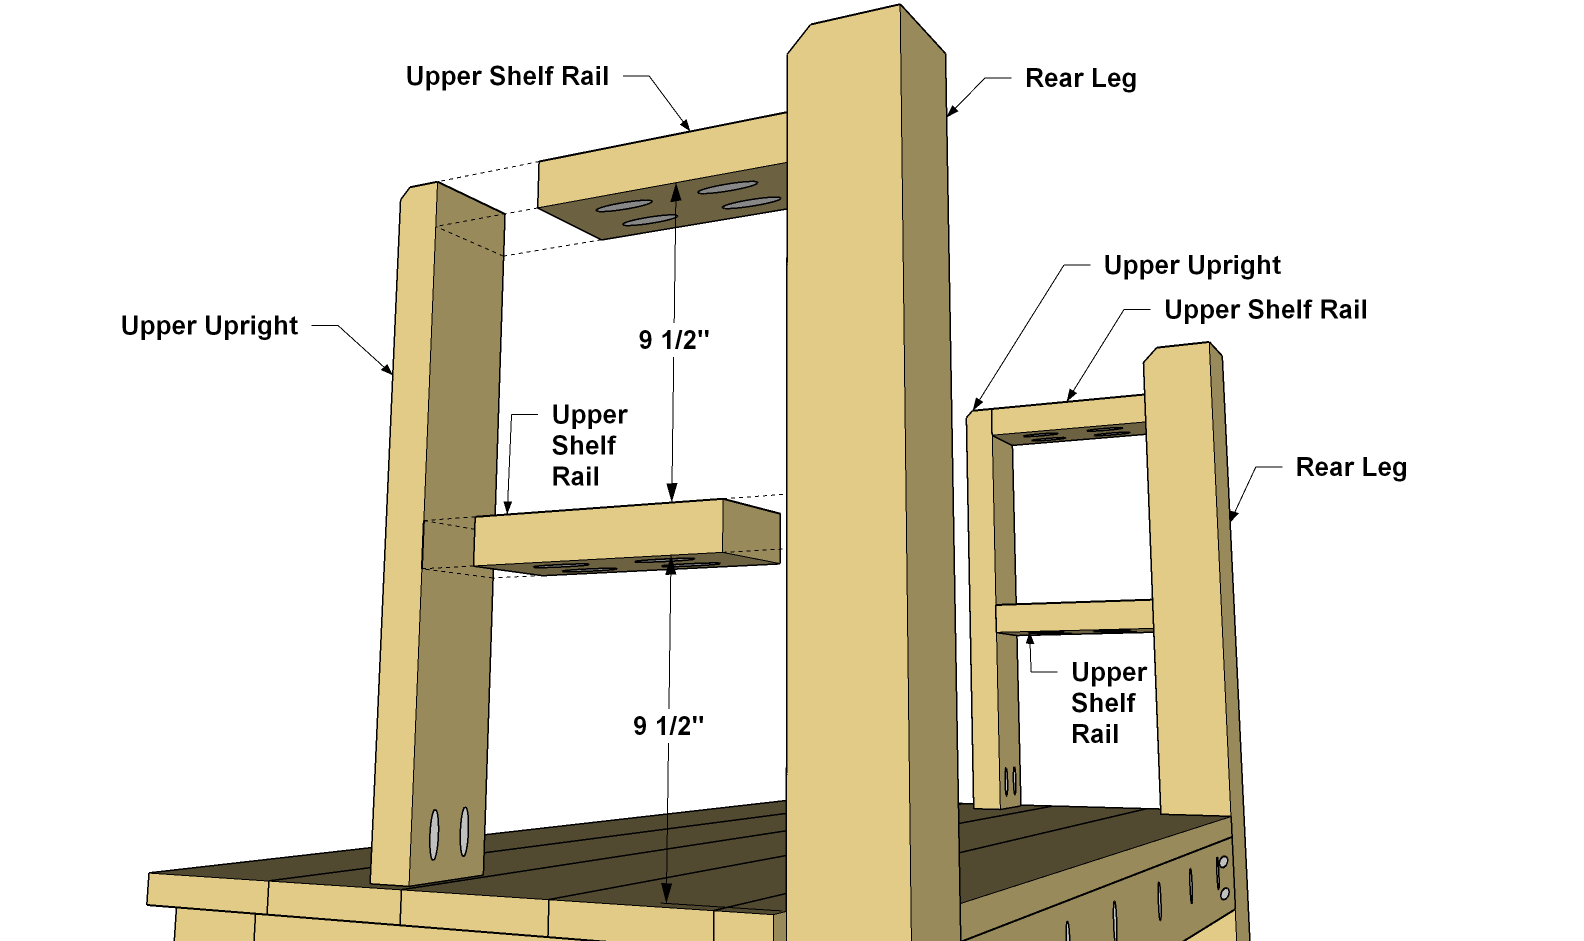
15Install the Uprights and Supports
Once the stain dries, you can glue and screw the Upper Shelf Supports and the Upper Uprights in place, as shown. For the Shelf Supports, you’ll once again need the Kreg 90° Pocket-Hole Driver and 3-long #3 bit to drive the 2 1/2"-long XL Pocket-Hole Screws. To attach the Uprights to the top, use the 90° Driver with its standard bit, and 1 1/2" Blue-Kote™ Pocket-Hole Screws.
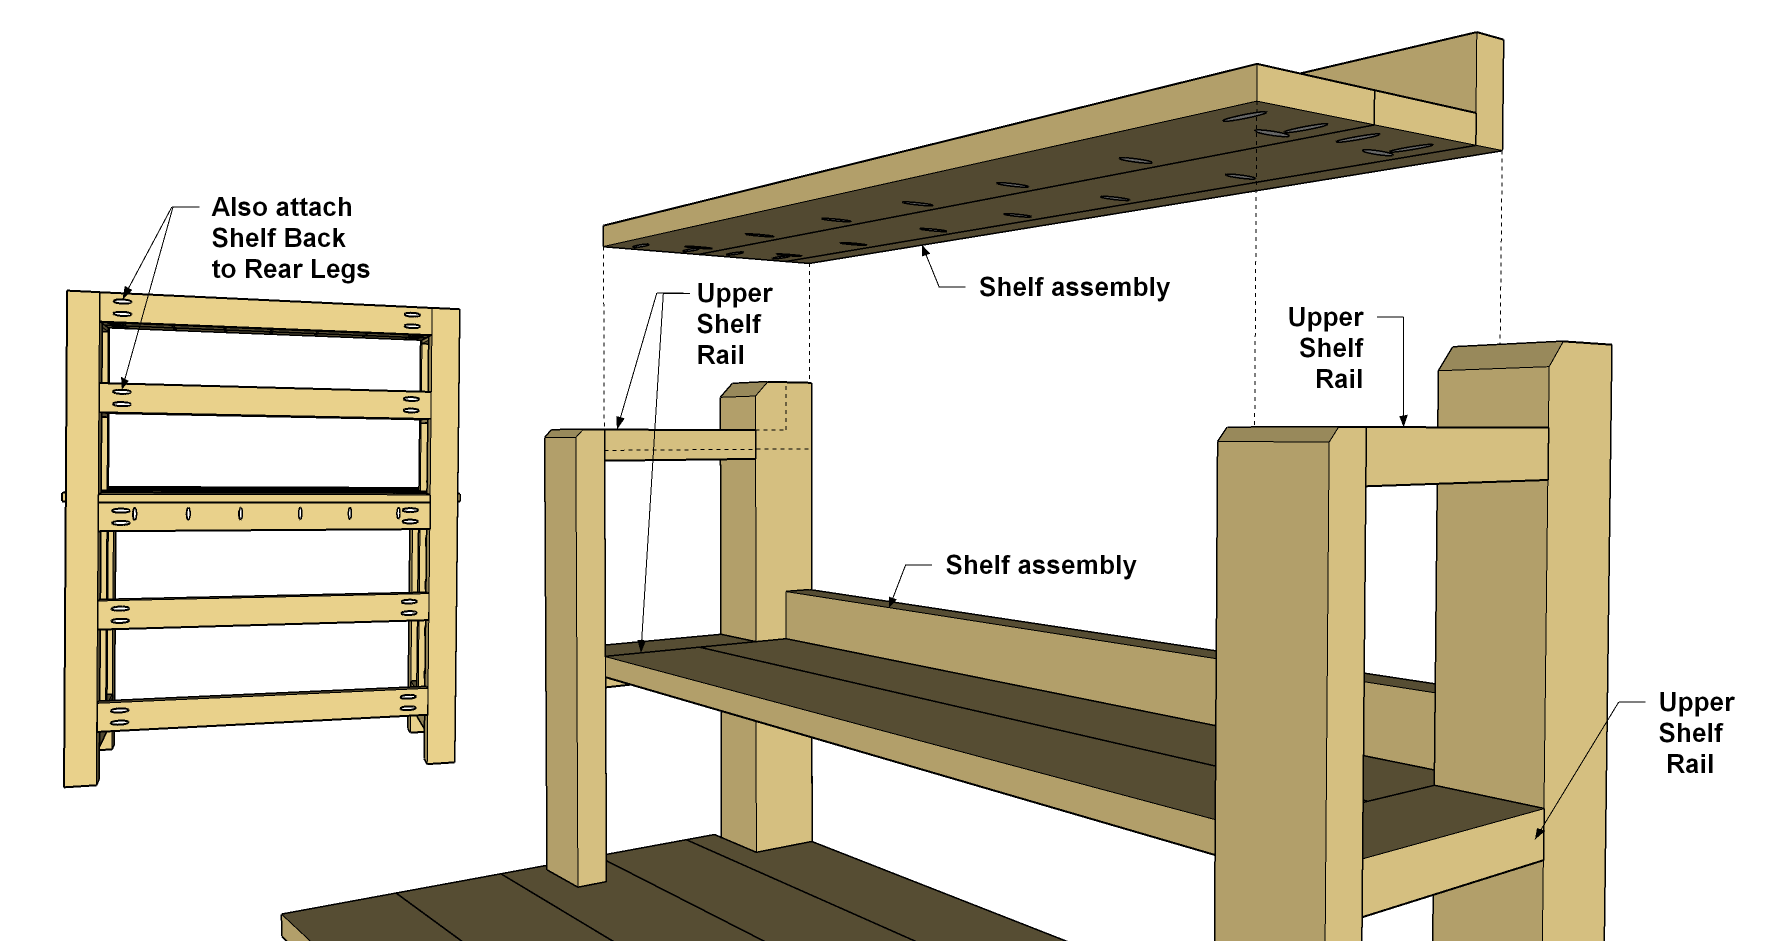
16Install the Upper Shelves
All that’s left to do now is install the upper shelf assemblies. If you stained one Shelf Back to match the bench base, the shelf with that back should go in the upper position. Now, your bench is ready to use, whether you’re potting plants or serving food.
Tags
- Outdoor Living
- Beginner
Reviews & builds
No reviews yet
Sign in to review this plan or share your build.
No reviews yet. Be the first to build this.