 Notch
Dog Bed
Step-by-step build — 12 steps. Also available as a print sheet.
1Cut the Wide Legs and Rails
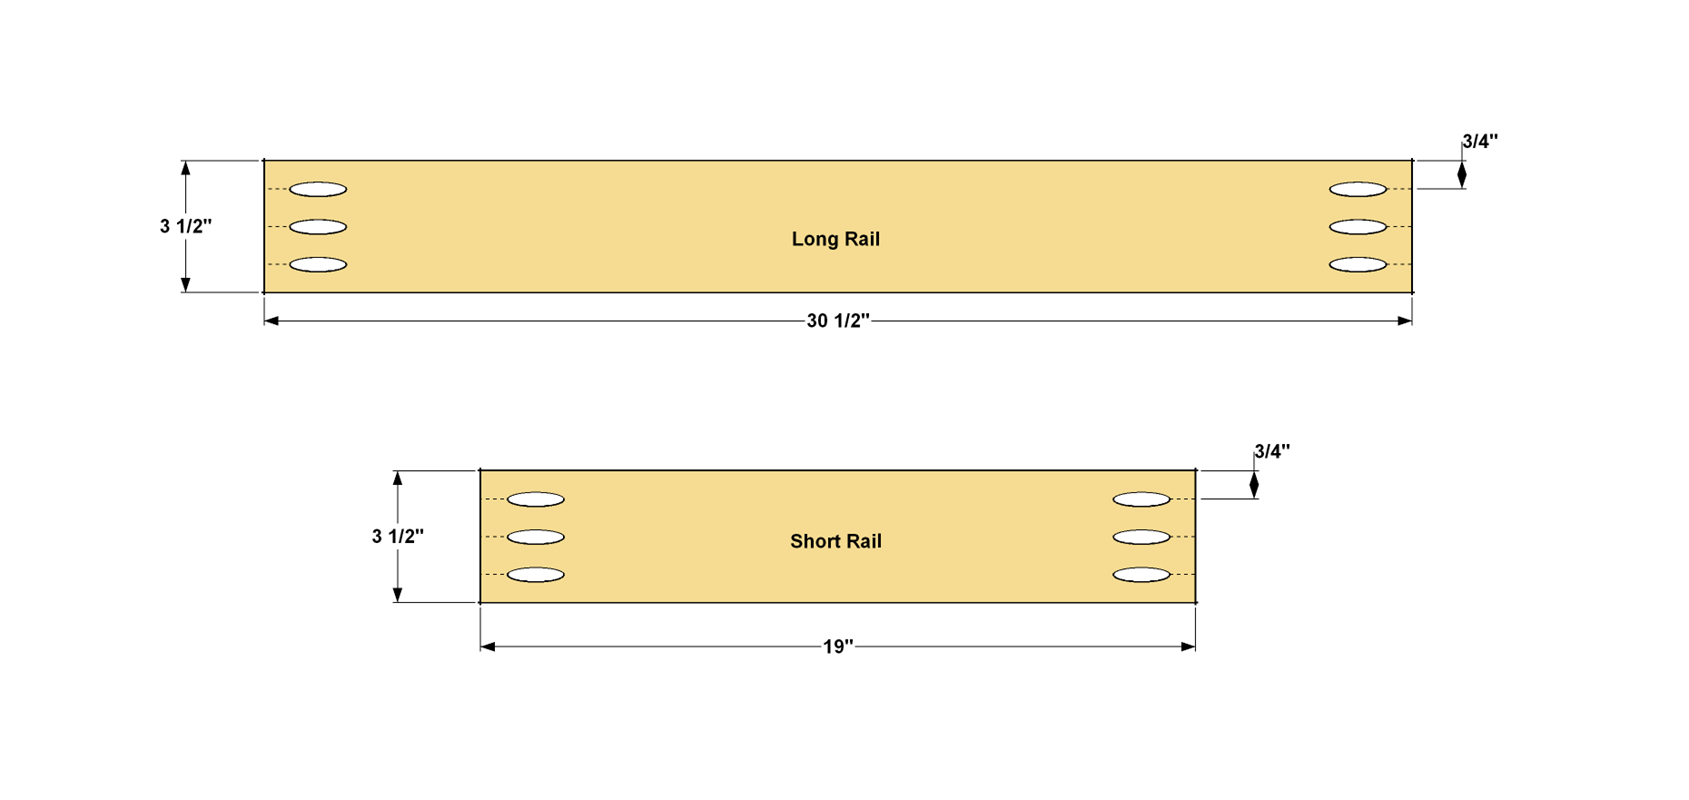
Begin by cutting four Wide Legs, two Short Rails and two Long Rails to length from 1x4 boards, as shown in the cutting diagram. Set your Kreg Pocket-Hole Jig for 3/4"-thick material, and then drill pocket holes in the Long and Short Rails, as shown. You’ll use the Wide Legs in the next step.
2Assemble the Long Sides
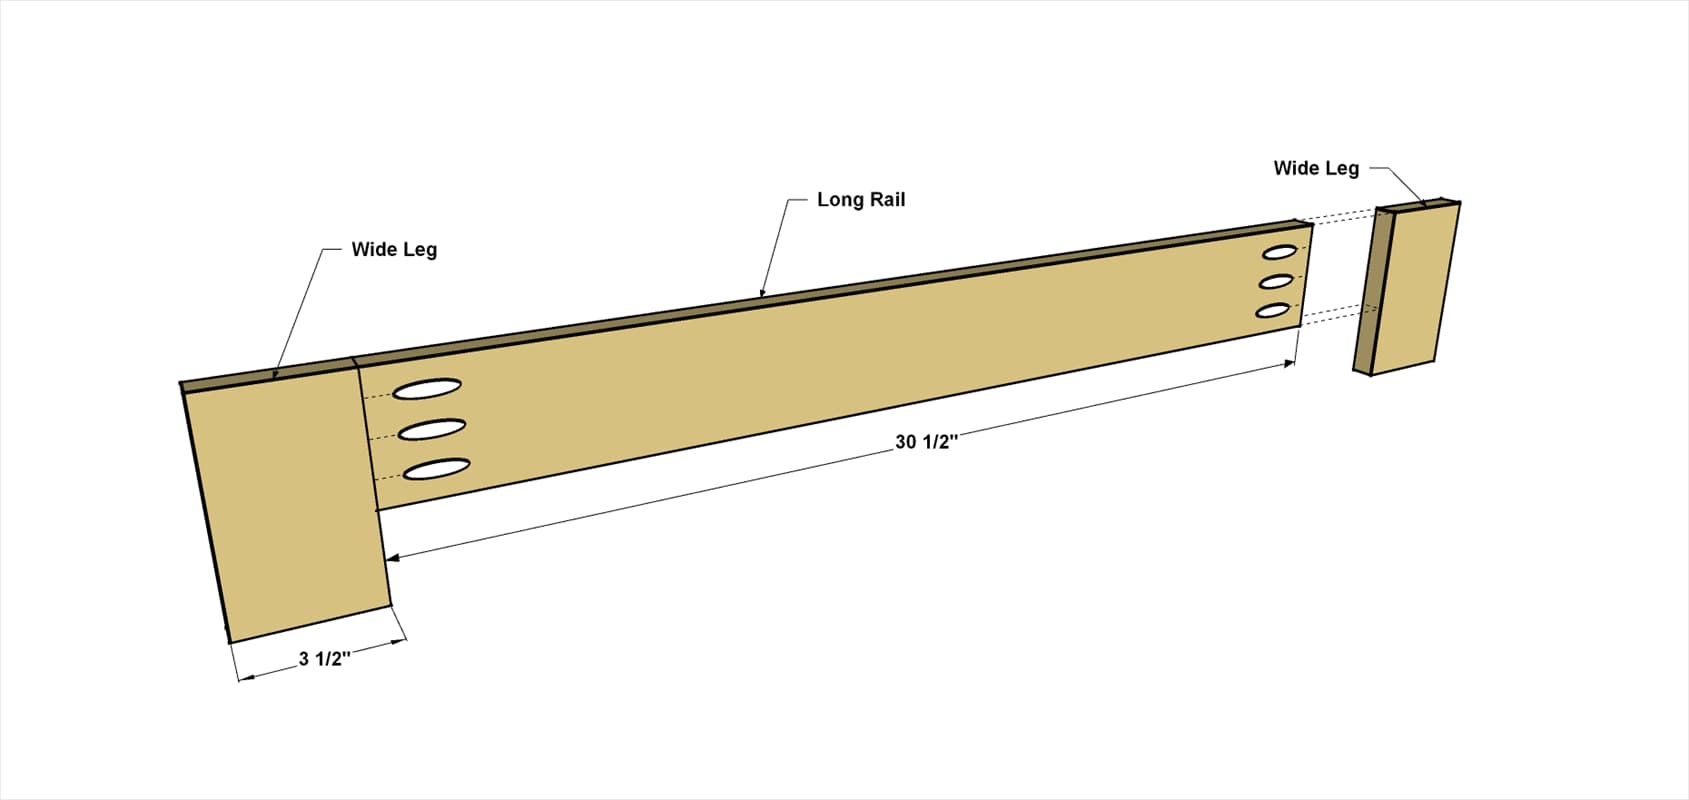
- Working on a flat work surface, apply a small amount of glue to the ends of one Long Rail.
- Then align two Wide Legs with that Long Rail so they are flush at the top, as shown. Secure the Wide Legs using 1 1/4" coarse-thread Kreg Screws.
- Repeat the process to create the second matching assembly.
- Once the glue dries, sand the assemblies smooth.
3Make the Narrow Legs
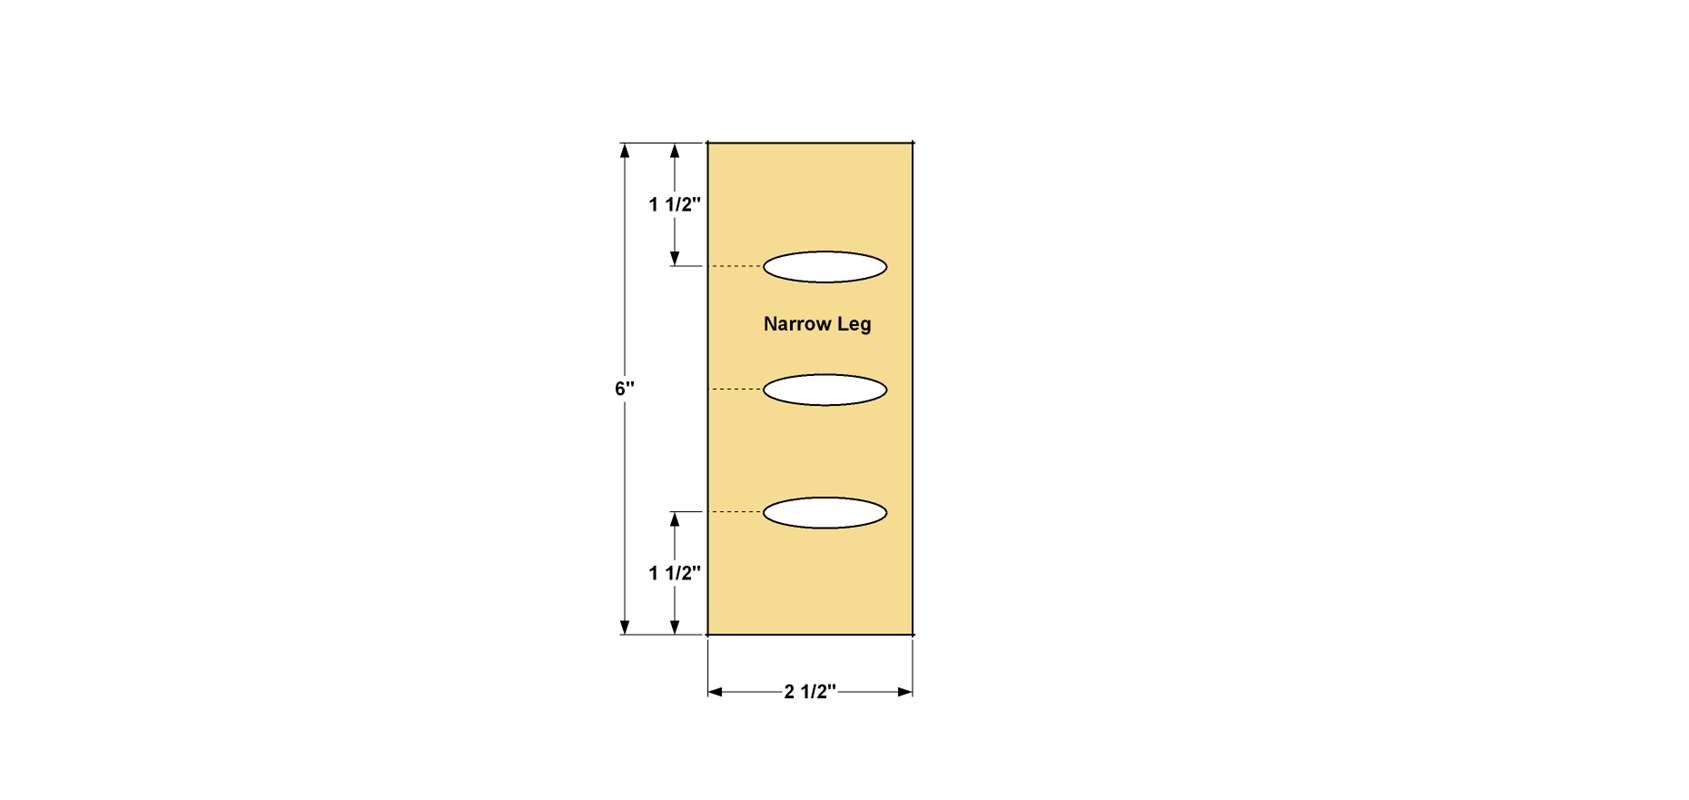
From a 1x3 board, cut four Narrow Legs to length, as shown in the cutting diagram. Drill pocket holes in each of the Legs at the locations shown.
4Assemble the Short Sides
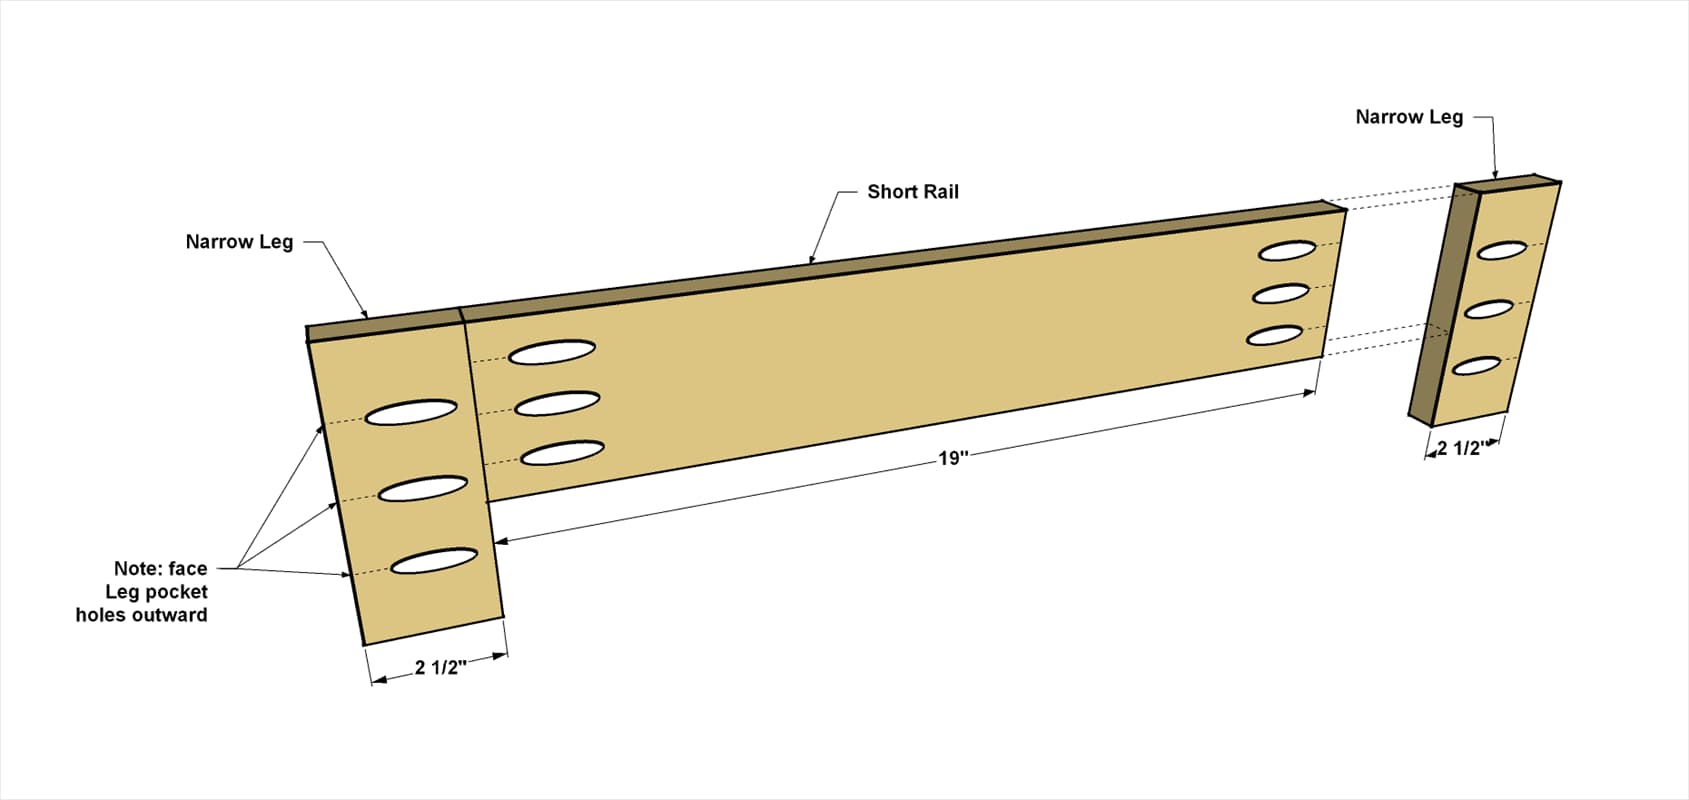
- Repeat the same process used for the long sides to make the short sides.
- Apply a small amount of glue to the ends of one Short Rail Then position the Narrow Legs as shown, making sure that the pocket holes face outward—these holes will be used in the next step to join the short rail assemblies to the long rail assemblies. Secure the Narrow Legs using 1 1/4" coarse-thread Kreg Screws.
- Then, assemble the second matching assembly the same way.
- Once the glue dries, sand the assemblies smooth.
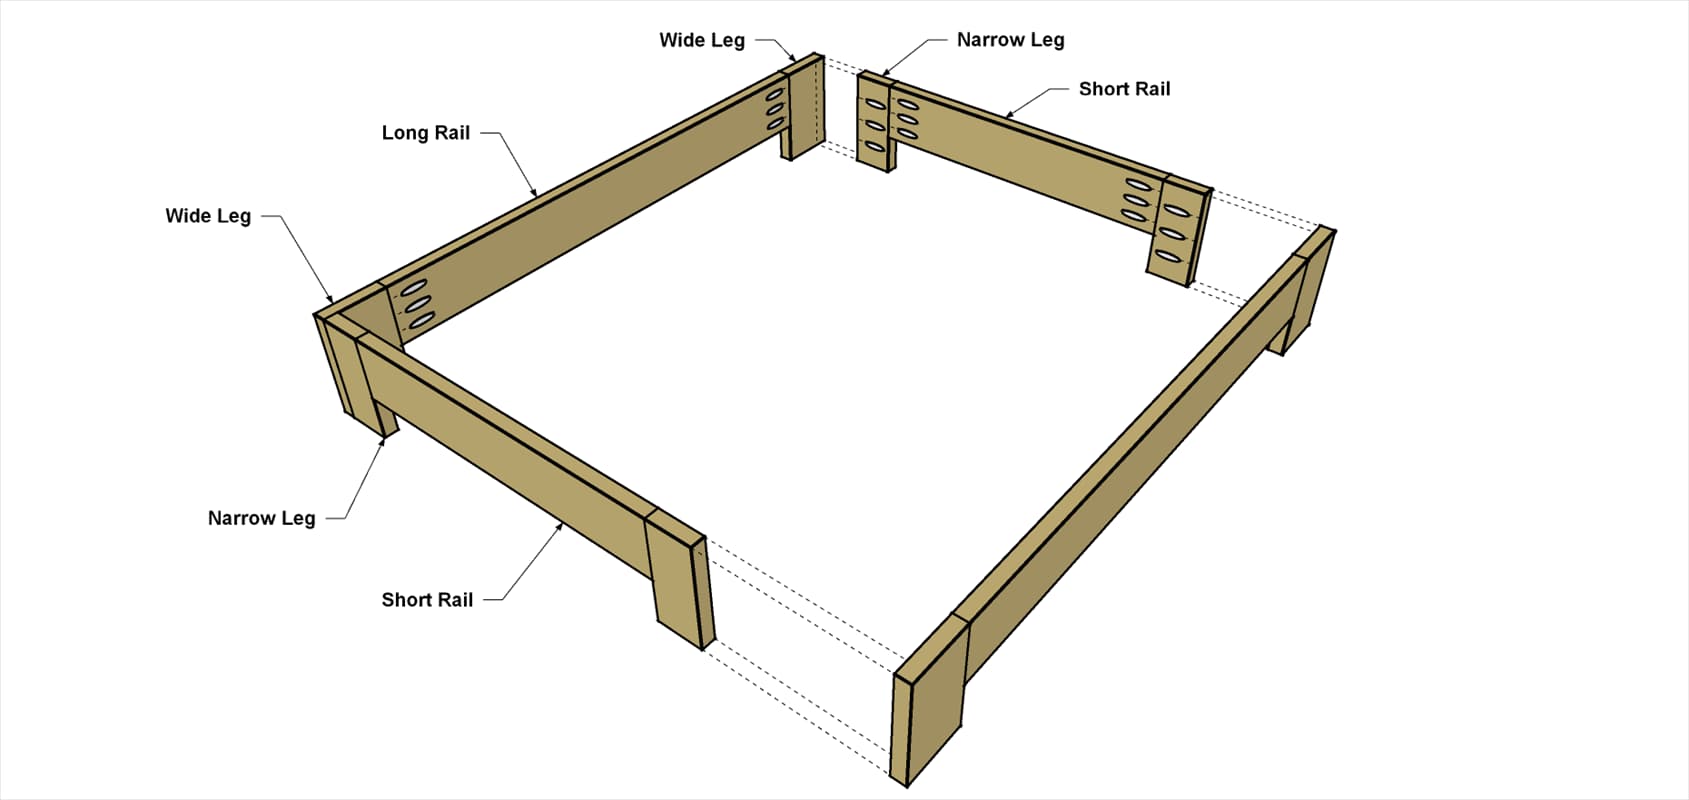
5Assemble the Base
- Apply a small amount of glue to the exposed edges of the Narrow Legs on one assembly.
- Then position the Long Rail/Leg assemblies, as shown, and attach them using 1 1/4" coarse-thread Kreg Screws.
- Repeat the process to attach the other Short-Rail/Leg Assembly to complete the base.
6Make the Cleats
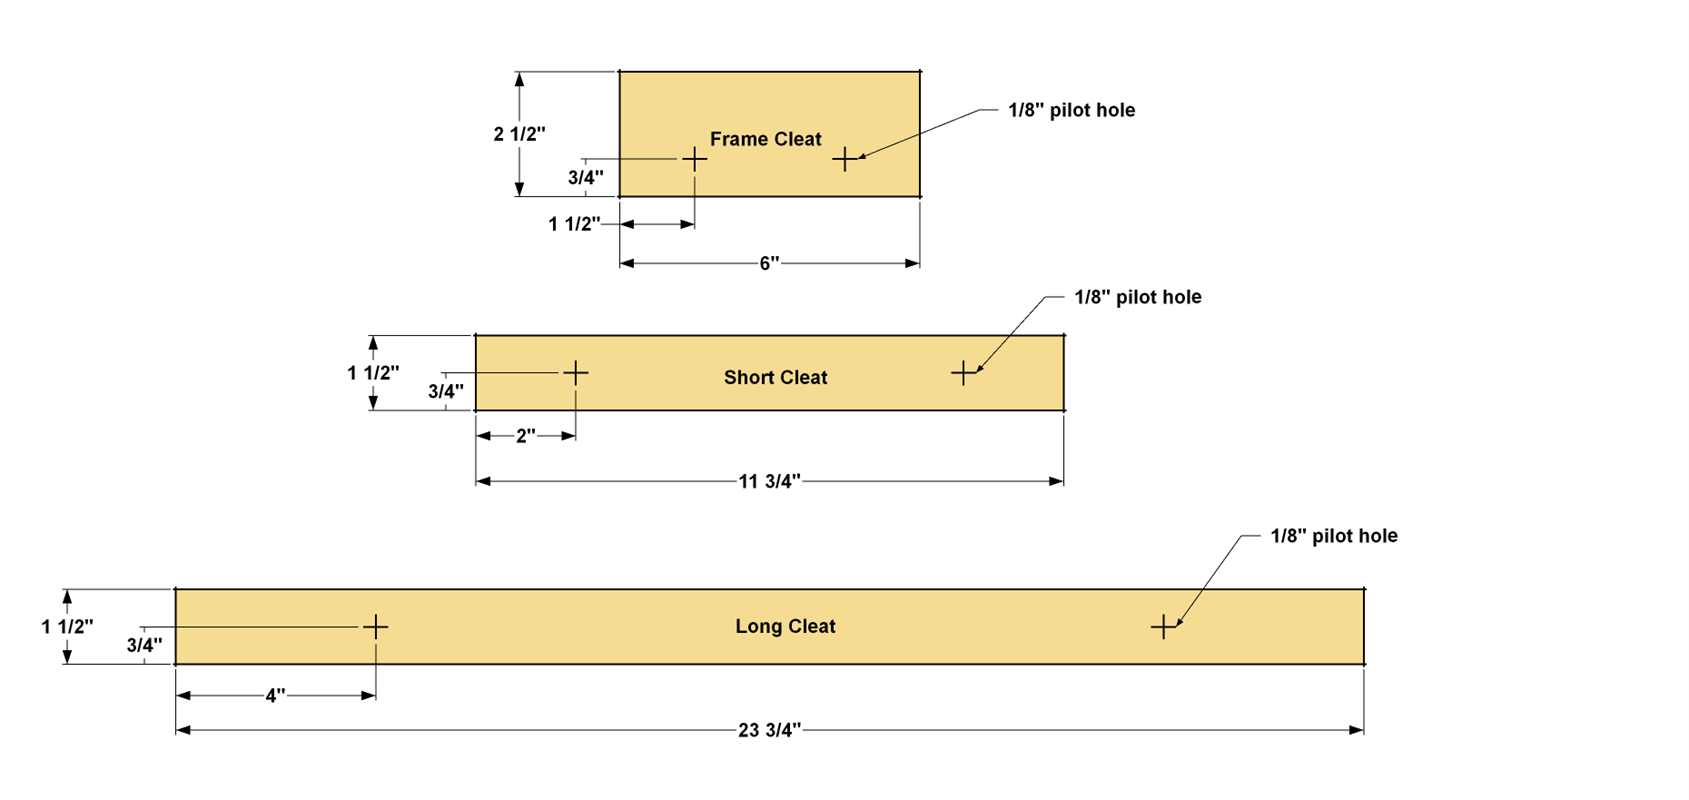
From a 1x2 board, cut two Long Cleats and two Short Cleats to length. From a 1x3 board, cut two Frame Cleats to length, as shown. Drill 1/8" pilot holes in each Cleat at the locations shown.
7Attach the Cleats
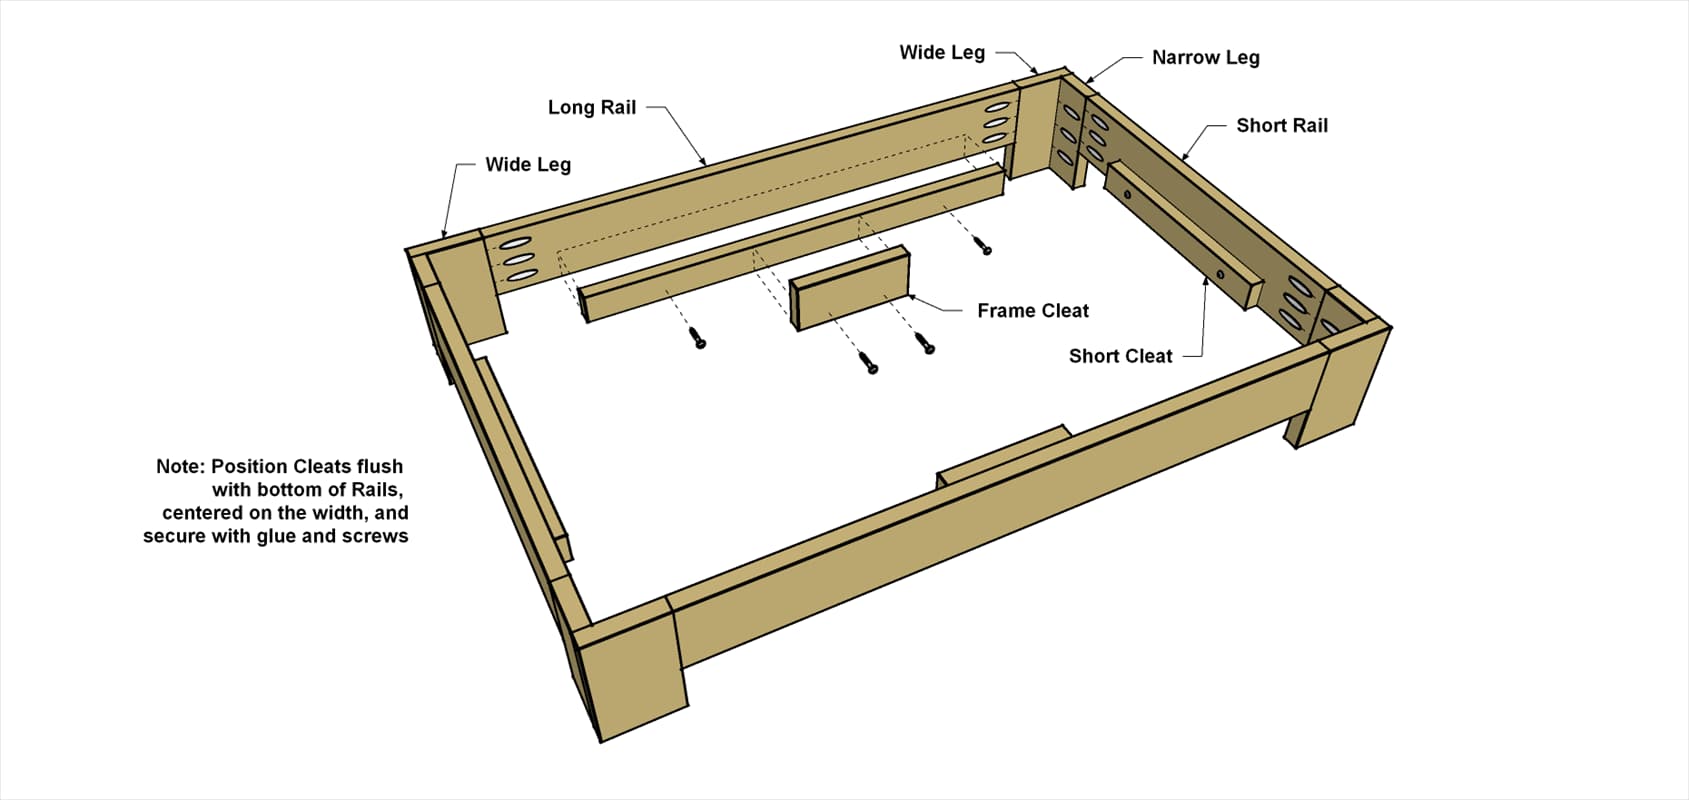
- Apply glue to one face of the first Long Cleat.
- Then center it on the Long Rail so it is flush along the lower edge, as shown.
- Clamp the Long Cleat in place, and then secure it using two 1 1/4" coarse-thread screws.
- Repeat this for the other Long Cleat, and for the Short Cleats.
- Then you can add the Frame Cleats. They are centered on the length of the Long Cleats, and they stick up to help hold the bed frame in position.
- Position the first Frame Cleat so it’s centered on the length of one Long Cleat, as shown. This should leave 1" of the Frame Cleat width stick up above the Long Cleat.
- Clamp the Frame Cleat in place, and then secure it with two 1 1/4" coarse-thread screws, as shown.
- Repeat this process to attach the other Frame Cleat.
8Make the Frame Parts
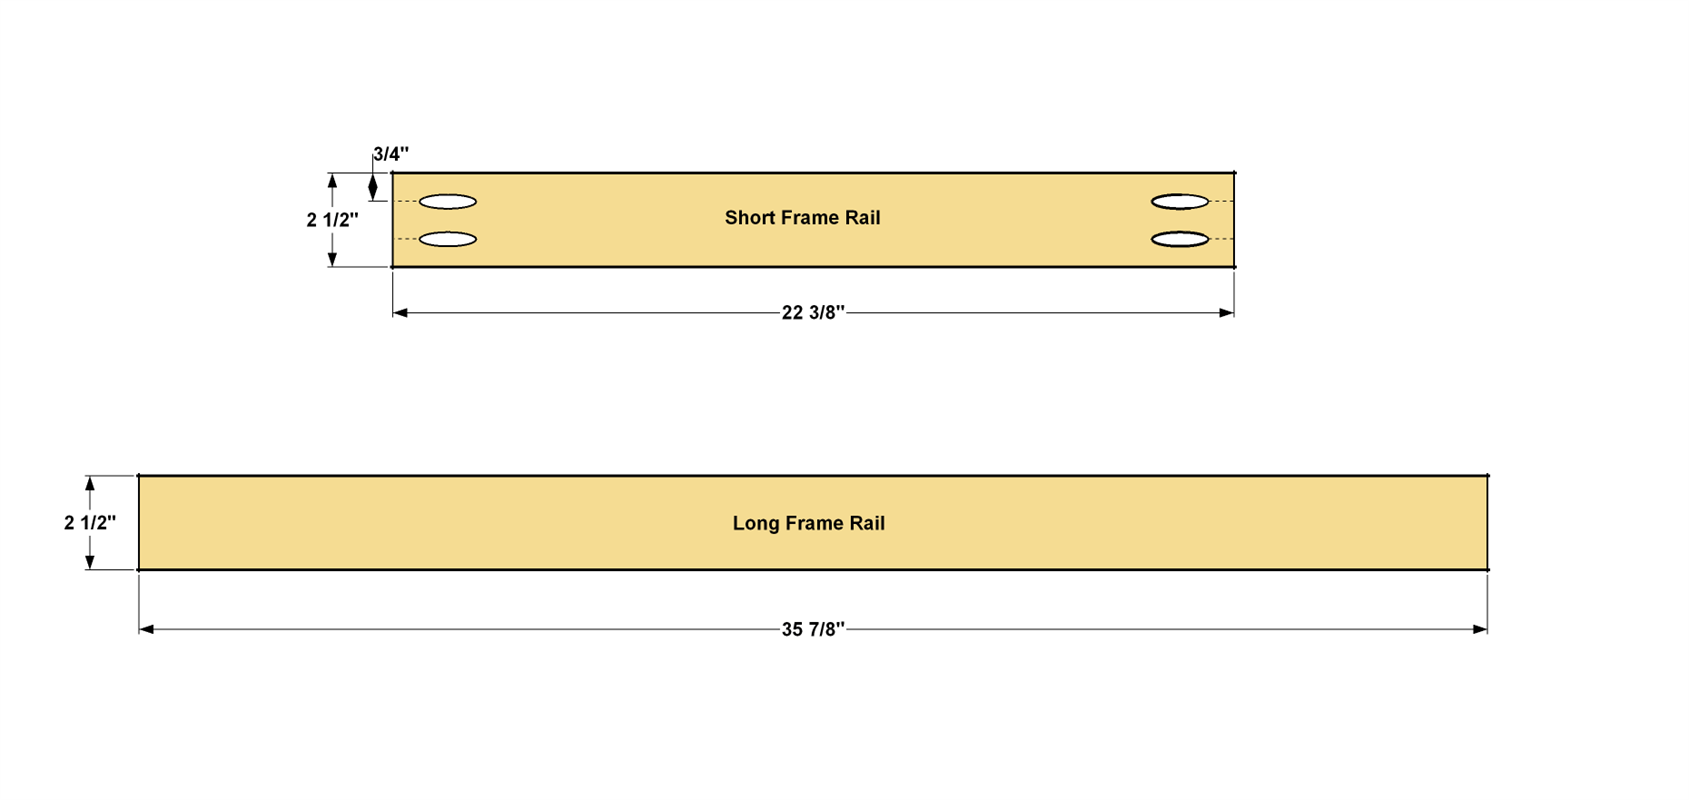
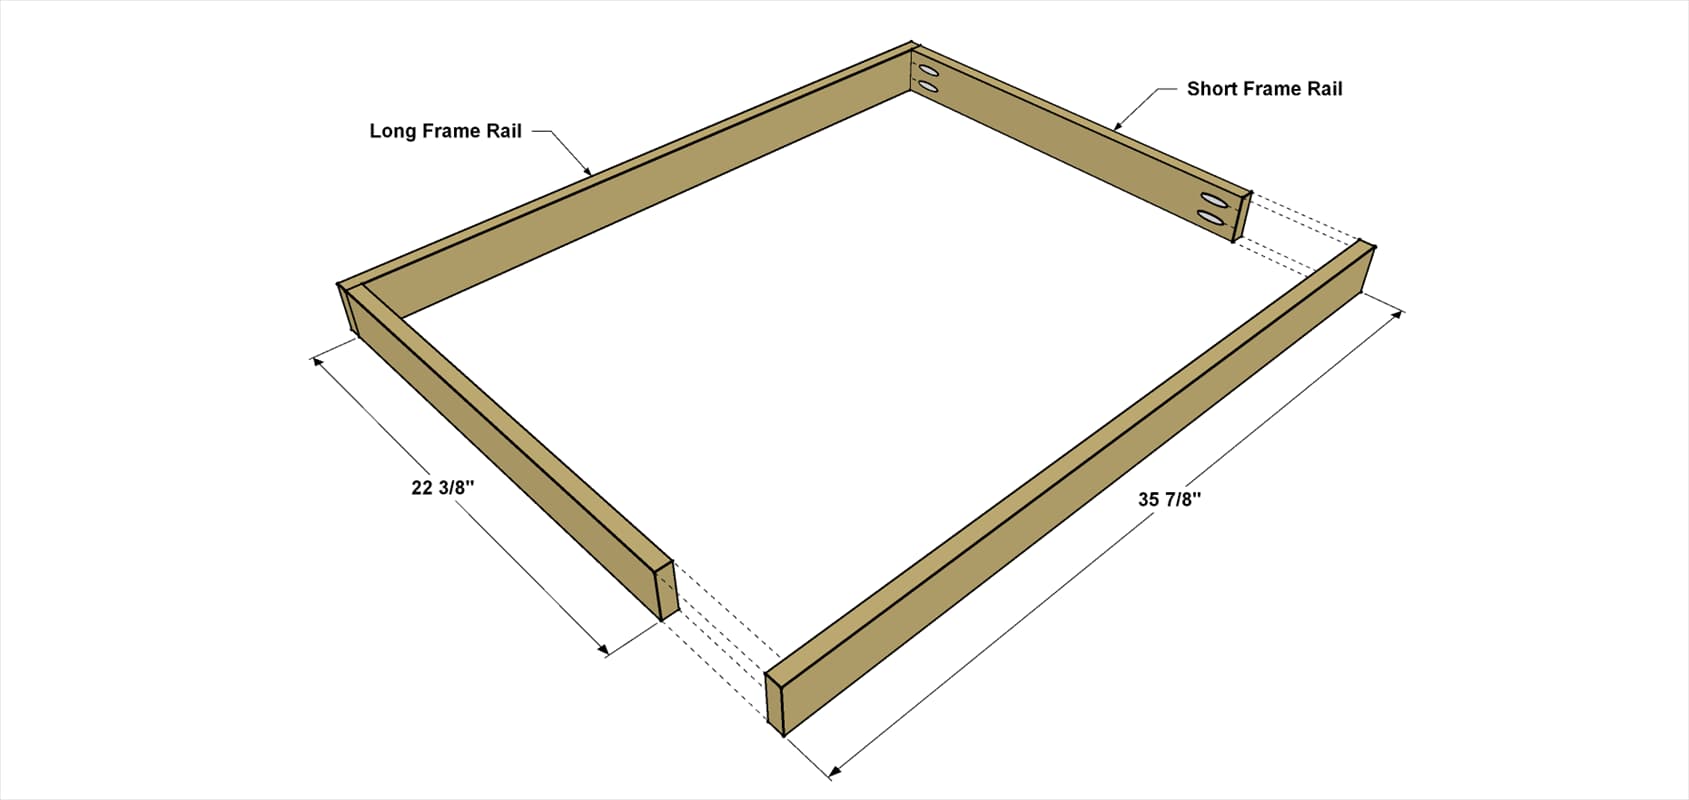
From a 1x2 board, cut two Long Frame Rails and two Short Frame Rails to length, as shown in the cutting diagram. Drill pocket holes in the two Short Frame Rails at the locations shown.
9Assemble the Frame
- Apply a small amount of glue on one end of the each of the Short Frame Rails, and then position them against a long Fame Rail, as shown. Secure each Short Frame Rail using two 1 1/4" coarse-thread screws.
- Repeat this to attach the other Long Frame Rail and complete the frame. When the glue dries, sand the faces and edges of the frame smooth.
- Also sand the sharp edges where the fabric will wrap around, just to round them off a bit for a softer surface under the fabric.
10Lay Out the Fabric
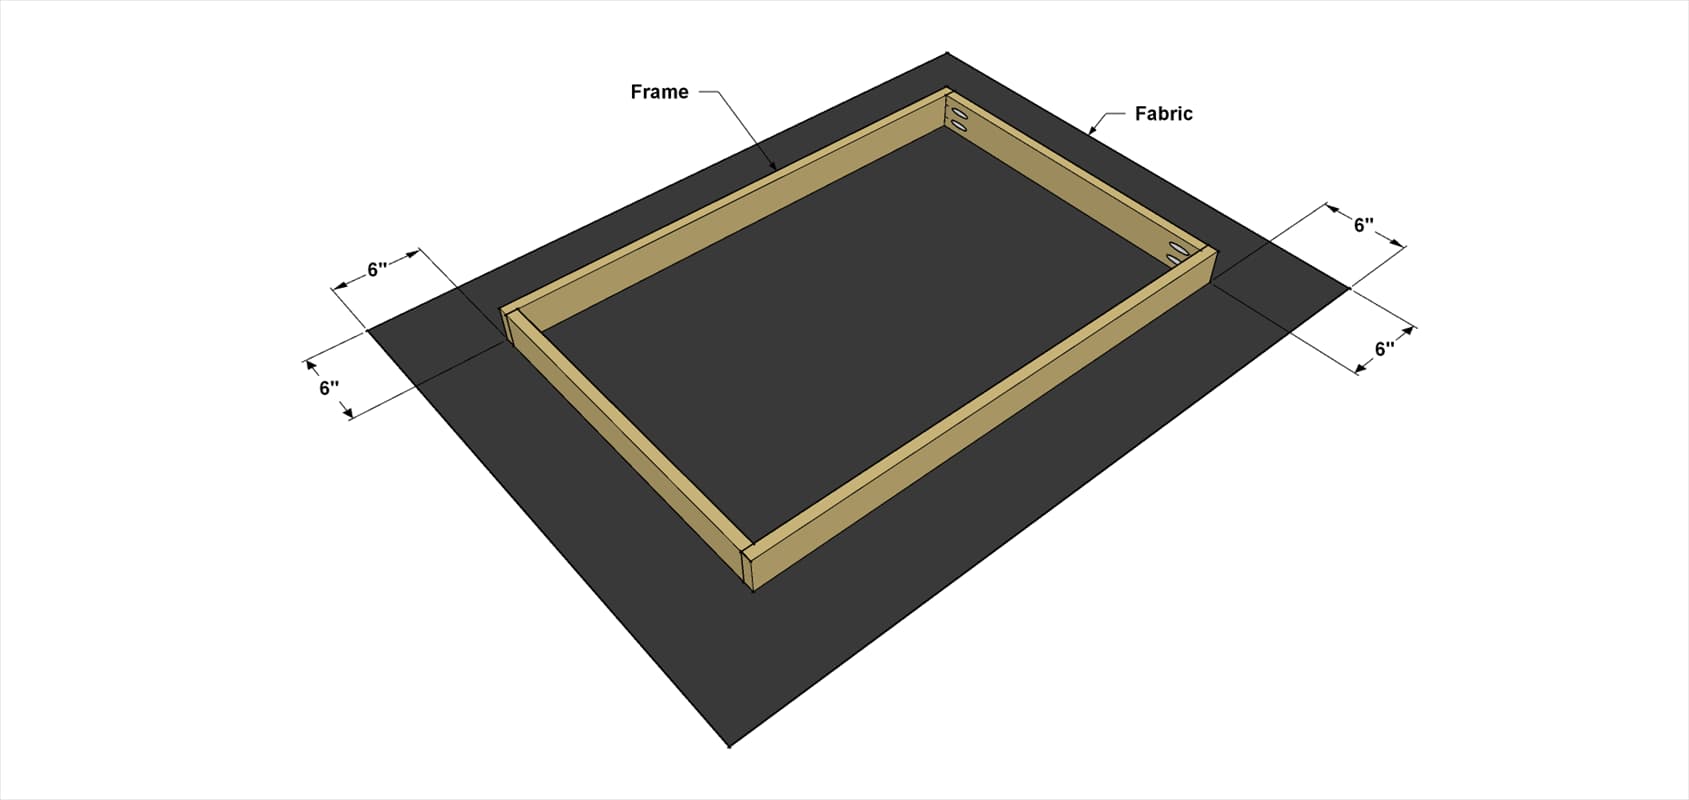
- To provide the bed surface, we used ripstop nylon fabric. The first step is to cut it oversize for the frame.
- Spread out the fabric and then place the Frame on top of it.
- Measure out about 6" beyond each side of the frame, as shown, and then cut the fabric to size. After that, you can attach the fabric. We did this using spray adhesive, as shown in the next step. The spray adhesive used to apply the fabric needs to be applied to both surfaces—the fabric and the frame in this case.
- Then, when the two adhesive-covered layers are brought together, they will stick. It’s helpful to have someone who can assist you with holding the fabric and pulling it tight as you attach it.
11Glue the Fabric Wrap the Frame
- First, spread paper to protect your work area.
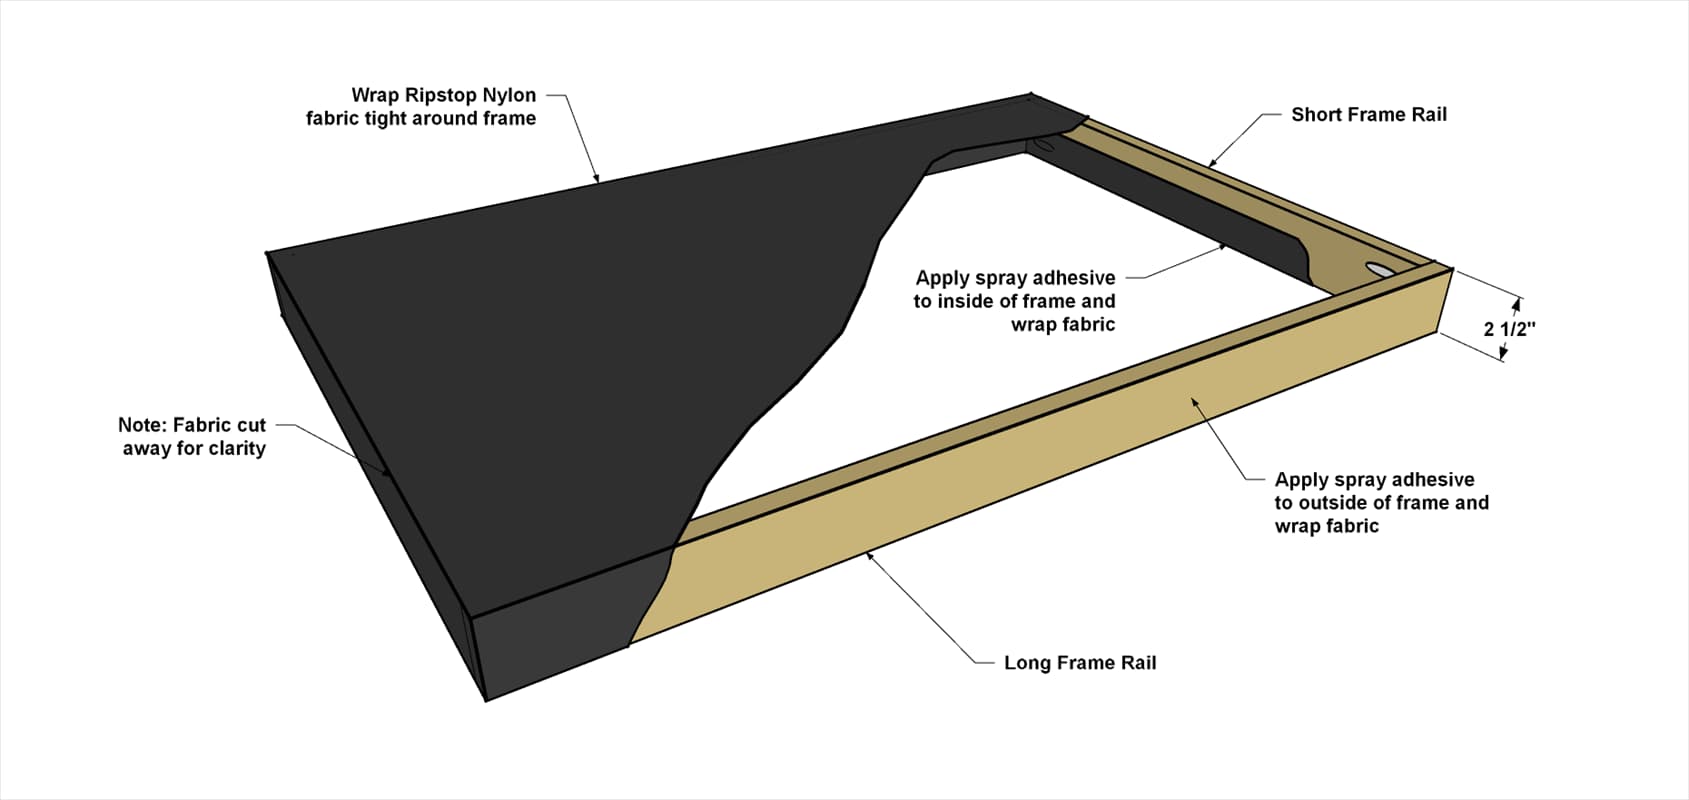
- Lay the fabric flat and spray the outer 6" of each edge with adhesive.
- Set the fabric aside.
- Next, spray the frame assembly, making sure to cover the faces and on the upper edge.
- Lay the fabric on the work area with the adhesive side up.
- Center the frame over the fabric with the glued edge facing the fabric. Have your assistant help you pull the fabric taut as you lay the frame the fabric and press down making sure the glue adheres. Starting at one end, wrap the fabric the Short Frame Rail and press it into place.
- Then move to the opposite end, make sure the fabric is pulled tightly, and wrap that end.
- Now you can do the same to wrap the Long Frame Rails.
- Then cut away excess fabric.
12Apply a Pup-Safe Finish
- Sand any sharp edges of the bed base, as well as any rough spots you find, to prepare for finishing, and then and wipe away dust with a cotton cloth or shop towel.
- Then you can apply finish to the frame. We wanted to make sure to use a finish that was safe for pets. We applied a natural non-toxic butcherblock oil. To ensure a pet safe finish, look for products that are labeled “food safe”. When the finish is dry and the spray adhesive has cured according to the directions, place the fabric frame into the base.
- Then, you can introduce your dog to its awesome new bed.