 Notch
Notch- Difficulty
- Easy
- Time
- 3.3–6.3 hours
- Cost
- $$
About this build
This modern dog bed is a simple build that will put a wag in your bestfriend’s tail. It’s designed to fit a large dog but is easily modified for any size dog you have and you can build it from a half sheet of plywood in just a few hours. Simply add a bed pillow and you’re good to go! Pet approved:)
Tools
Essential
- Circular Saw
- Drill / Driver
- Jigsaw
- Miter Saw
- Pocket Hole Jig
Optional / nice to have
- Tape Measure
Materials
| Item | Qty |
|---|---|
| Plywood, 3/4" Thick Half Sheet | 1 board |
| Board, 1x8 36" | 1 board |
| 2" wood screws | 8 each |
| 1 1/4" pocket hole screws | 18 each |
Overall cost: $$. Lumber prices vary by region, species, and season, so we give a band rather than a figure we would only be pretending to know.
Cut list
| Part | Qty | T × W × L |
|---|---|---|
| Back Box Side | 1 | 3/4" × 10" × 35" |
| Box Sides | 2 | 3/4" × 10" × 24" |
| Front Box Side | 1 | 3/4" × 10" × 17" |
| Box Bottom | 1 | 3/4" × 24" × 34" |
| Legs cut to template design | 4 | 3/4" × 6" × 7" |
What to buy
Buy 4 boards at 8 ft.
3/4" × 24"
1 board
3/4" × 10"
2 boards
3/4" × 6"
1 board
Assumes 8 ft stock, a 1/8" saw kerf, and buying each part at its own width. Change the board size or kerf on the full board plan →
Instructions
1Cut Plywood Pieces
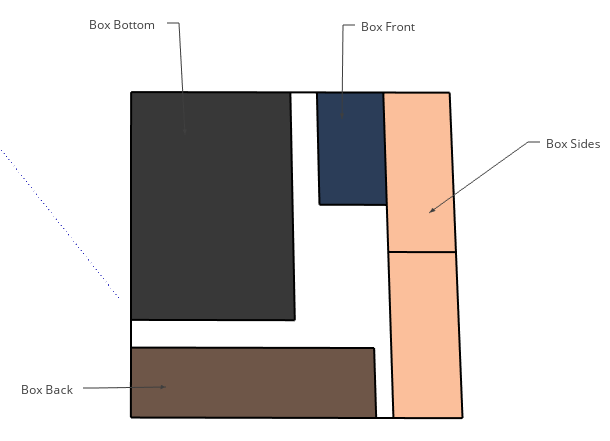
Cut pieces like shown for the dog bed box from a half sheet of ¾” thick plywood according to the cut list. NOTE: This dog bed is designed to fit a dog bed of about 25x35 inches measured laying on the ground puffed up (it's 28x38 laying FLAT according to the tag). If you have a different size, cut your bottom 1 inch smaller in width and length than your dog bed and cut to fit the side pieces around the bottom.
2Apply Edge Banding
I applied edge banding, but this is just an optional step. I applied it along the tops and every plywood edge that will be exposed.
3Assemble Dog Bed Box
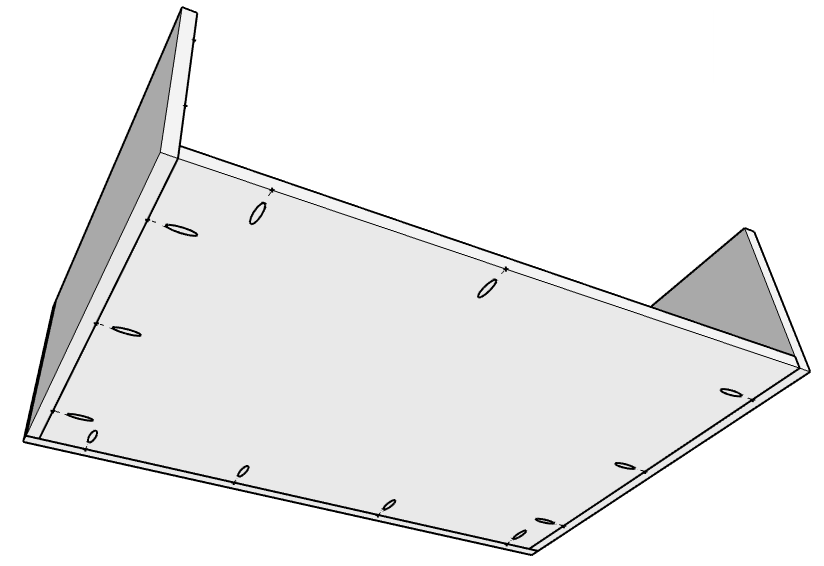
Drill ¾” pocket holes along the bottom of the dog bed box using a Kreg pocket hole jig, along the back edges of the side pieces and along the front edge of the left side piece. Then, using 1 ¼” pocket hole screws, attach the back and sides of the dog bed box like shown through the holes drilled in the bottom.
4Assemble Dog Bed Box Continued
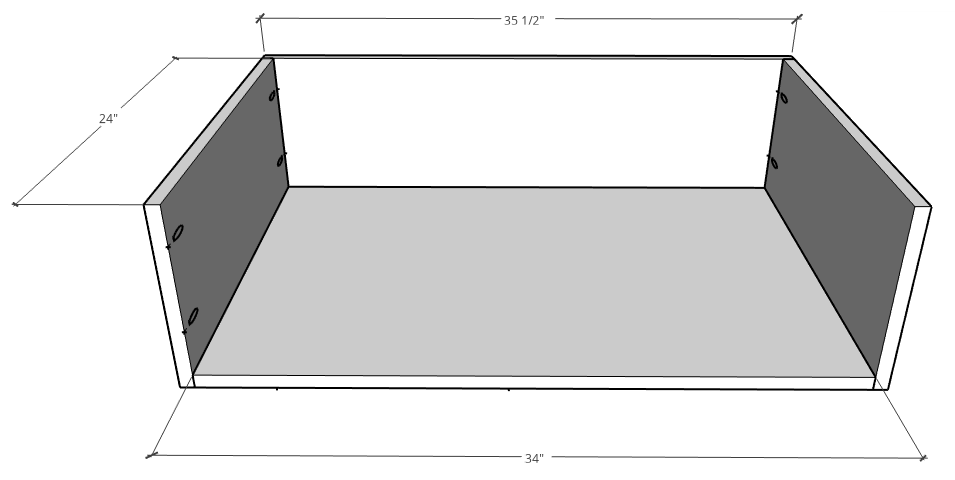
Once the pieces are attached along the bottom holes, also screw the sides together through the pocket holes in the back of the side pieces like shown. NOTE: In the video in the extras tab, you will see the pocket holes drilled in the back piece instead of the side pieces. That’s definitely an option, however, if you cut and assemble pieces the way shown here, it’s easier to cut all your pieces from a half sheet of plywood vs. having to buy a whole sheet.
5Stain Dog Bed Box
I stained my box in two colors. The front piece was one color and the rest of the box was another color. So I went ahead and stained this box. But if you want it all one color, you can skip this step.
6Install the Front Side of Dog Bed
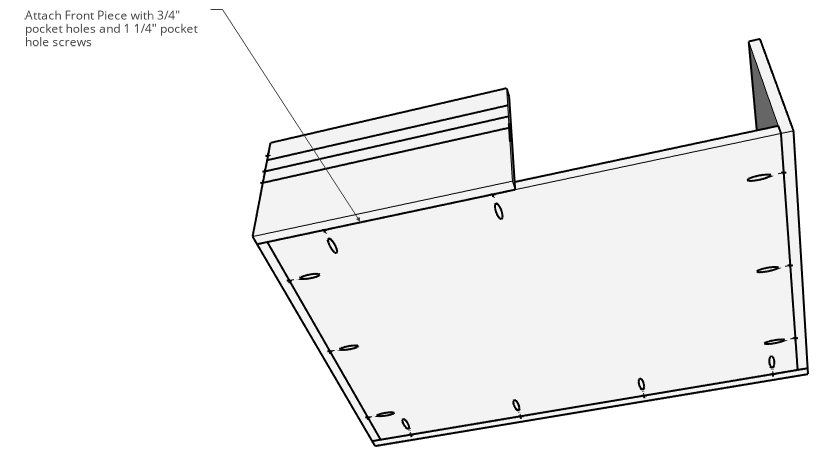
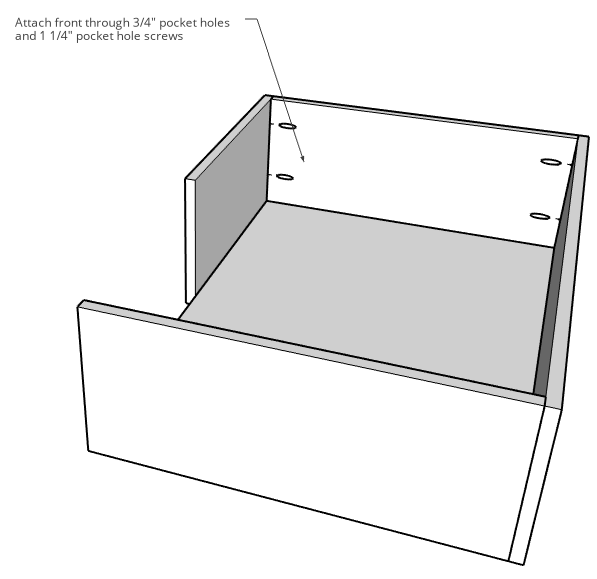
To add a little visual interest, I set my table saw blade depth to ¼” and cut a few kerfs spaced about 1 ¼” apart on the front. This is TOTALLY optional and just a decorative touch. You can see this process in the video in the extras tab. Finish (stain or paint) the front piece and attach through the pocket holes on the bottom and the front edge of the left side piece like shown.
7Install Front Side of Dog Bed Cont.
See image of attaching front piece from sides.
8Cut Dog Bed Legs
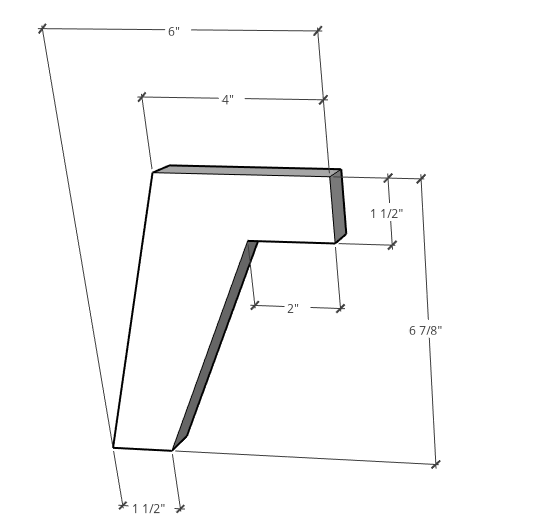
Cut four legs according to this template. You can cut these from leftover plywood, OR some scrap wood, OR a 1x8 board. I cut mine from some scrap walnut pieces.
9Install Dog Bed Legs
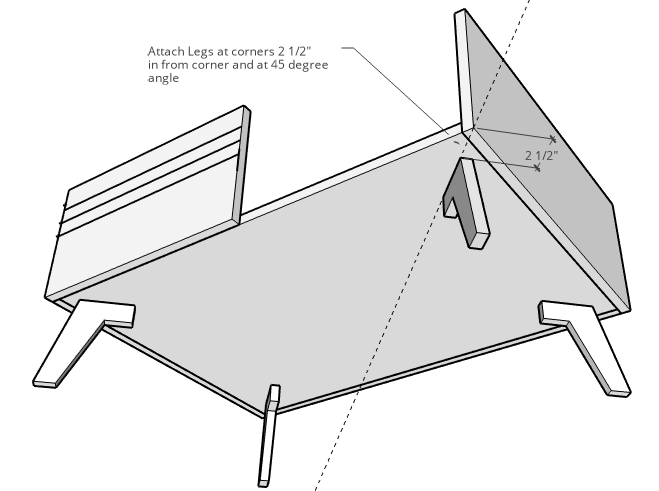
- Screw these legs into the bed box like shown. It’s helpful to use a square to line the leg up at a 45 degree angle on the bottom side, then use the square at the top to help you line up where to drive the screws.
- Predrill and drive two 2” wood screws per leg to attach. The video shows you how I did this for a better idea.
10Finish
- Finish the legs and dog bed box as desired. I used a water based clear coat poly.
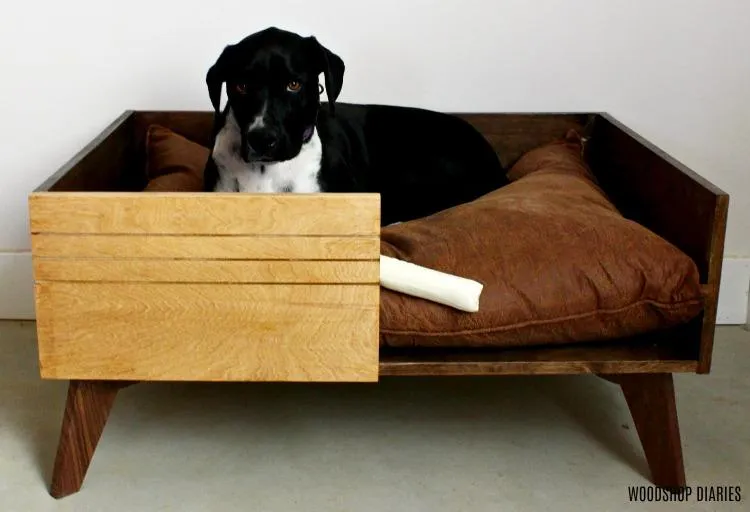
- Then, add your dog bed and your dog and you and your best friend are ready for a nap!
Tags
- Pets
- Beginner
Reviews & builds
No reviews yet
Sign in to review this plan or share your build.
No reviews yet. Be the first to build this.