Notch
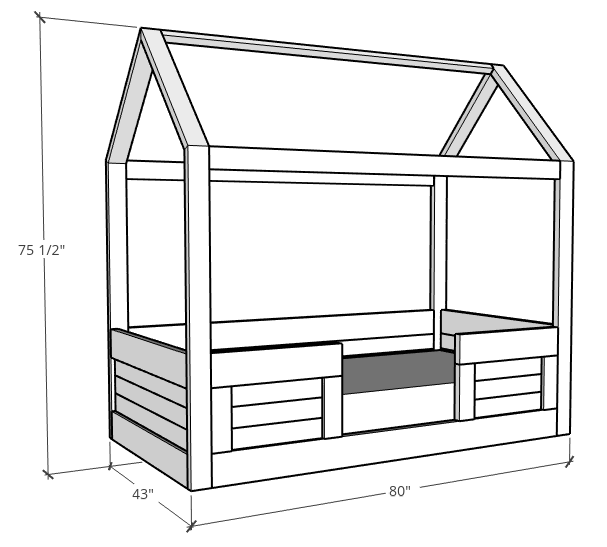
NotchDIY Kids House Bed
Step-by-step build — 17 steps. Also available as a print sheet.
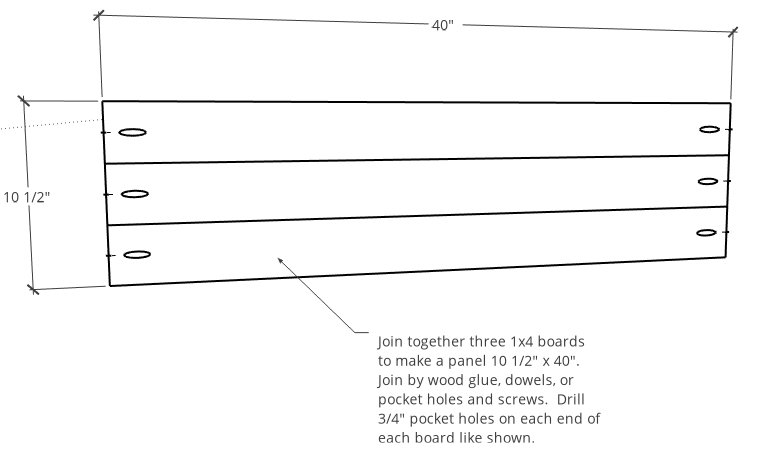
1Build Side Slat Panels
- Build TWO identical side panels like shown using 1x4 boards.
- Join using wood glue, biscuits, dowels, or pocket hole joinery. I just glued and clamped until dry.
- Once dry, drill ¾” pocket holes into each end of each board like shown.
2Assemble Side Panel Frames
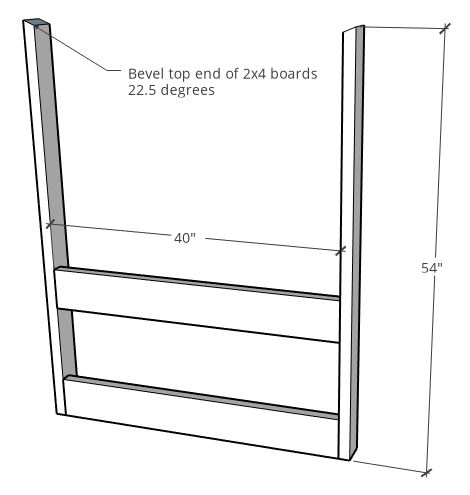
- Assemble TWO identical side panel frames like shown. Use 2x4 posts as the sides and 2x6s as the top and bottom.
- Bevel the top ends of the 2x4s at 22.5 degrees.
- Attach the 2x6s between the 2x4s using 1 ½” pocket holes and 2 ½” pocket hole screws.
- Attach so that there is 10 1/2" between the top and bottom 2x6 boards and so that they are flush along the outside of the 2x4s.
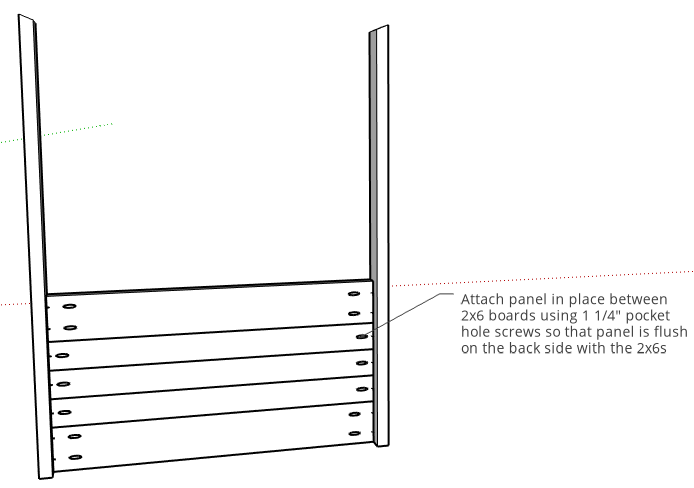
3Install Side Panels
Install side panels into side panel frame like shown. Attach flush to the back side of the 2x6s using 1 ¼” pocket hole screws.
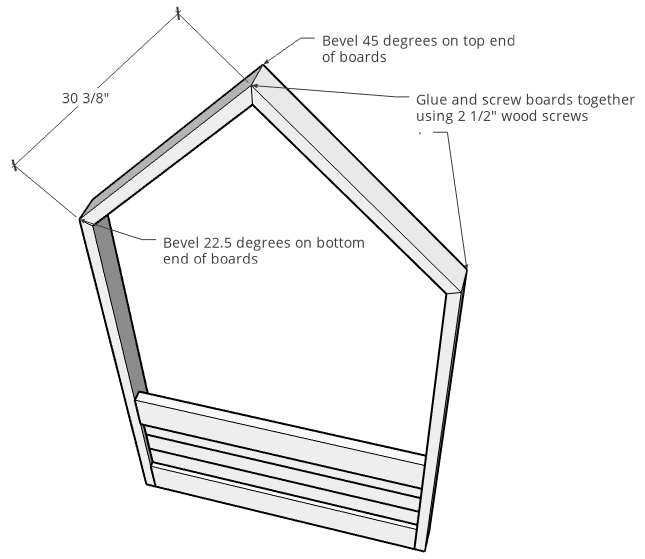
4Attach Roof Tops
- Cut 2x4s for the roof tops like shown.
- Bevel the top ends 45 degrees and the bottom ends 22.5 degrees.
- Attach at all joints using wood glue and 2 ½” wood screws. I found it easiest to attach the two boards together at the top peak using wood glue and 2 ½” wood screws.
- Then, attach the ends to the side panel posts using wood glue and 2 ½” wood screws. You can see this in the video in the extras tab.
5Build Front Slat Panels
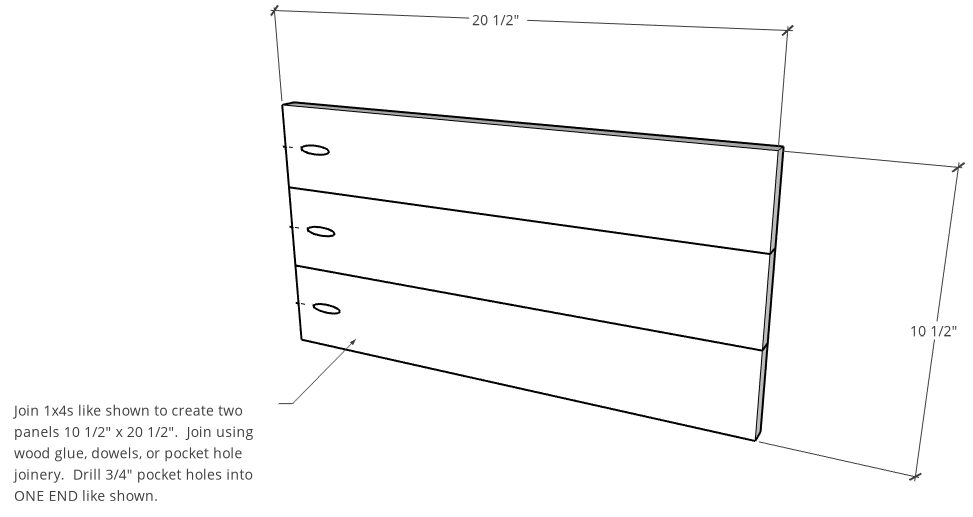
- Build two identical panels like shown.
- Glue (3) 1x4 boards together to create each panel. You could also join using biscuits, dowels, or pocket hole joinery. I just used wood glue and clamped until dry.
- Once dry, drill a ¾” pocket hole into each board only on one end.
6Assemble Front Panel Frame
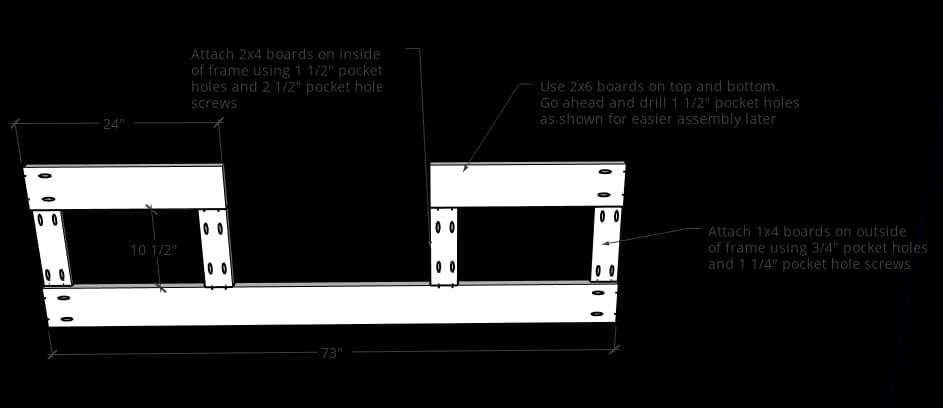
- Assemble the frame of the front panel like shown. Use a 2x6 on the bottom and for the two tops. Use 2x4s for the inside frame pieces and 1x4s on the outsides.
- Assemble with 1 ½” pocket holes and 2 ½” pocket hole screws on the 2x material and ¾” pocket holes and 1 ¼” pocket hole screws on the 1x4. Go ahead and drill 1 ½” pocket holes into the outside ends of the 2x6 boards like shown for easier assembly in a later step.
7Install Front Panels
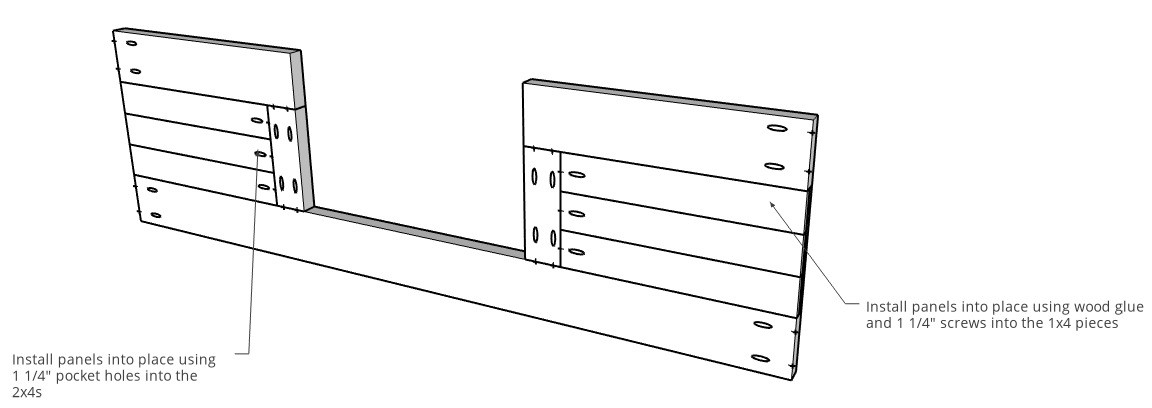
Install front panels into the front panel frame like shown. Use 1 ¼” pocket hole screws to attach to the side of the 2x4 board and use wood glue and brad nails or 1 ¼” screws to attach to the back of the 1x4 board.
8Build Back Slat Panel
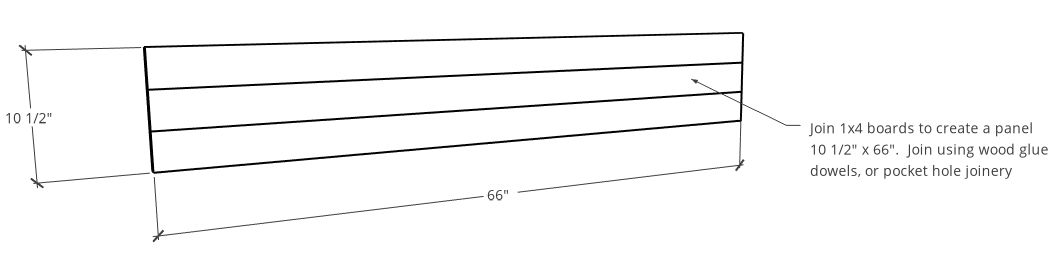
- Build a panel like shown using a 1x4 boards.
- Glue them together to create a solid panel just like step 2. Alternately, you can use dowels, biscuits, or pocket hole joinery here as well. I just glued and clamped until dry.
9Assemble Back Panel Frame
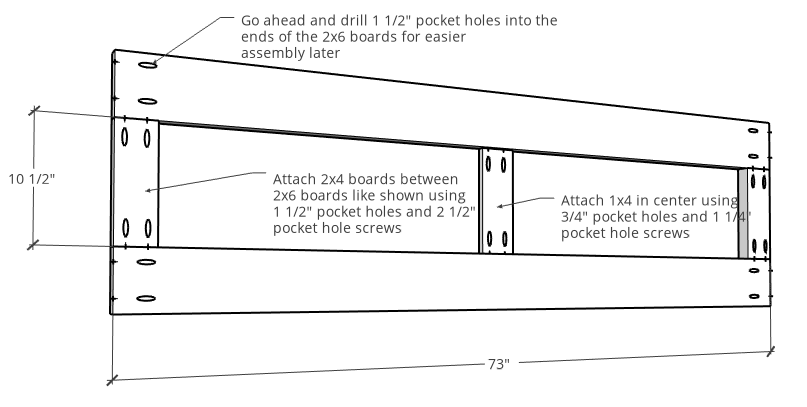
- Assemble the back panel frame like shown. Use 2x6s for the top and bottom, 2x4s for the sides and a 1x4s in the center.
- Attach the 1x4 in center (flush with outside of frame) using ¾” pocket holes and 1 ¼” pocket hole screws.
- Attach 2x4s on outside using 1 1/2" pocket holes and 2 1/2" pocket hole screws. Go ahead and drill 1 ½” pocket holes into the ends of the 2x6 boards for easier assembly in a later step.
10Install Back Panel
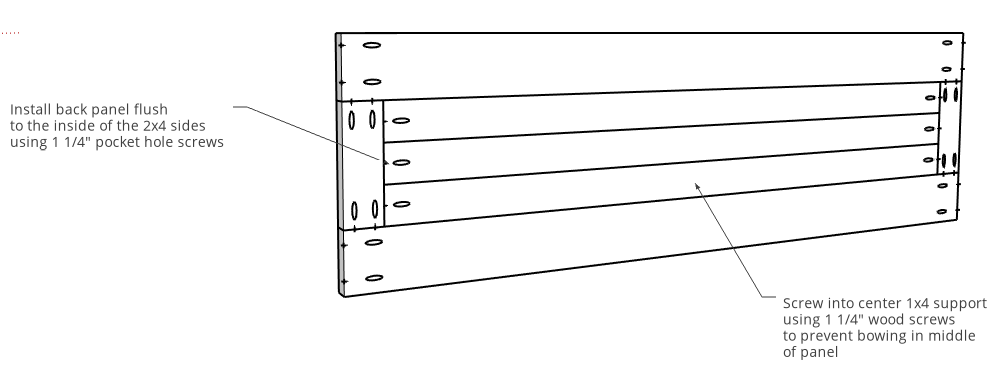
Install back panel into place in back panel frame using 1 ¼” pocket hole screws in the ends and 1 1/4" wood screws or brad nails into the center 1x4 like shown.
11Assemble Bed
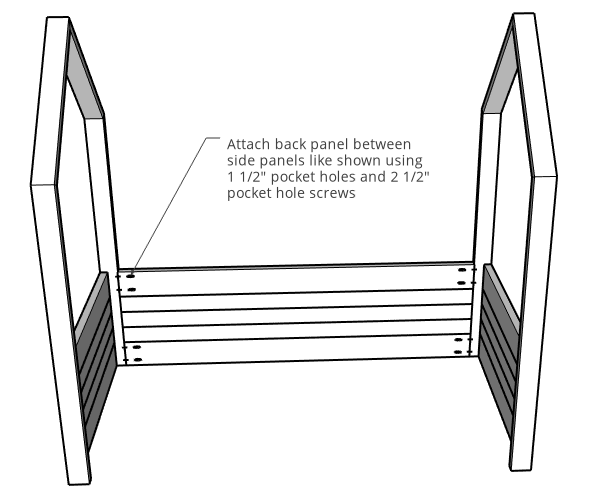
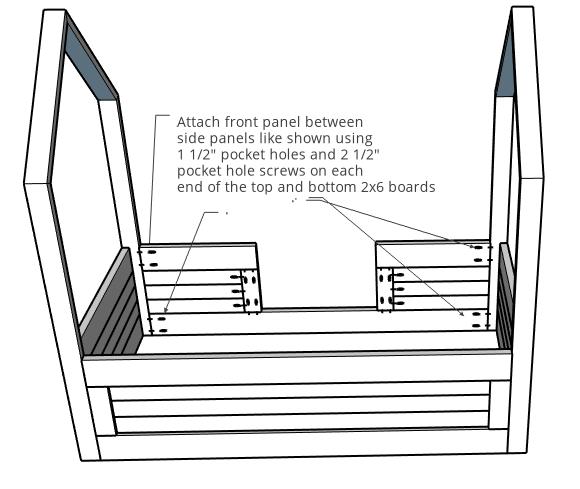
Now that you have two side panels, and a back and front panel, it’s time to move them where the bed will be set up and start putting them together. To assemble the bed together, attach the back panel between the two side panels like shown using 2 ½” pocket hole screws through the top and bottom 2x6 boards.
12Assemble Bed Cont.
Now, attach the front panel similarly using 2 ½” pocket hole screws through the 2x6 boards.
13Install Roof Roof Supports
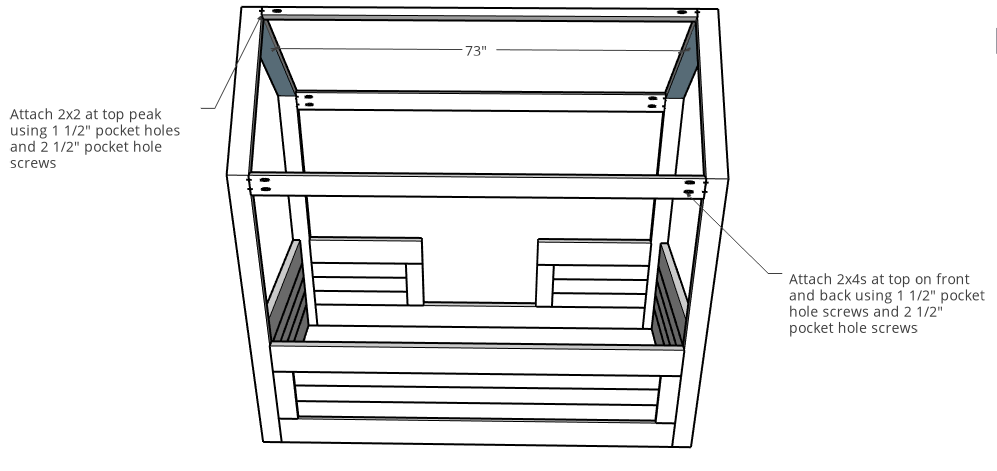
- Cut two 2x4s and one 2x2 board to 73” and drill 1 ½” pocket holes into the ends.
- Attach like shown using 2 ½” pocket hole screws. Exact placement of these isn’t crucial. You can place as high or as low as you wish.
14Attach Bed Slat Runners
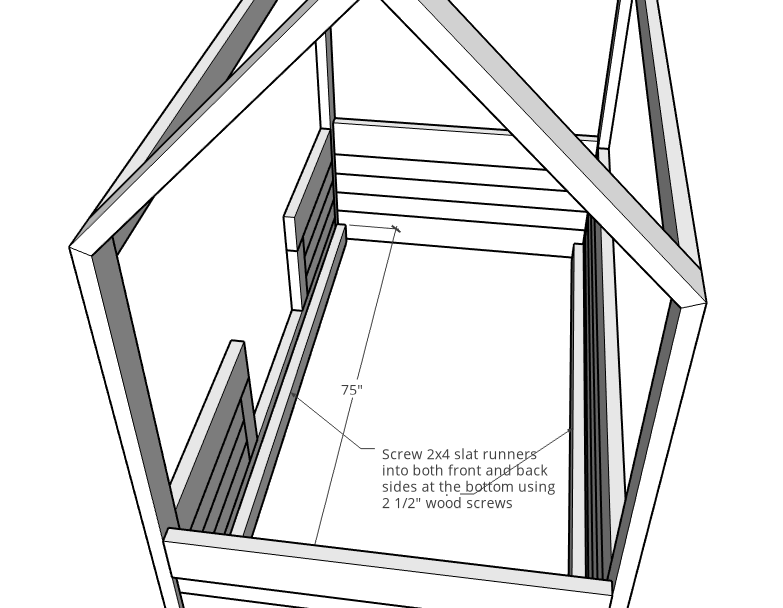
Cut two more 2x4s at about 75” long and screw into the bottom of the front and back panel using 2 ½” wood screws. These give somewhere to place the bed slats onto.
15Assemble Bed Slats
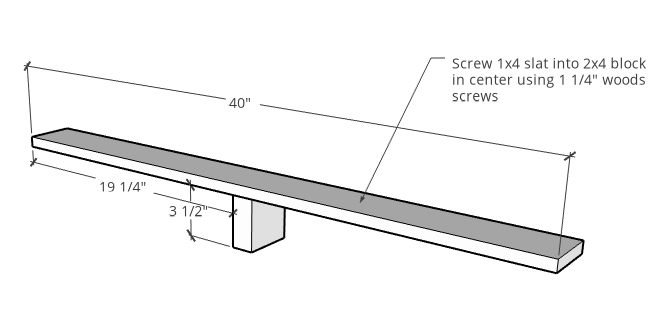
- Assemble nine bed slats (or more if you wish) like shown. Use a 2x4 block in the middle on the bottom to keep the slat from sagging.
- Attach 1x4 bed slat onto 2x4 block using 1 ¼” wood screws.
16Install Slats
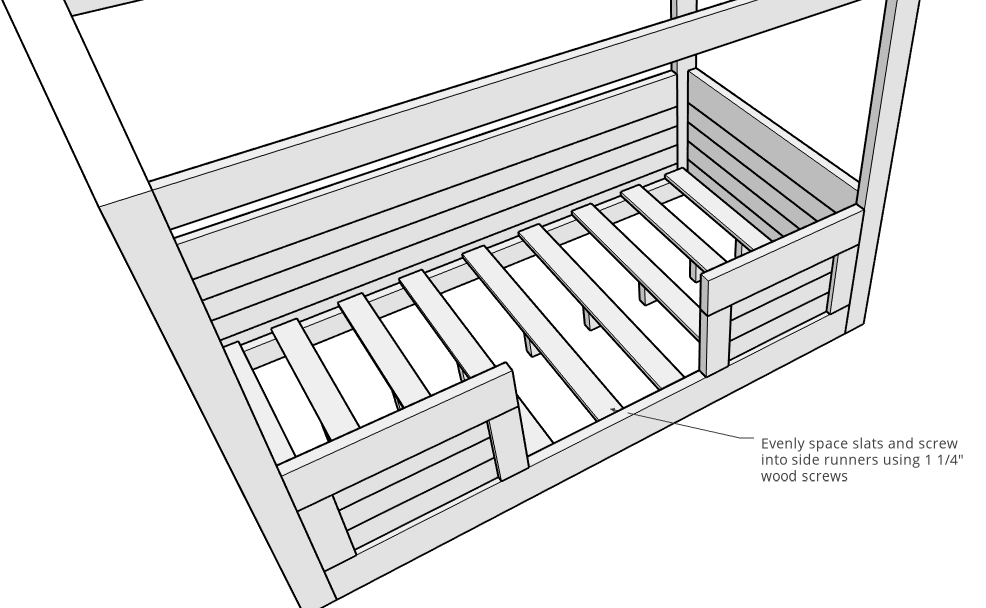
Evenly space bed slats out on runners from step 14. And screw them in place on the runners using 1 ¼” wood screws.
17Install Mattress
Place mattress on bed slats, add bedding, and take a nap