 Notch
Notch- Difficulty
- Intermediate
- Time
- 5–9.8 hours
- Cost
- $$$
About this build
This simple hope chest looks great as a Christmas tree box stand, but when the season is over, it can hold all your decorations so they are ready for next season! If you don't want to use it for seasonal decor, it also makes a great coffee table or entryway bench as well. Great plan for a beginner!
Tools
Essential
- Circular Saw
- Drill / Driver
- Miter Saw
- Pocket Hole Jig
- Random Orbit Sander
- Table Saw
Optional / nice to have
- Bar / Pipe Clamps
- Combination Square
- Tape Measure
Materials
| Item | Qty |
|---|---|
| Plywood, 3/4" Thick Quarter Sheet | 1 board |
| Board, 1x3 120" | 1 board |
| Board, 1x2 36" | 1 board |
| Board, 2x4 96" | 5 board |
| Board, 1x4 96" | 5 board |
| Board, 1x6 120" | 1 board |
| 2 1/2" Pocket Hole Screws | 56 each |
| 1 1/4" Pocket Hole Screws | 20 each |
| 1 1/4" Wood Screws | 62 each |
| Hinges to Attach Lid | 2 each |
| Chest Handles | 2 each |
| Chest Lid Latch | 1 each |
| Pair Soft Close mechanisms | 1 each |
Overall cost: $$$. Lumber prices vary by region, species, and season, so we give a band rather than a figure we would only be pretending to know.
Cut list
| Part | Qty | T × W × L |
|---|---|---|
| Long Frame Top and Bottom | 4 | 1" × 3" × 38" |
| Long Frame Sides | 4 | 1" × 3" × 11" |
| Short Frame Top and Bottom | 4 | 1" × 3" × 15" |
| Short Frame Sides | 4 | 1" × 2" × 11" |
| Plywood Bottom | 1 | 3/4" × 15" × 35" |
| Side Panel Slats | 28 | 3/4" × 3" × 15" |
| Long Lid Frame Pieces | 2 | 1" × 3" × 38" |
| Short Lid Frame Pieces | 2 | 1" × 3" × 15" |
| Short Inside Lid Frame | 2 | 3/4" × 2" × 15" |
| Long Inside Lid Frame | 2 | 3/4" × 2" × 33" |
| Lid Middle Supports | 2 | 3/4" × 1" × 14" |
| Lid Slats | 2 | 3/4" × 5" × 35" |
| Lid Slat | 1 | 3/4" × 4" × 35" |
What to buy
Buy 16 boards at 8 ft.
1" × 3"
4 boards
1" × 2"
1 board
3/4" × 15"
1 board
3/4" × 5"
1 board
3/4" × 4"
1 board
3/4" × 3"
5 boards
3/4" × 2"
2 boards
3/4" × 1"
1 board
Assumes 8 ft stock, a 1/8" saw kerf, and buying each part at its own width. Change the board size or kerf on the full board plan →
Instructions
1Build Short Frames
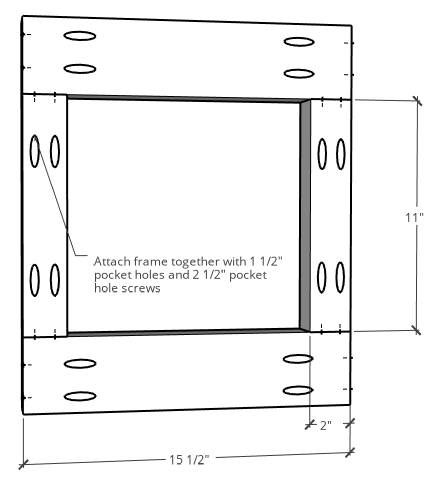
- Cut pieces according to the cut list to assemble the short side frames—so two pair of: two 2x4s @ 15 ½” and two 2x4s @ 11” and ripped to 2” wide. Side note: if you don’t have a table saw to rip these to 2”, that’s totally fine. You can use as a standard 2x4 instead OR you can also replace this with a 2x2 as well. The only reason I ripped these to 2” is just to make the corner pieces the same width on both sides. It doesn’t affect the overall design.
- Drill 1 ½” pocket holes using a Kreg Jig into the ends of all these pieces.
- Assemble like shown using 2 ½” pocket hole screws.
2Build Front and Back Frames
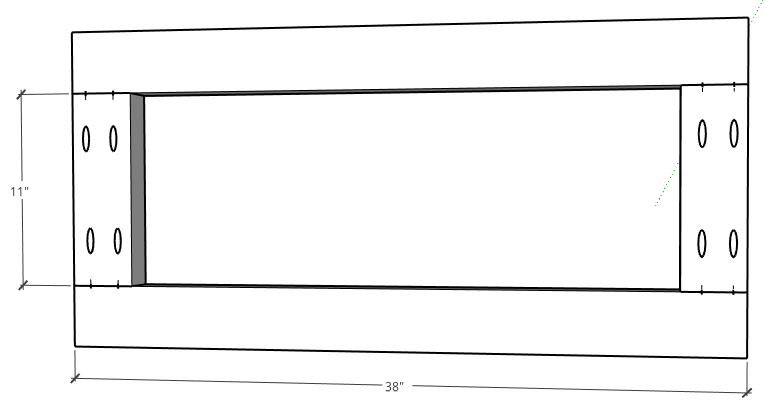
Similarly, build two long frames by cutting the long frame pieces according to the cut list and drilling 1 ½” pocket holes into the ends of the 11” long pieces and assemble like shown with 2 ½” pocket hole screws.
3Assemble Box Frame
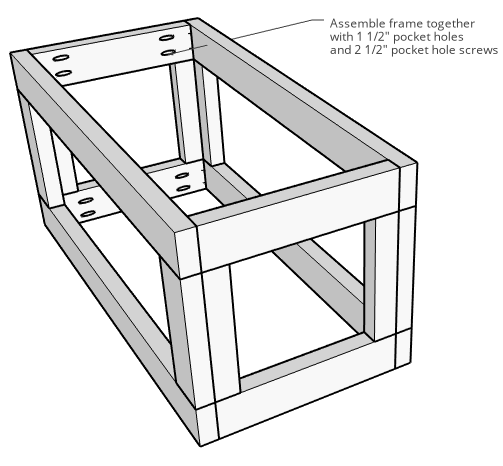
Now, it’s time to put all the side frames together to build the box frame. Using 2 ½” pocket hole screws through the short frame ends like shown, assemble the box.
4Attach Bottom
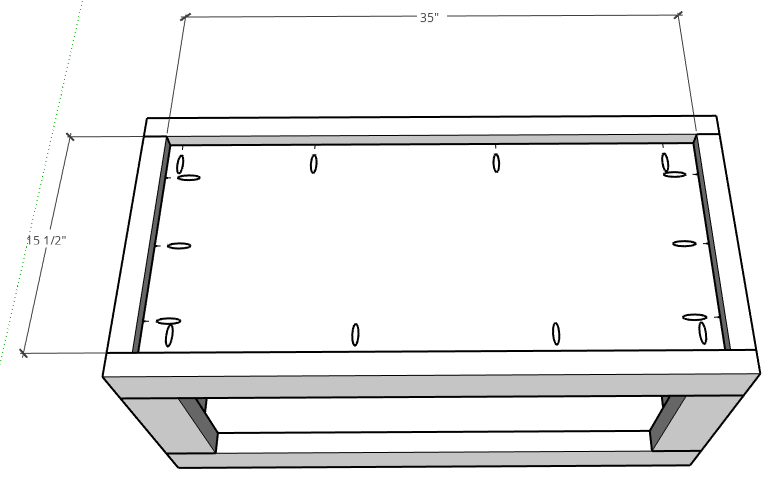
Cut the bottom of the box according to the cut list from ¾” plywood and drill ¾” pocket holes along the edges using a Kreg pocket hole jig. Insert the bottom into the box frame like shown so that it is about 1” from the bottom edge and attach using 1 ¼” pocket hole screws through the pocket holes like shown.
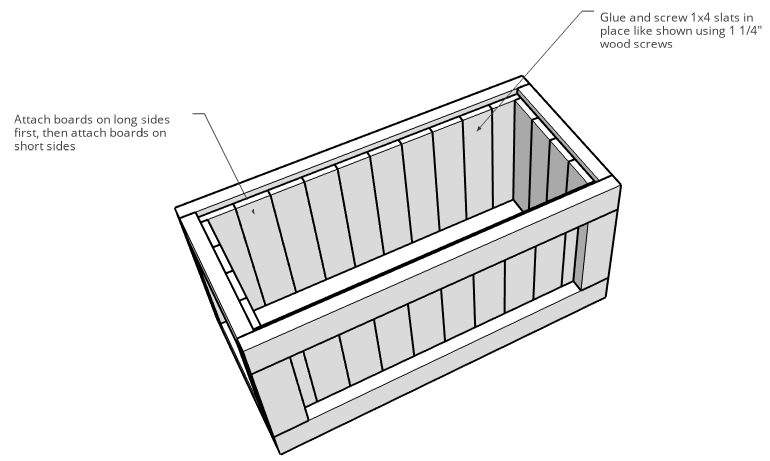
5Add Side Slats
- Now things start to take some shape.
- Cut pieces for the side slats according to the cut list.
- Place these slats in the front and back first, then work on the sides.
- Glue and screw these slats in place at the top and bottom using 1 ¼” wood screws. NOTE: Place these slats up against the bottom of the box. There will be about a ¾” “lip” along the top of these boards. THAT IS OKAY.
6Build Lid Outside Frame
- Now that the box is together, it’s time to work on the top.
- Now, the lid is optional. Remember the ¾” lip along the top of the box from step 5? If desired, glue some foam on a piece of ¾” plywood and cover it with fabric and place on that lip for an easily removable upholstered lid. OR, proceed with this wooden lid instead.
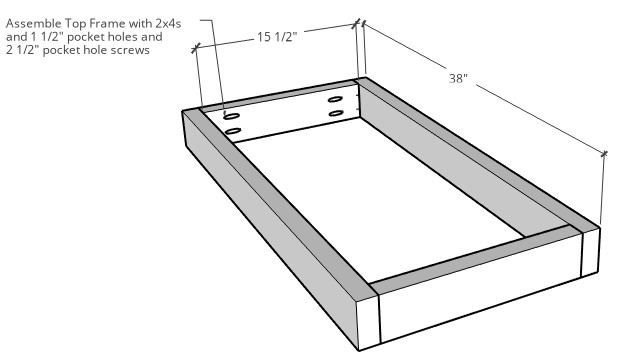
- Assemble a frame like shown from 2x4s using 1 ½” pocket holes and 2 ½” pocket hole screws. This should be the exact same size as your box.
7Attach Lid Inside Frame
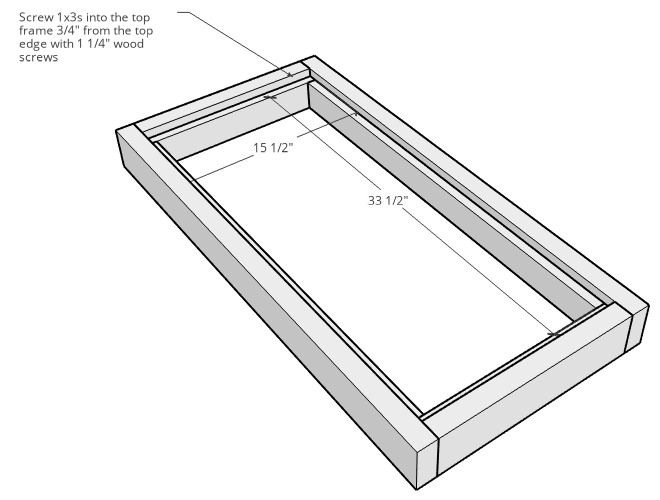
Cut and screw “inside liner” pieces cut from a 1x3 along the inside of this frame leaving a ¾” lip along the top. Screw these 1x3 boards in place using 1 ¼” wood screws.
8Attach Lid Frame Supports
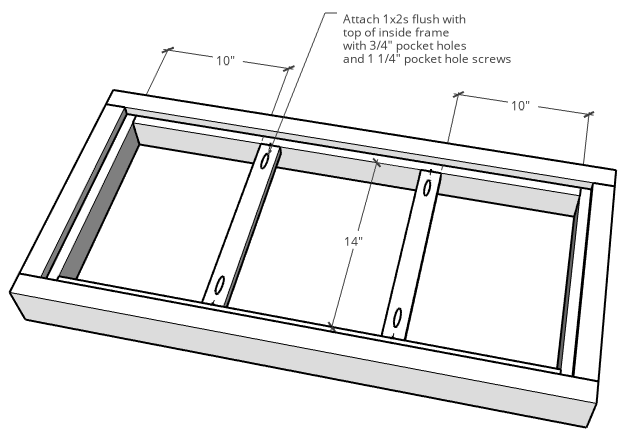
Attach two 1x2s like shown into the frame keeping it flush to the top of the INSIDE boards. If you didn’t want to buy a 1x2 for this, you can use any kind of scraps instead. It’s just to help hold the lid slats together.
9Add Top Slats
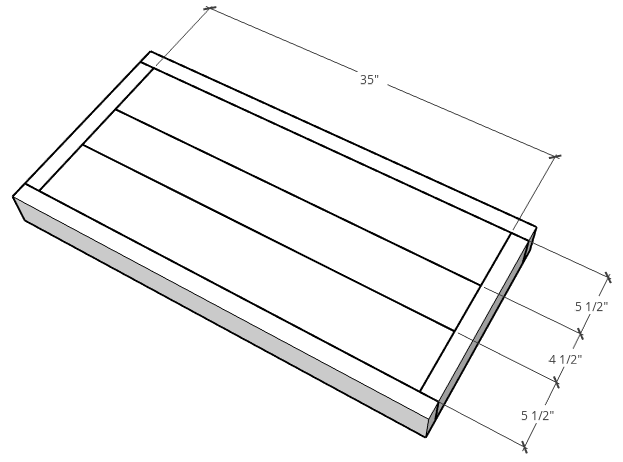
- Cut three pieces of 1x6 to 35” long and rip one piece to 4 ½” wide.
- Apply wood glue along the inside lip of the lid and along the middle supports.
- Place these slats on this lip and screw securely in place through the boards from step 8 on the underside using 1 ¼” wood screws.
10Finish
Allow the glue to dry completely on the lid slats, then sand well and finish as desired. As an optional step, install chest handles, a latch, etc.
11Attach Lid
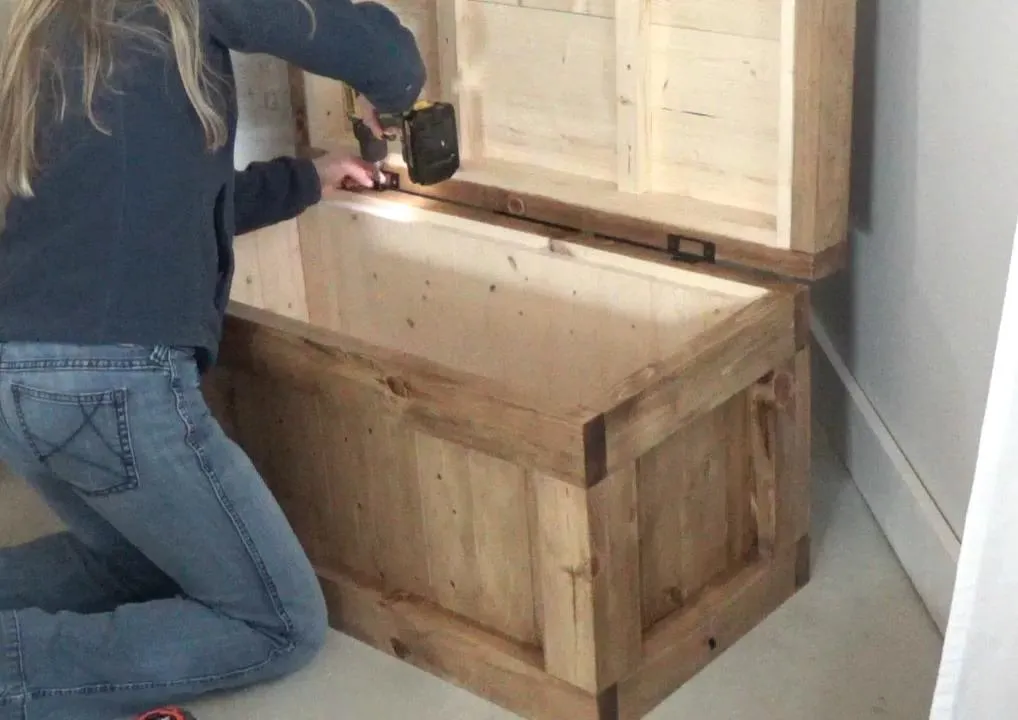
Install lid to box using some heavy duty hinges like shown. You could also use a piano hinge as well. And if desired, add a soft close mechanism to prevent smashed fingers. Links to the exact hardware shown can be found at the link in the extras tab.
12Use as Desired
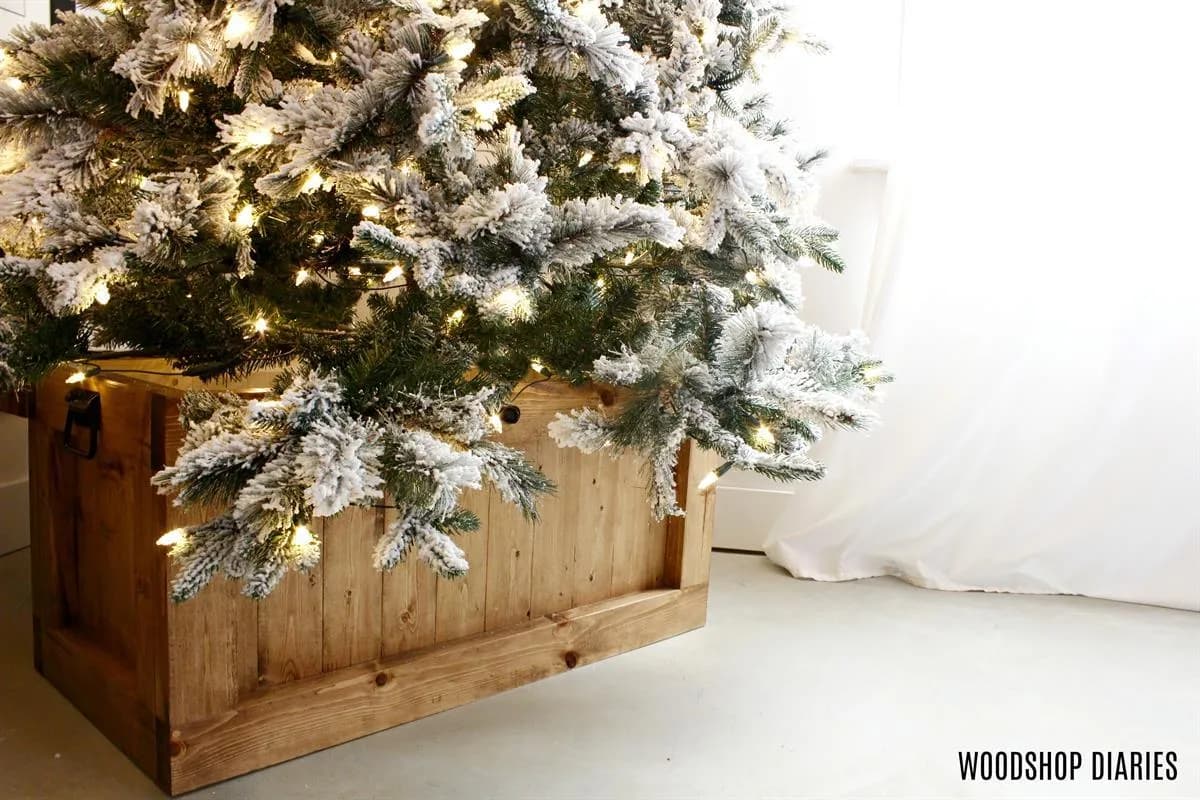
This hope chest makes an excellent Christmas tree box stand and once the holidays are over, it’s a great place to store your decorations so everything is ready again for next year! To open the lid all the way for the tree to be placed inside, simply “unhook” one end of the soft close mechanisms and open all the way. Then hook it back once you’re ready to use it as a chest again. (See video) This makes a great coffee table, end of bed storage, or entry way bench when not serving as a tree stand.
Tags
- Bedroom
- Intermediate
Reviews & builds
No reviews yet
Sign in to review this plan or share your build.
No reviews yet. Be the first to build this.