 Notch
Notch- Difficulty
- Advanced
- Time
- 6–11.8 hours
- Cost
- $$$
About this build
Build a bear - just kidding. Build a bed!
Tools
Essential
- Circular Saw
- Drill / Driver
- Impact Driver
- Pocket Hole Jig
- Random Orbit Sander
Optional / nice to have
- Level
- Speed Square
Materials
| Item | Qty |
|---|---|
| Wood of your choice, 1x6x7 | 3 board |
| Wood of your choice, 1x4x7 You may need 7 or 8 of these | 7 board |
| Wood of your choice, 1x3x8 | 1 board |
| Wood of your choice, 1x2x7 | 2 board |
| Wood of your choice, 3x3x6 | 2 board |
| Box of 1 ¼” Kreg Pocket Hole Screws (See tools list) | 1 each |
| Box of 1 ½”-2” Kreg Pocket Hole Screws (See tools list) | 1 each |
| Set of non-mortise brackets | 1 each |
| Pair of safety glasses / personal protective equipment | 1 each |
| Sandpaper | 1 each |
| Finish of your choice (water based polyurethane, oil or furniture butter, etc.) | 1 each |
| Set of non-mortise brackets (see Extras) | 1 each |
Overall cost: $$$. Lumber prices vary by region, species, and season, so we give a band rather than a figure we would only be pretending to know.
Cut list
| Part | Qty | T × W × L |
|---|---|---|
| A. Headboard posts | 2 | 3" × 3" × 4" |
| B. Headboard rails | 2 | 3/4" × 3 1/2" × 8" |
| C. Headboard stiles | 9 | 3/4" × 2 1/2" × 10" |
| D. Footboard posts | 2 | 3" × 3" × 4" |
| E. Footboard rail | 1 | 3/4" × 5 1/2" × 8" |
| F. Bed rails | 2 | 3/4" × 5 1/2" × 75" |
| G. Slat support rails | 2 | 3/4" × 1 1/2" × 72" |
| H. Headboard cap | 1 | 3/4" × 3 1/2" × 43" |
| I. Mattress support slats | 12 | 3/4" × 3 1/2" × 8" |
What to buy
Buy 8 boards at 8 ft.
3" × 3"
1 board
3/4" × 5 1/2"
2 boards
3/4" × 3 1/2"
2 boards
3/4" × 2 1/2"
1 board
3/4" × 1 1/2"
2 boards
Assumes 8 ft stock, a 1/8" saw kerf, and buying each part at its own width. Change the board size or kerf on the full board plan →
Instructions
1Tips to think about before you start:
- Remember that wood is labeled with its “nominal” dimension in the store, similar to how I have it listed above. Actual dimensions will be ¾”x5.5” for a 1x6, for example. The last number, how many feet long a board is, remains the same. - Using a stop block can allow you to make the same cut over and over again without having to keep measuring it out each time (see photo at miter saw) - It’s nice to cut all the parts in advance and then assemble but I would wait to cut your mattress support slats until the very end to confirm the width they ought to be. - Check out the wood you are using before you start and mark what sides you want to be your presentation face. Sometimes a knot or imperfection in the wood can make or break the overlook of your project depending on if you are going for a clean or rustic look. Pocket holes will be going on the backside of your wood so this is key in making sure you don’t accidentally drill into the nicer appearance face. - Consider utilizing a 45-degree miter cut on the bottom ends of your bed posts to make them look slightly less chunky and a little more finished. - Think about what type of reveal you want your bed rails to have. I went with ¾” and this basically means choosing how much you want to inset your rails and bed parts in on the posts rather than them being “flush” with one another. You’ll see what I mean in the photos. - If working with a dense hardwood like hickory or oak, utilizing a wax on your pocket hole screws can make it easier to drive them into the wood. Be careful with this though because your hands will inevitably get wax on them and if you then get waxy prints on the wood, it could get into the grain and prevent a stain from penetrating there. You can always sand it off before you finish if you do this on accident. Don’t ask how I know. ? - Try to wipe off any glue squeeze out that may happen before it hardens. - Rails are pieces that go horizontally. Stiles are pieces that go vertically. - Be sure to confirm you have a standard twin mattress for these dimensions – a twin XL would require it to be bigger.
2Cut
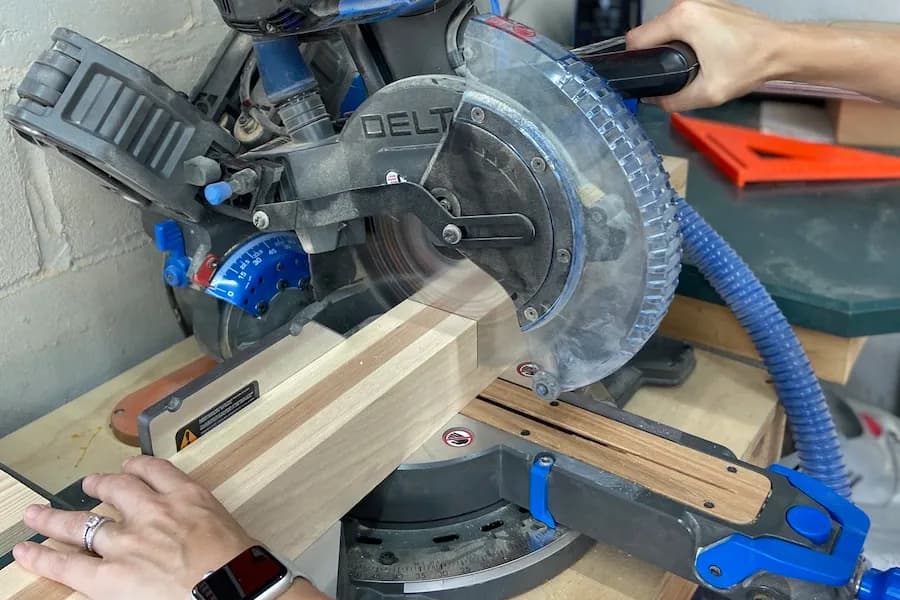
Make all your cuts from the cut list, saving the mattress support slats as the last step after the bed is assembled. I used my miter saw but a circular saw could also be used.
- Tip: This is the time to cut bevels on the bottoms of your bed posts if you want that look.
- Set your miter saw to 45 and take off small amounts until you decide how much you want to remove.
- Once you get it how you like it, draw a pencil mark on the throat plate of your miter saw and use that as your mark for where the end of your post goes to continue to make the rest of the 45 degree miter cuts as you rotate the post.
3Test Fit
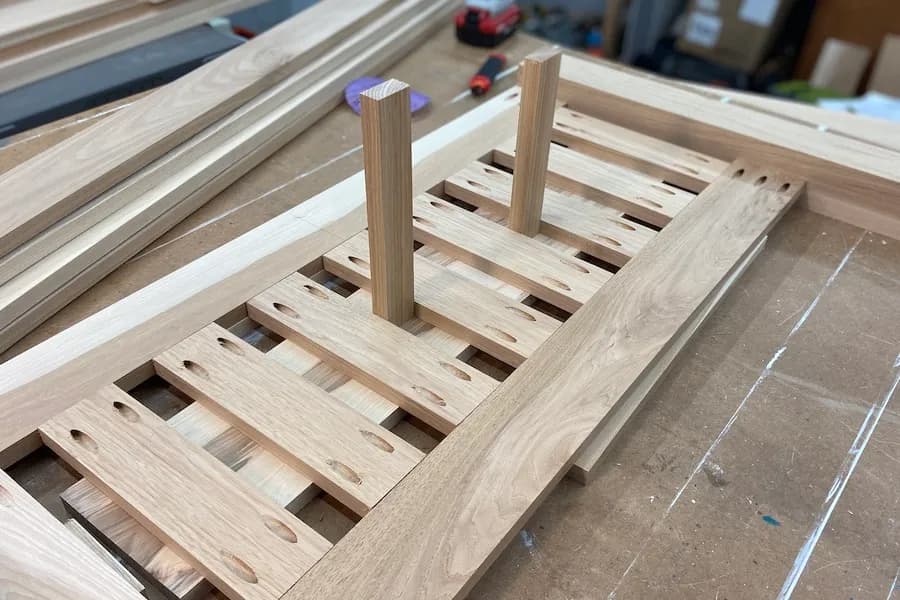
Do a dry/test fit of the headboard (Parts A, B, C). This is the main feature of the bed and it’s a good idea to do a dry fit (no glue yet) of the components before you go any further to ensure your cuts were accurate. You can also use this opportunity to find the center of your headboard rails (B) for spacing out the headboard stiles (C) evenly – if you place one stile centered with the rail, you can then use a scrap of 1x2 as a spacer to evenly place the rest of the boards.
4Pocket Hole Time
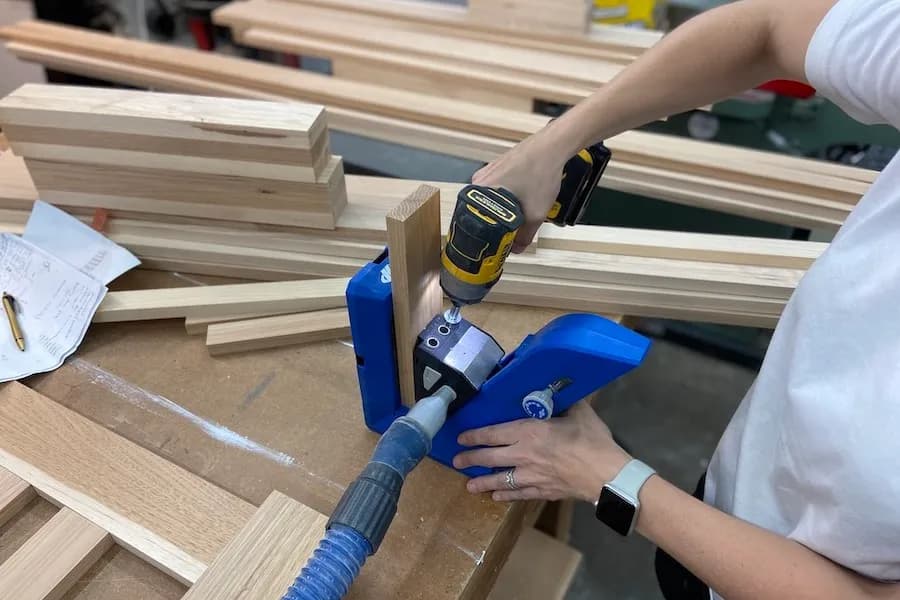
Use the 720 Pro Kreg Pocket Hole Jig to drill 2 pocket holes on each end of the 9 headboard stiles (C). Drill 3 pocket holes on each end of the headboard rails (B). Remember, be sure to select which sides of the components you would like to be the appearance face so that you drill into the backside.
Tip: Make sure your bit has the stop collar set at the ¾” mark using the onboard hex wrench.
5Headboard assembly - part 1
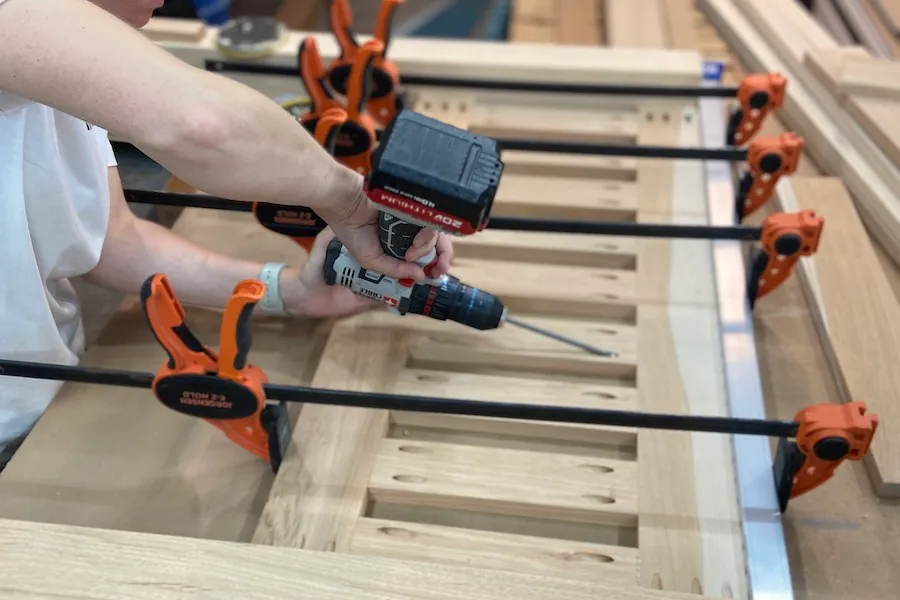
Lay everything out with pocket holes up, utilizing clamps to hold your posts (A) in place so that they do not push away when you begin to fasten your rails (B) to them. Be sure to use glue on all your joints as it is the combination of glue and the screw that make pocket holes a strong joint.
6Headboard Assembly - part 2
Attach the headboard cap (H) with a small amount of wood glue and clamp it in place. I used an 18g brad nail, 1 in each bed post, to pin it in place while I applied clamps to let the glue do the real work of keeping it in place. Clamps need to stay on this part until the glue cures based on the instructions on the glue you are using.
Tip: Wax is a helpful trick to get the screws to go in more easily if using hardwoods.
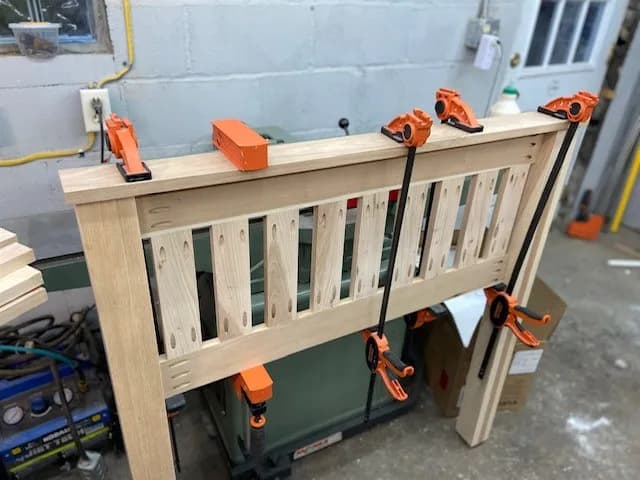
7Footboard Assembly
Repeat the same process as above, except use 4 pocket holes on each end of the footboard rail (E). This will seem super easy after you have done the headboard!
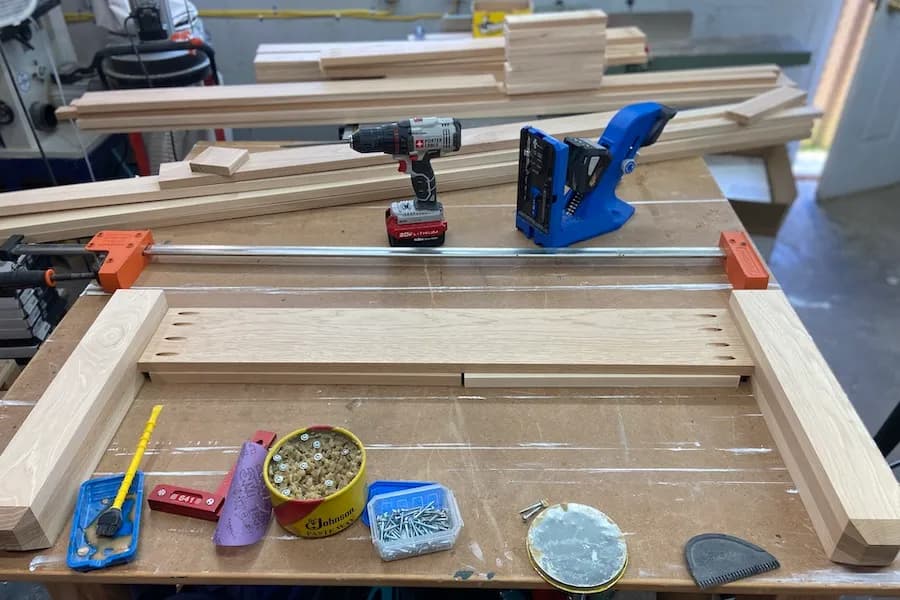
8Attaching Hardware to Footboard
On the footboard, the female end of the bracket needs to be flush with the top of the bedpost (D) and then you can use ¾” scrap pieces to simulate a reveal as well as the bed rail itself; just be sure to keep the male part of the bracket attached for this part as well to get the correct spacing. once the female end is attached you will pull away the scrap pieces and see that it causes the male side to need to be about 1/8” offset from the end of the bed rail (F).
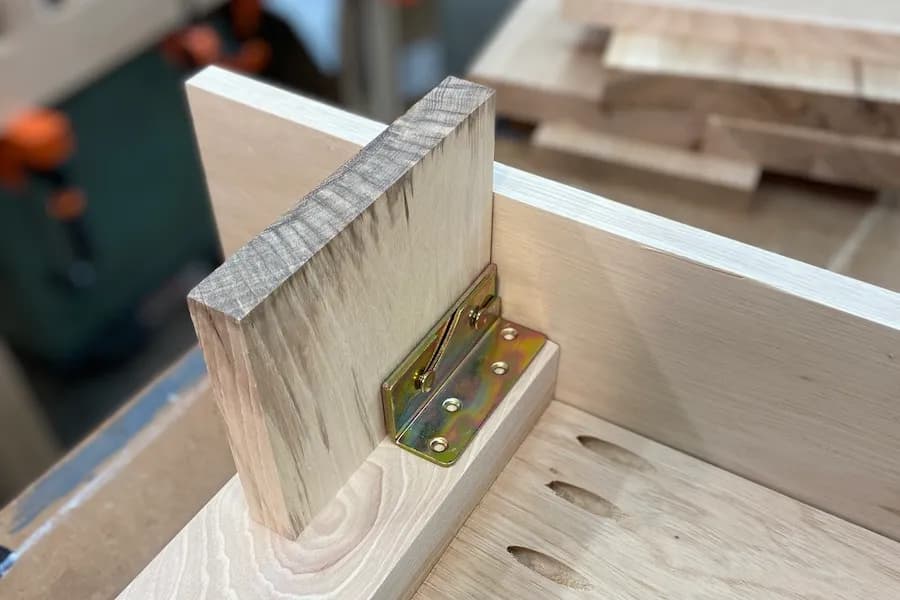
9Attaching Hardware to Headboard:
Measure up from the bottom 18” to set the appropriate height for your brackets to correspond with your 18” foot posts and fasten hardware in the same manner as the previous step.
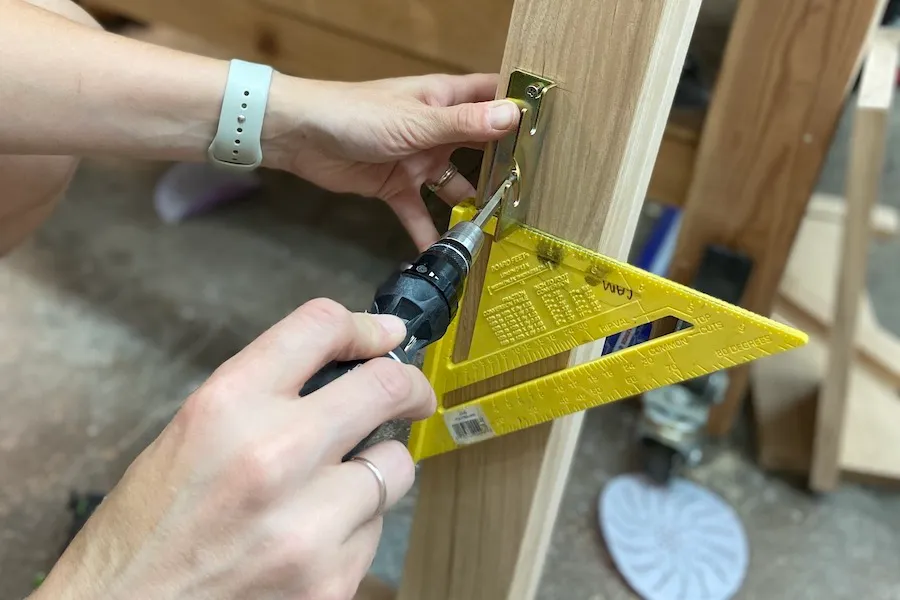
10Attaching Bed Slat Supports (G)
Lay the bed rails (F) down and use a 1x3 scrap from the headboard stile (C) components to act as a spacer at the top of the bed rail and then place your 1x2 slat support beneath that. This will allow for your ¾” thick mattress support slats to rest on the 1x2 piece, give your mattress 1 ¾” to nestle into the bed frame and overlap a little bit of the bottom of the headboard rail. Pre-drill these holes to avoid cracking your 1x2 slat support (G) piece and attach it to the bed rail. I just eye-balled a screw in the center, checked it for level, and then spaced screws apart by about 12” the rest of the way down the 1x2.
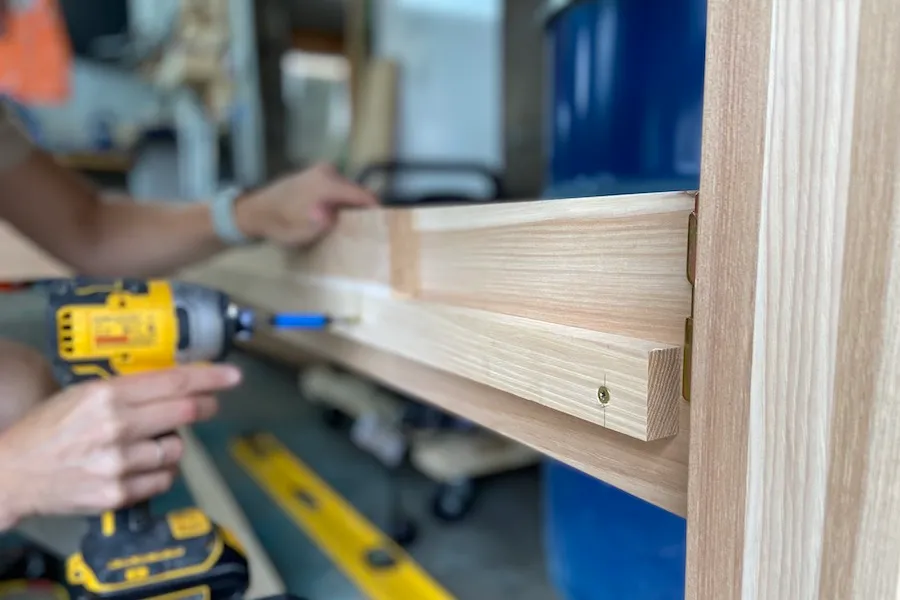
11Bed Slats
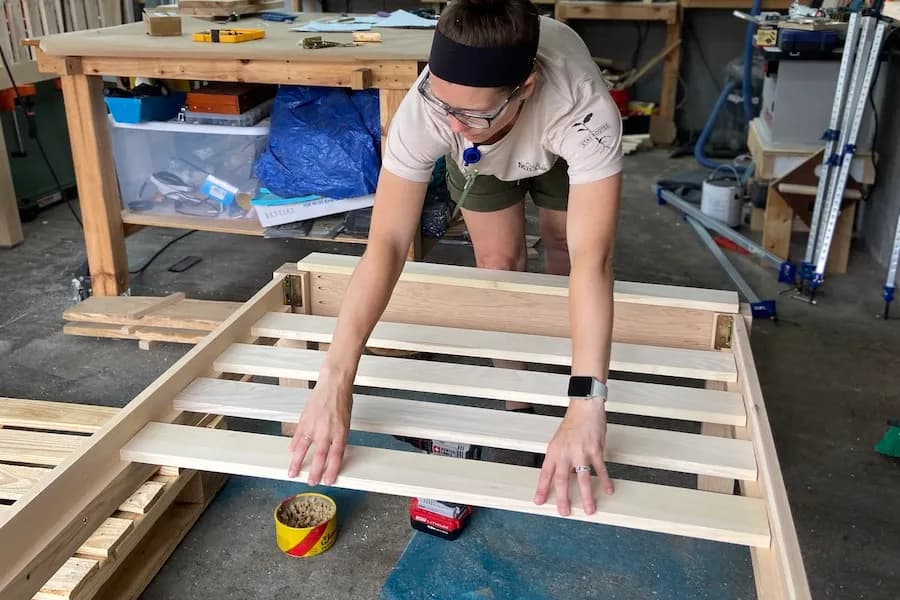
- Assemble your bed and double check the width between the bed rails to get the exact width you need for your bed slats (I). Mine was 38 7/8”.
- Cut them to length and test them out!
12Touch Ups
- Take this opportunity to do any sanding/softening of rough edges. I just eased my edges with 150 grit because I used S4S lumber from Baird Brothers Fine Hardwoods that was already finish sanded to 180 on the appearance face. It costs a little bit more when purchasing lumber stock this way but the amount of time it saves you is totally worth the added cost and you get quality stock to work with.
- Add your finish of choice to your new twin bed and celebrate, you weekend warrior, you!
Tags
- Bedroom
- Advanced
Reviews & builds
No reviews yet
Sign in to review this plan or share your build.
No reviews yet. Be the first to build this.