 Notch
NotchCoffee Table
Step-by-step build — 9 steps. Also available as a print sheet.
1Cut the Top to Rough Size
Cut the Top to rough size from 3/4" oak veneer plywood, as shown in the cutting diagram. You can just cut it rectangular for now.
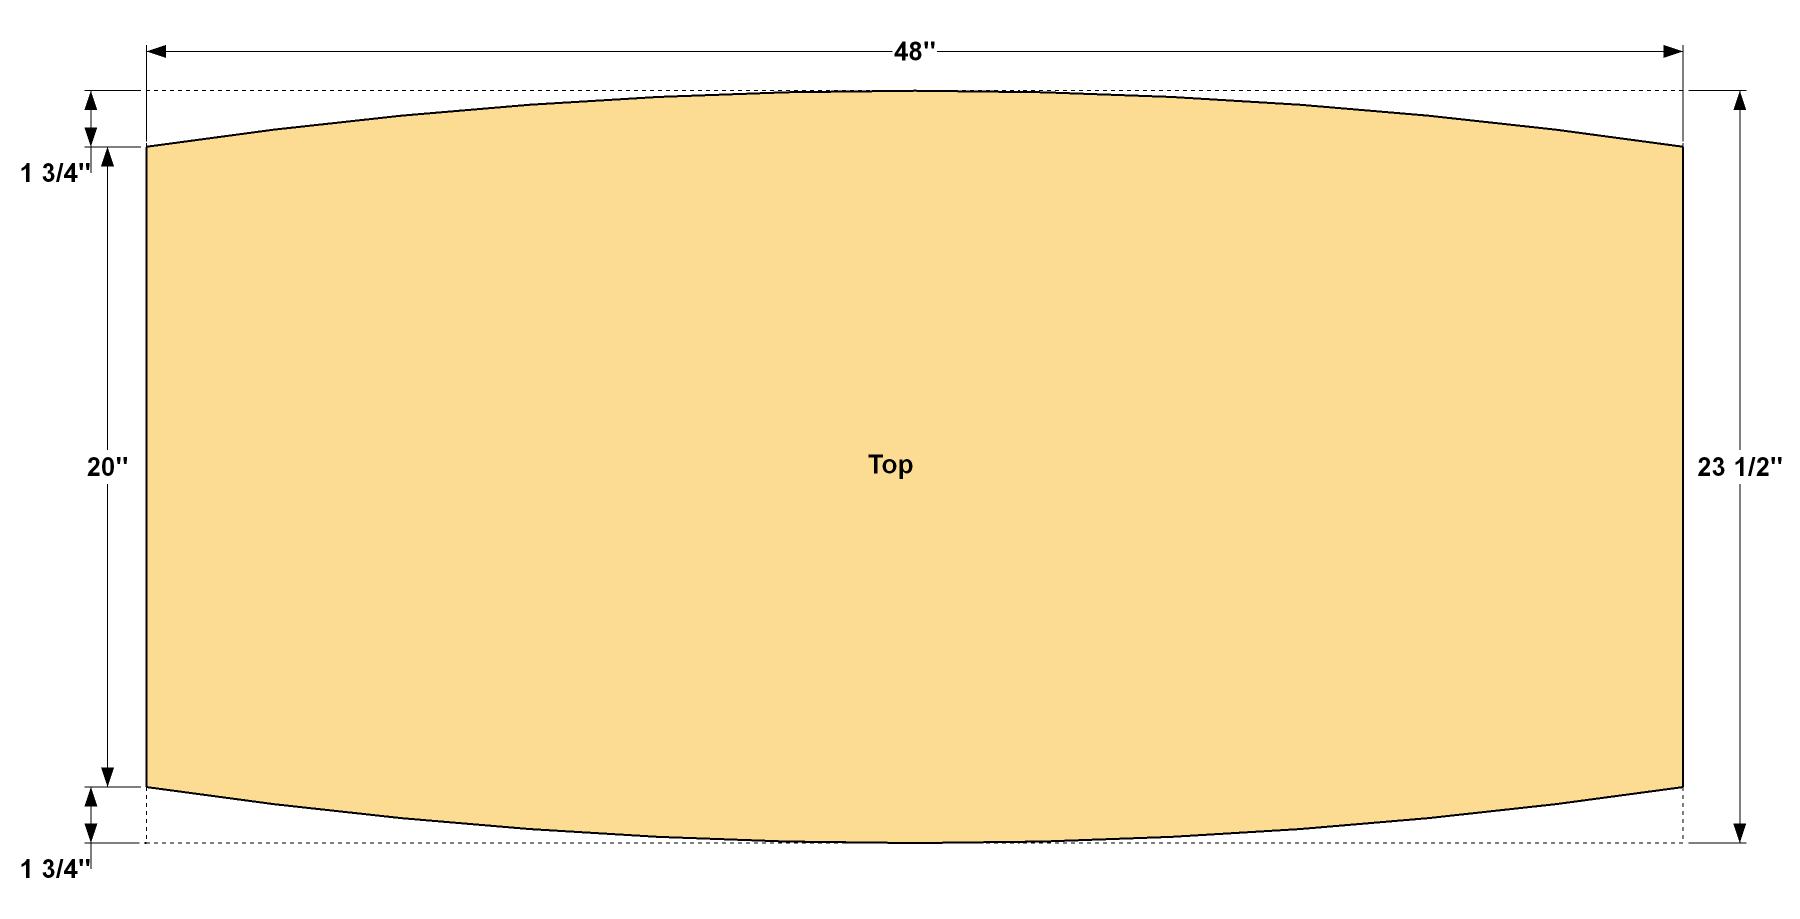
2Lay Out and Cut the Curves
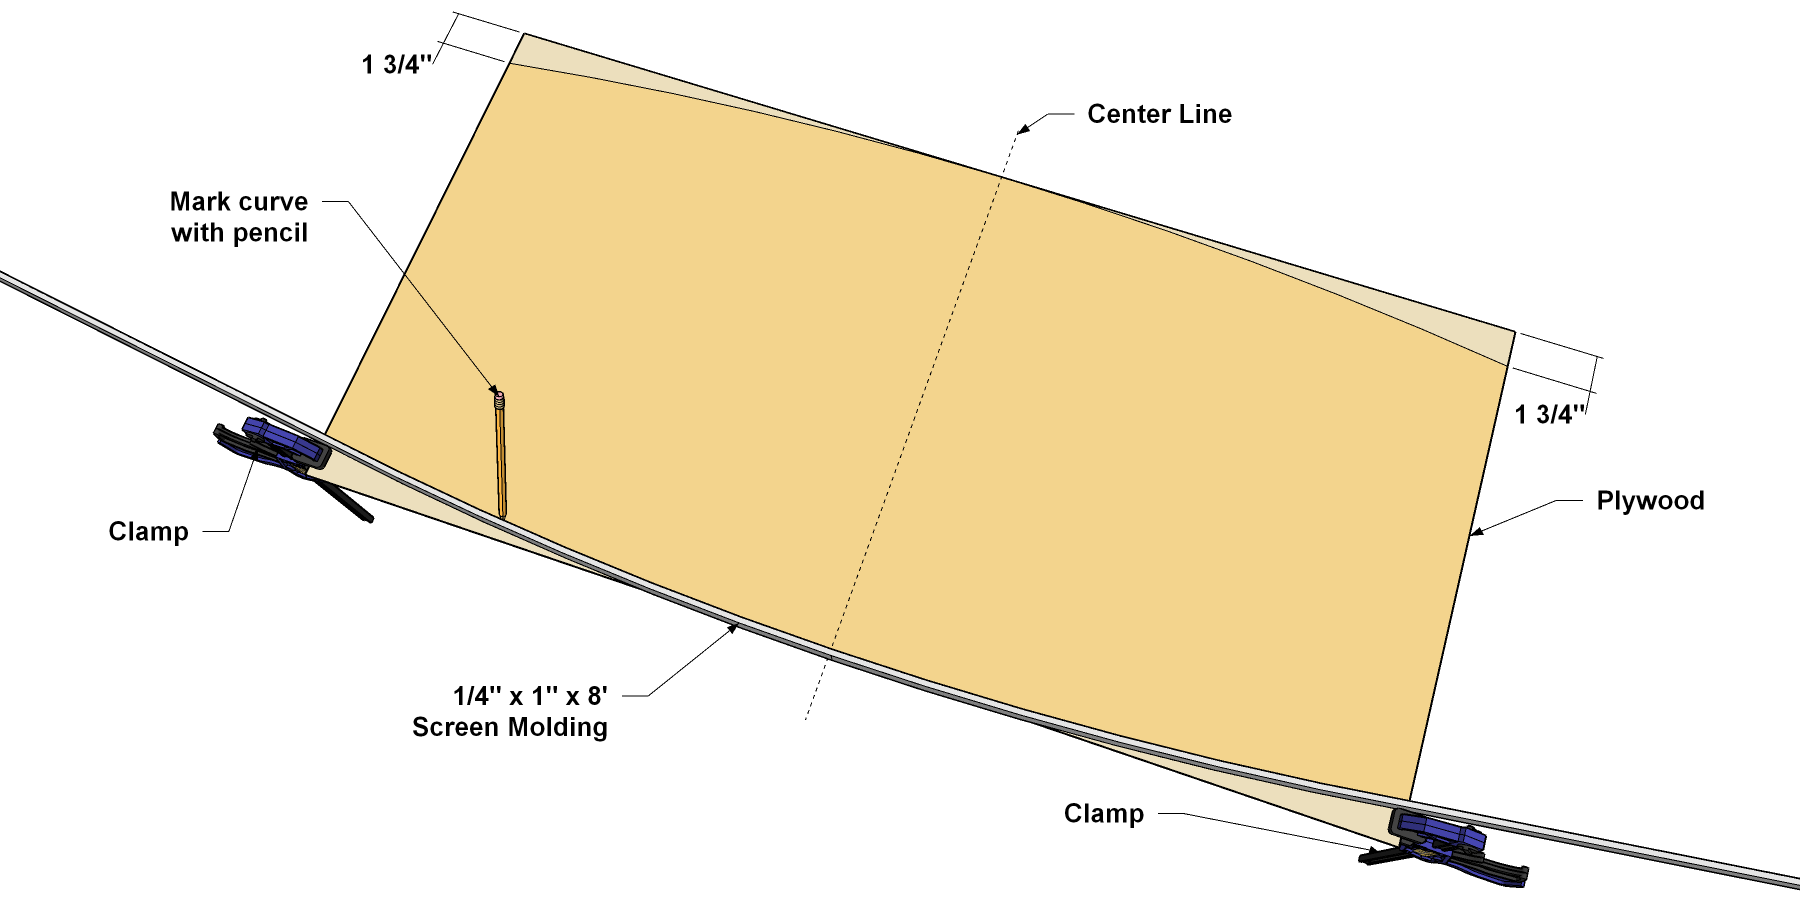
- Next, you can lay out the curved sides. To do that, simply use a couple of clamps, an 8’ piece of screen molding, and a pencil.
- Mark the center line of the plywood and the location of the narrow part of the curve along the short ends.
- Set the screen molding on the mark and then place the clamps on the outside of the molding piece as shown. Flex the screen molding at the center line and extend it to the edge of the plywood co create the curve. You may need to adjust the clamp locations slightly to set the curve in the right position. Do this for both sides of the Top.
- Then cut the arches out with a jigsaw with a fine-tooth blade.
- Sand the curved edges smooth.
3Make the Shelf
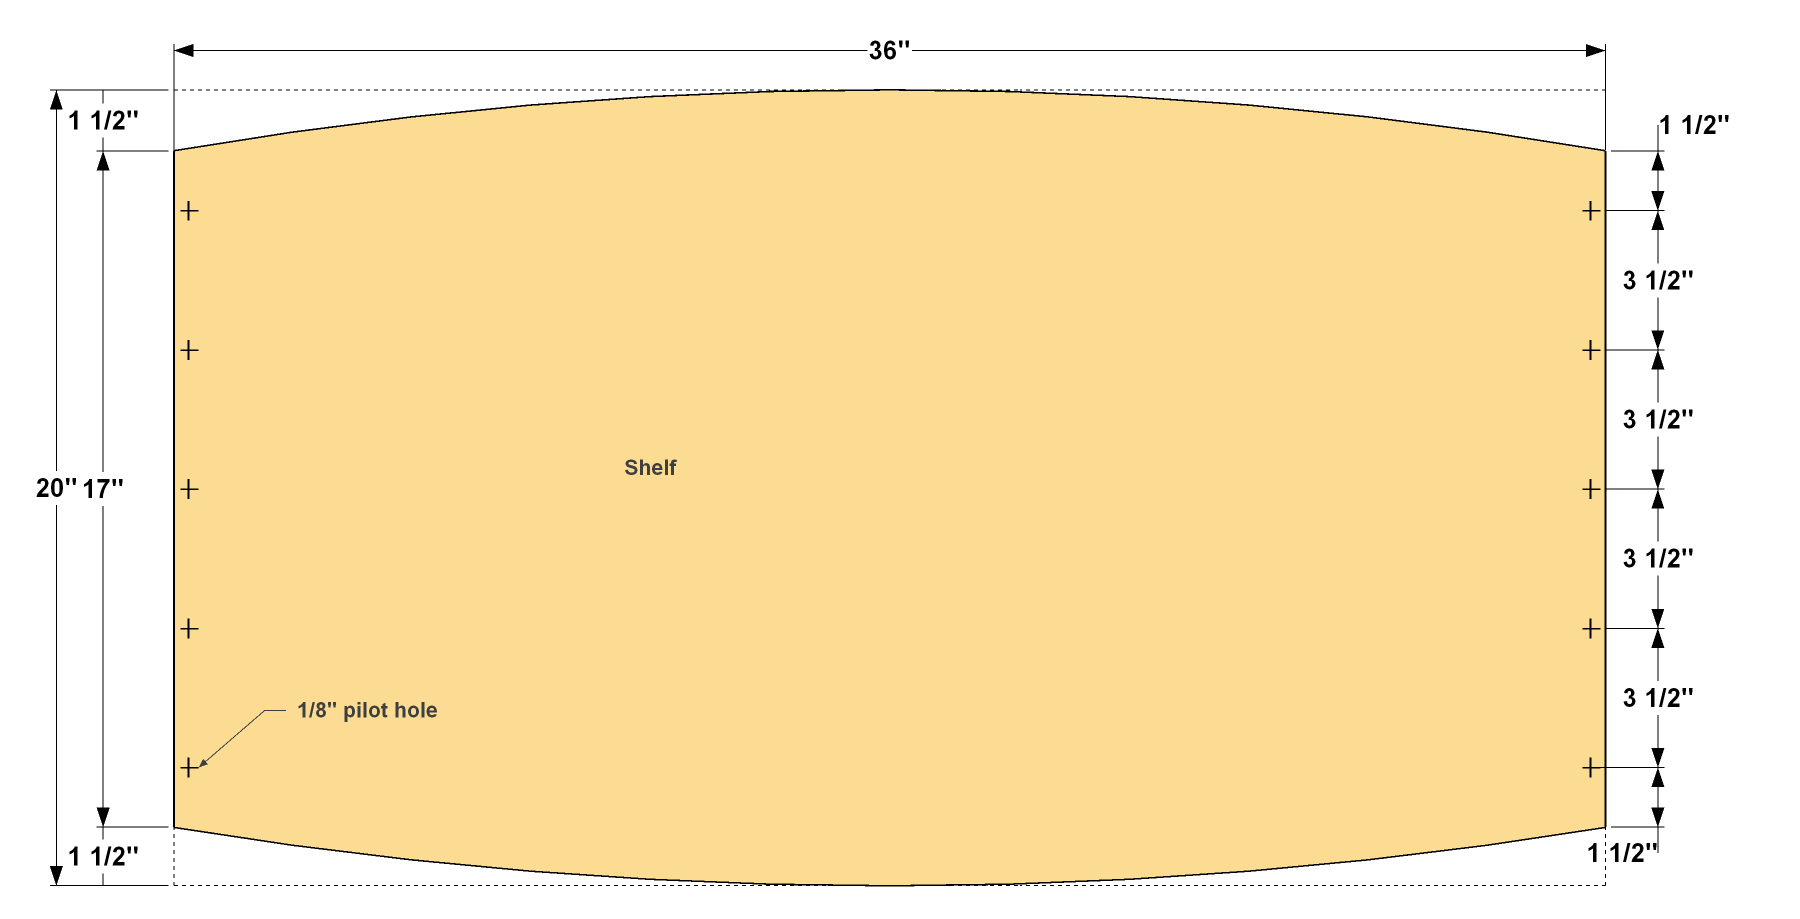
- Cut the shelf to rough size, as shown in the cutting diagram.
- Lay out and cut the curves the same way as you did on the Top.
- Sand the curved edges smooth.
- Then lay out and drill pilot holes, as shown for screws that will be used to attach the shelf later.
4Make the Shelf Ends
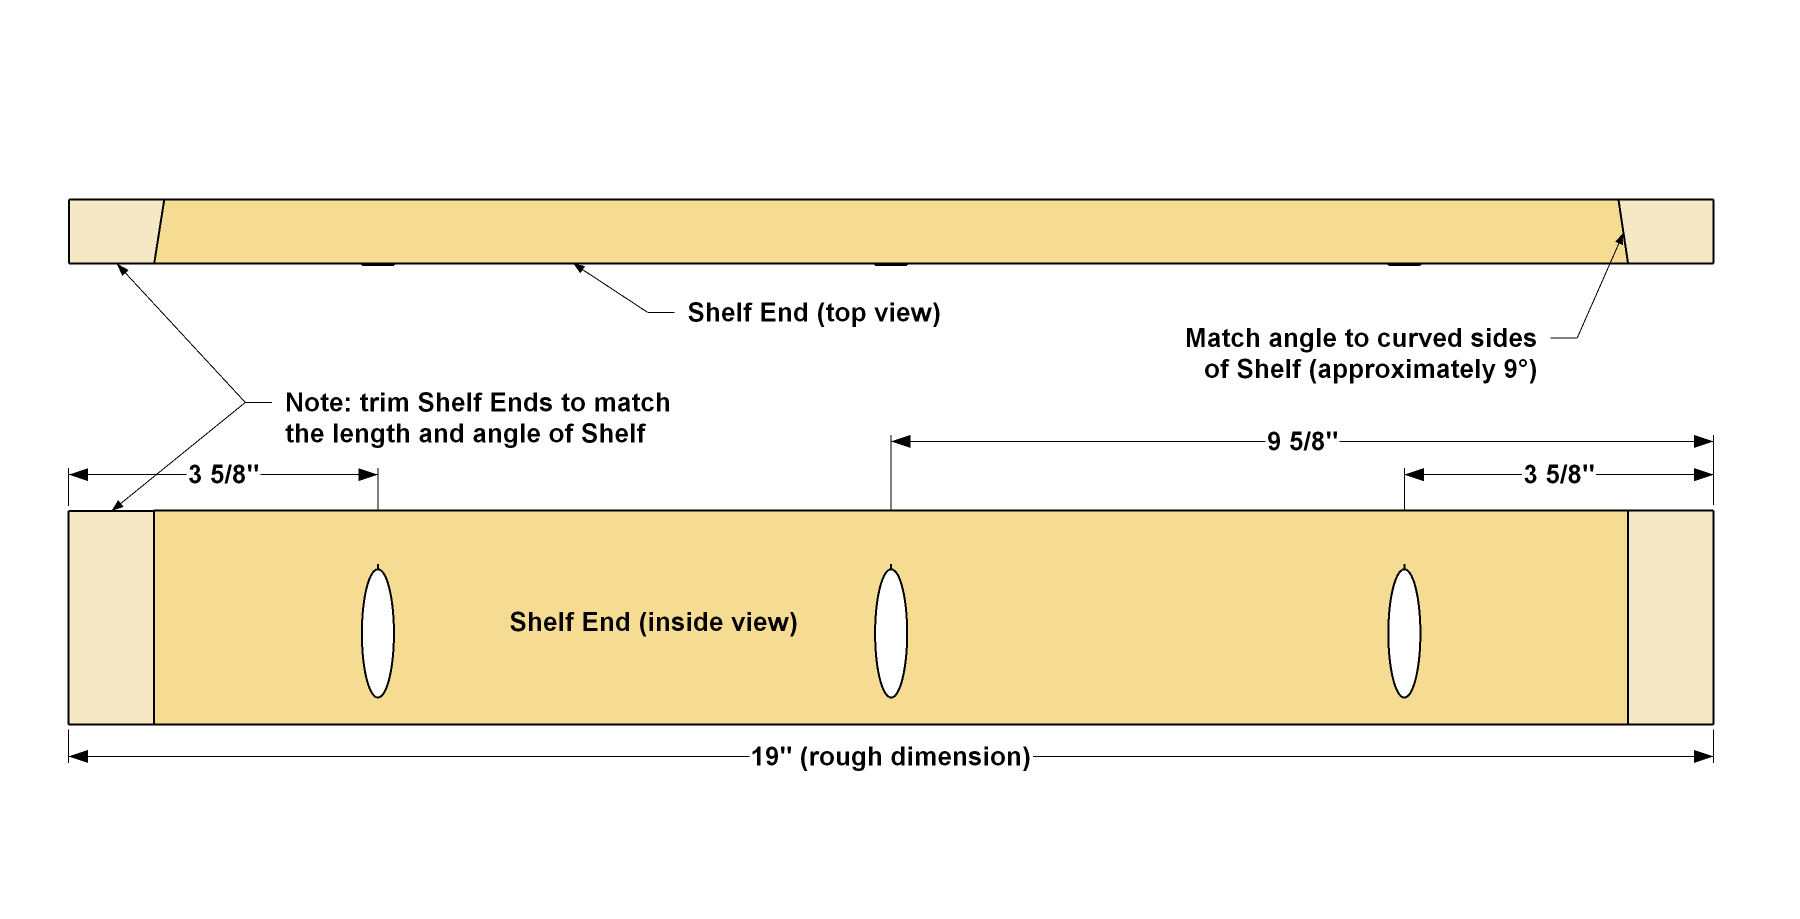
- Cut two Shelf Ends to finished width and to rough length, as shown in the cutting diagram.
- Set one of the Ends on the Shelf so the outside face is flush with the end, and it overhangs each side of the Shelf slightly. With a pencil, mark the corner and the location of the Shelf curve. This will be the angle that will match the curves (approximately 9°). Do this for the other Shelf End, as well.
- Cut the angles on the miter saw.
- Next, set your Kreg Pocket-Hole Jig for 3/4"-thick material.
- Then drill pocket holes on the inside face (the longer face) of each of the Shelf Ends, as shown.
5Add Edging to the Plywood
- To hide the plywood edges, first, apply iron-on veneer edge banding to the straight ends of the Top and the Shelf.
- Trim the length and the edges, and then sand them smooth.
- Next, apply veneer to each of the curved sides of both parts.
- Trim the length and the edges, and sand them smooth.
- Finally, veneer the short ends of the Shelf Ends the same way.
6Attach the Shelf Ends to the Top
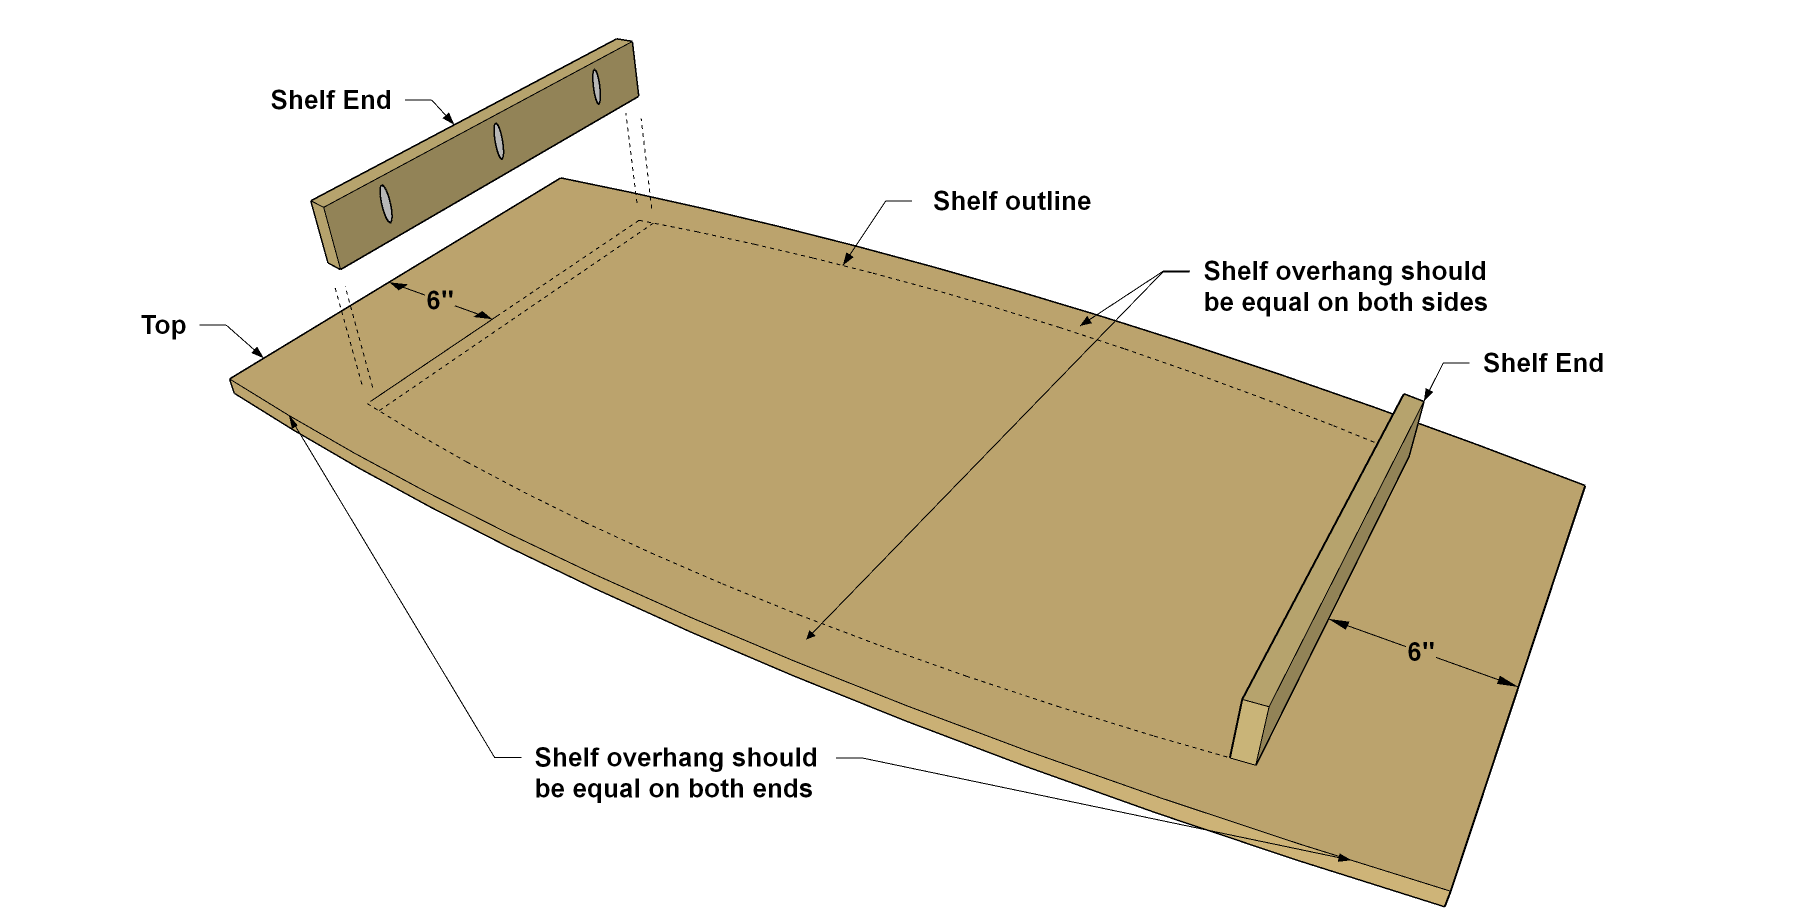
- Place the Top on a flat work surface with the bottom facing up.
- Position the Shelf on the Top and space it equally on all sides, as shown. Lightly outline the ends of the Shelf to mark its position on the Top.
- Remove the Shelf, and then place the first Side on the pencil line so the edge and ends match up and the pocket holes face inward. Secure the Side to the Top with glue and 1 1/4" coarse-thread Kreg Pocket-Hole Screws.
- Repeat this to mount the other Side.
7Attach the Shelf to the Ends
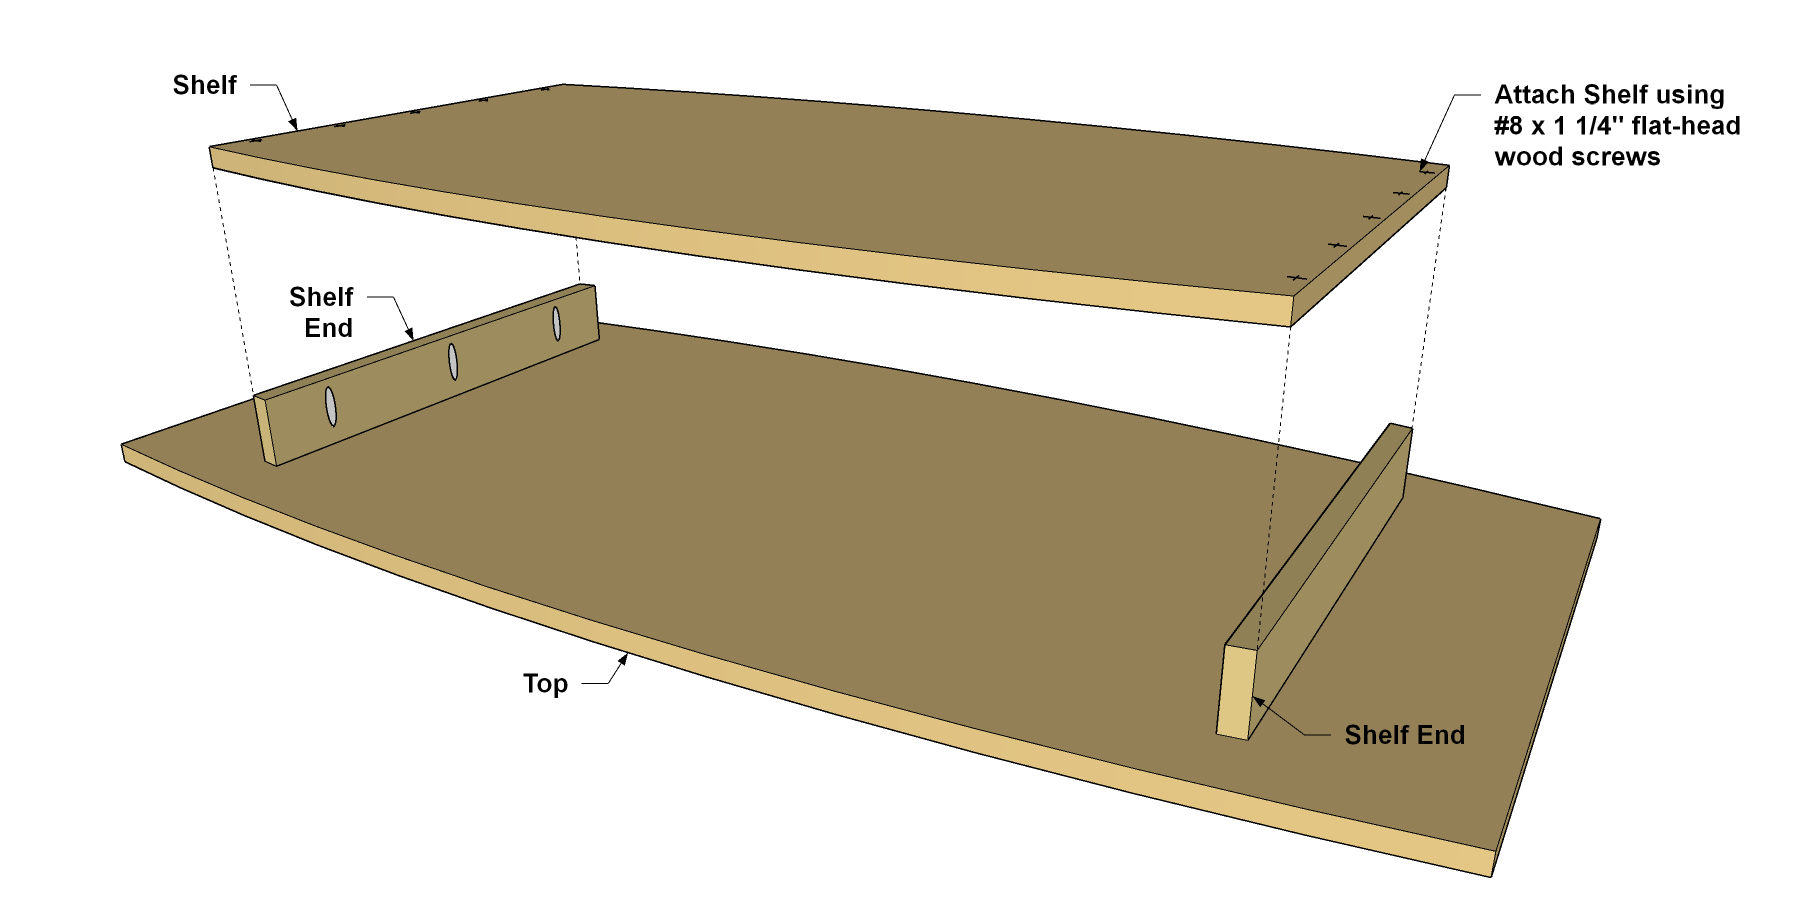
Secure the Shelf Ends to the Shelf using 1 1/4" flat-head wood screws only. By not gluing the Shelf in place, you remove it after initial assembly to make applying stain and finish much easier. Once you’re done finishing, just screw the Shelf back in place.
8Attach the Legs
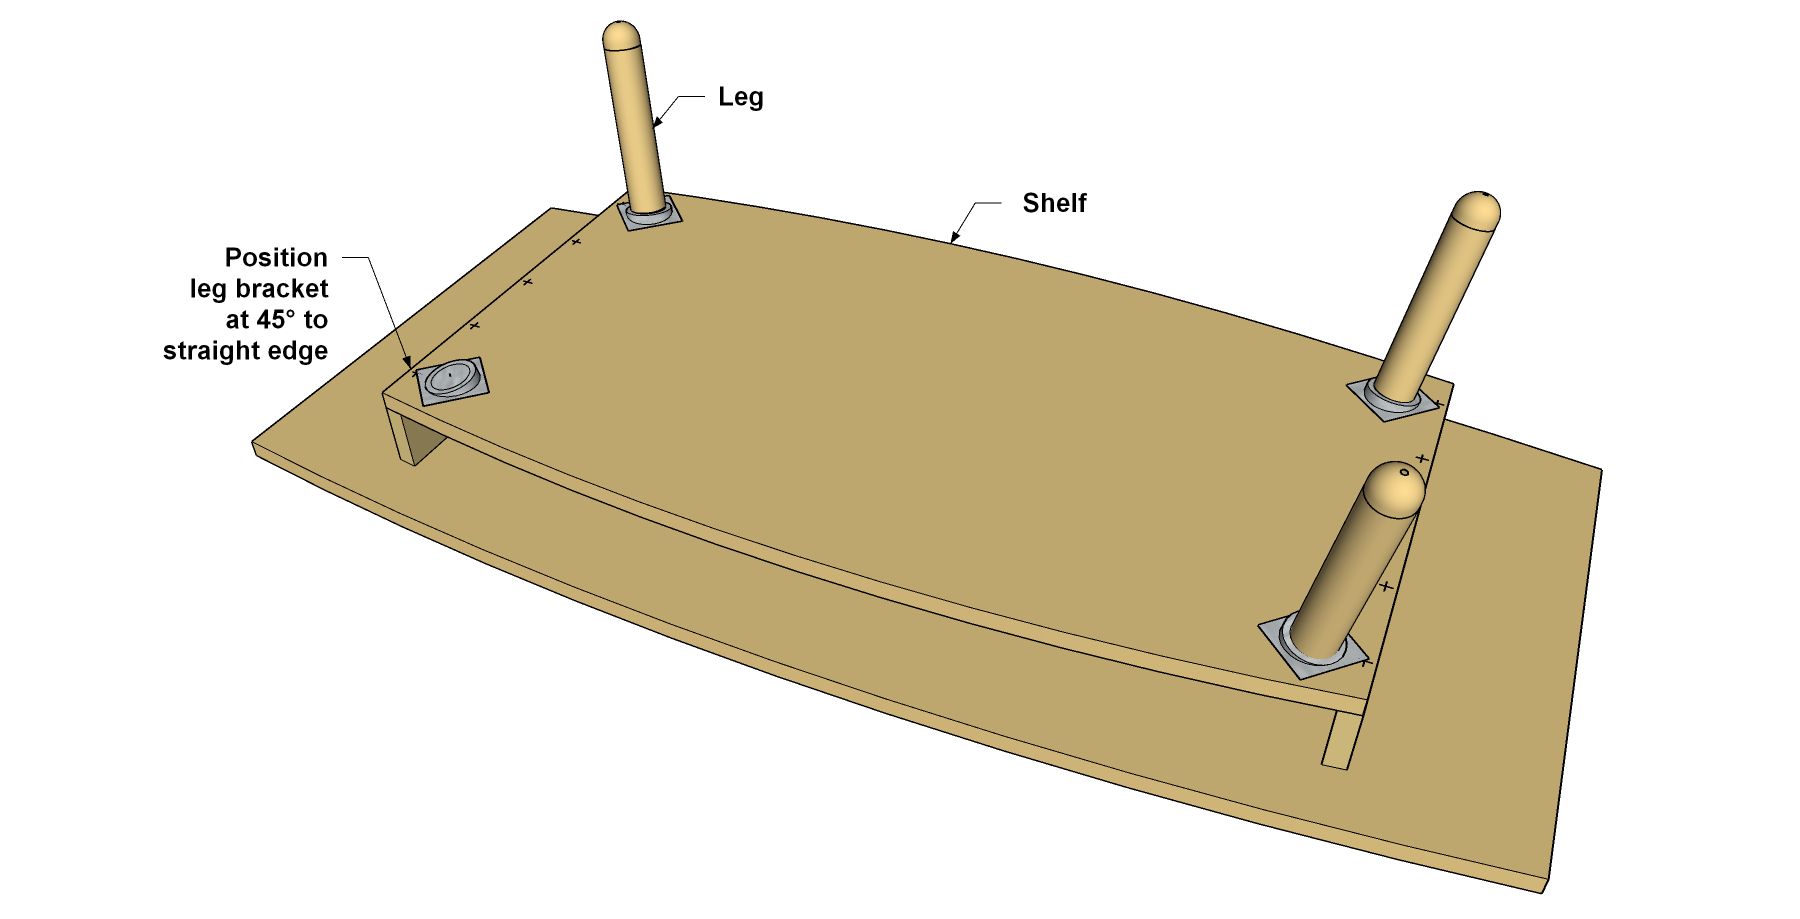
The legs we used are already have a threaded bolt installed. All there is to do is attach the metal leg brackets to the bottom of the table with the screws supplied, and then screw the Legs into the brackets. It’s as easy as that. For this table, we used angled brackets that position the legs out at a slight angle. We set the brackets at 45° to the straight edge of the Shelf.
9Finish It Up
Unscrew and remove the shelf from the Shelf Ends. You can keep the legs attached. Complete any final sanding, clean all the parts thoroughly, and then apply the finish of your choice. We used a black Gel Stain. Once the finish is dry, crew the Shelf back in place and then pass out the coasters.