 Notch
Notch- Difficulty
- Intermediate
- Time
- 5.5–10.8 hours
- Cost
- $$$
About this build
Every kitchen can use more work space and storage. This island offers both in a great-looking package. The island is easy to build thanks to purchased legs and a clever way to create the extra-thick top from ordinary boards. Because it’s freestanding, you can incorporate it into almost any kitchen.
Tools
Essential
- Circular Saw
- Drill / Driver
- Jigsaw
- Miter Saw
- Pocket Hole Jig
- Random Orbit Sander
Optional / nice to have
- Bar / Pipe Clamps
- Tape Measure
Materials
| Item | Qty |
|---|---|
| Board, 1x6 96" | 2 board |
| Board, 1x6 48" | 1 board |
| Board, 1x4 96" | 1 board |
| Board, 1x4 48" | 1 board |
| Board, 1x2 96" | 3 board |
| Board, 1x2 48" | 1 board |
| Plywood, 3/4" Thick Half Sheet | 1 board |
| Narrow Concord Island Post | 4 each |
| 1 1/4" fine-thread pocket hole screws | 129 each |
Overall cost: $$$. Lumber prices vary by region, species, and season, so we give a band rather than a figure we would only be pretending to know.
Cut list
| Part | Qty | T × W × L |
|---|---|---|
| Leg | 4 | 3" × 3" × 34" |
| End Rail | 2 | 3/4" × 3" × 18" |
| Side Rail | 2 | 3/4" × 3" × 34" |
| Center Support | 1 | 3/4" × 3" × 22" |
| Shelf | 2 | 3" × 22" × 38" |
| Shelf Long Edge | 4 | 3/4" × 1" × 34" |
| Shelf Short Edge | 4 | 3/4" × 1" × 14" |
| Top Board | 5 | 3/4" × 5" × 47" |
| Top Long Edge | 2 | 3/4" × 1" × 44" |
What to buy
Buy 12 boards at 8 ft.
3" × 22"
1 board
3" × 3"
2 boards
3/4" × 5"
3 boards
3/4" × 3"
2 boards
3/4" × 1"
4 boards
Assumes 8 ft stock, a 1/8" saw kerf, and buying each part at its own width. Change the board size or kerf on the full board plan →
Instructions
1Start by Ordering Legs
Because this project uses purchased Legs, your first step should be ordering those. That way, you’ll know that they’re available before you start making the other parts.
2Make the Rails and Center Support
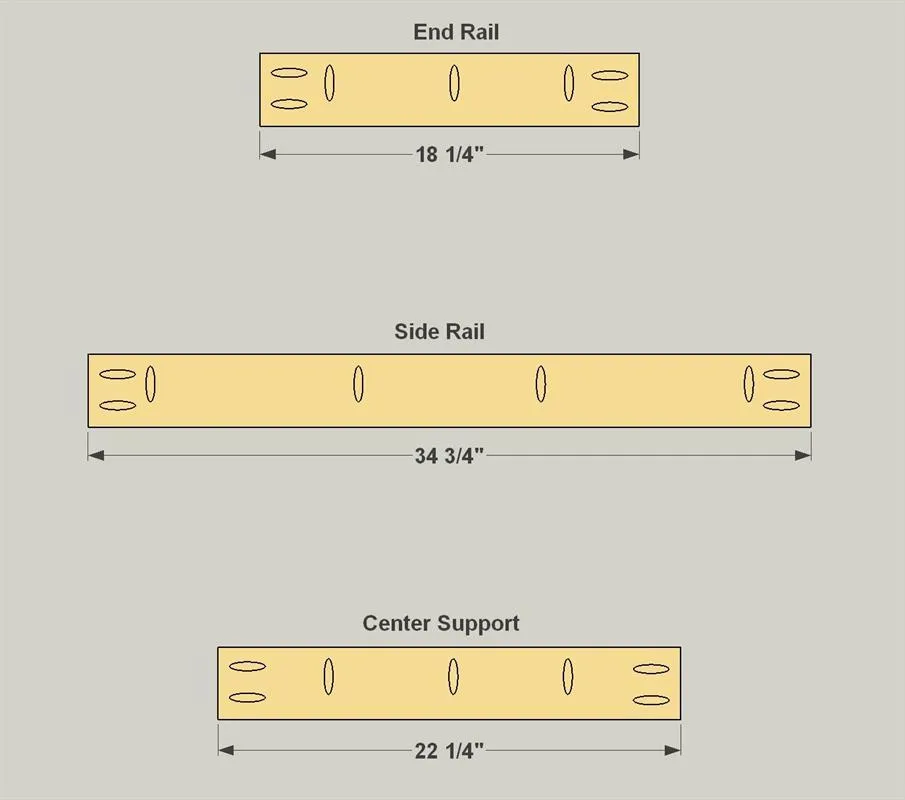
Cut two End Rails, two Side Rails, and one Center Support to length from 1x4 boards (we used poplar), as shown in the cutting diagram. Then, with your pocket hole jig set up for 3/4" material, drill pocket holes in the Rails and the Support, as shown.
3Attach the End Rails
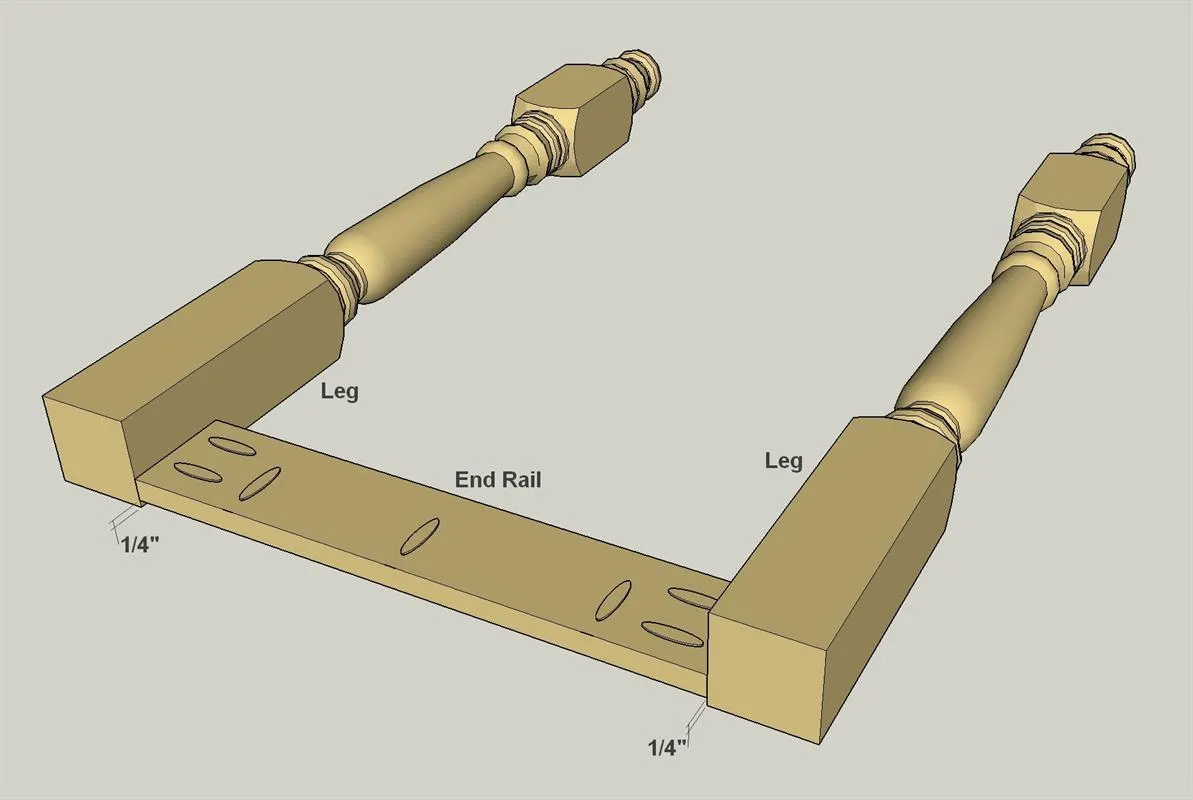
Now you can attach the End Rails to the Legs using 1 1/4" fine-thread pocket hole screws, as shown. Note that the End Rails are inset 1/4" from the outer face of the Legs. Make sure that the pocket holes are oriented correctly for attaching the island top later.
4Assemble the Side Rails and Support
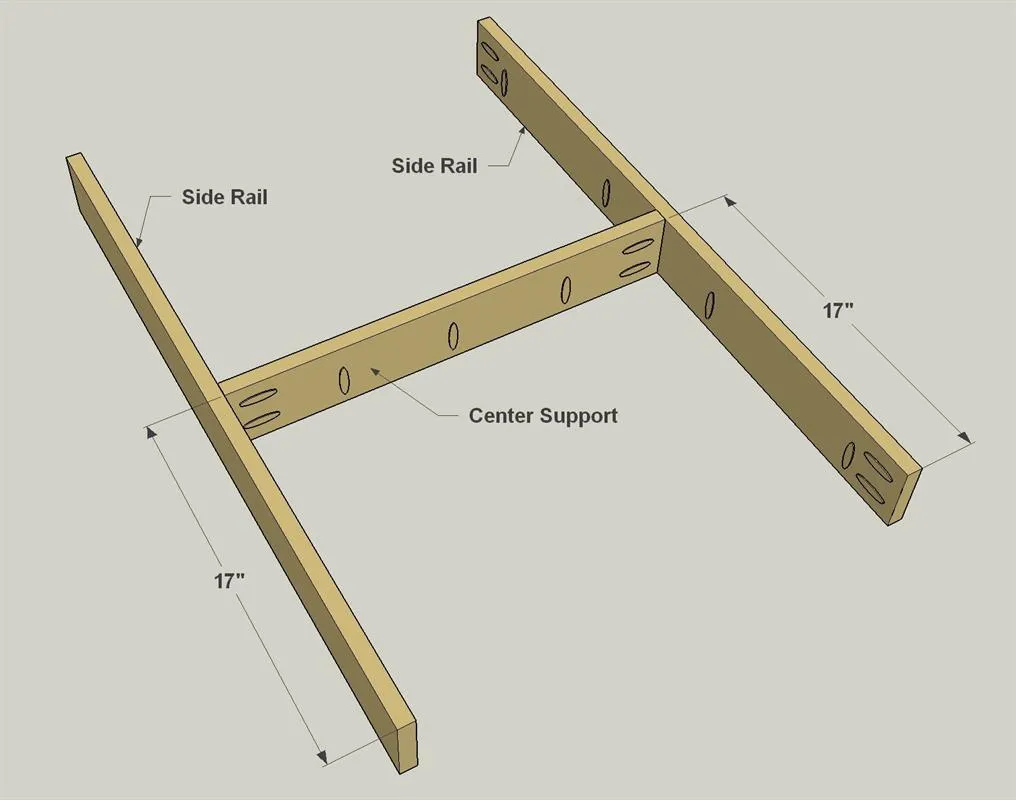
Attach the Center Support to the Side Rails using 1 1/4" fine-thread pocket hole screws, as shown. Make sure that the pocket holes along the edges are all oriented in the same direction.
5Create the Shelf Panels
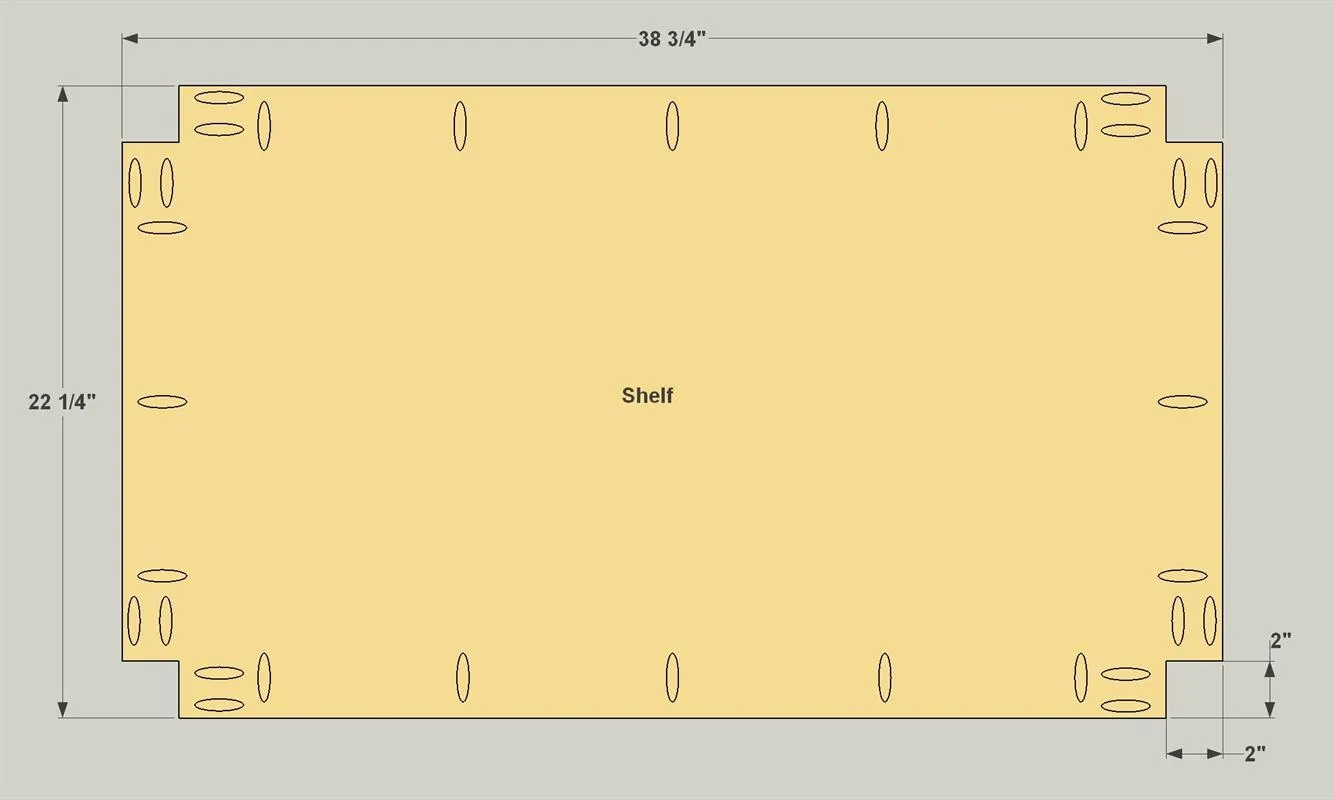
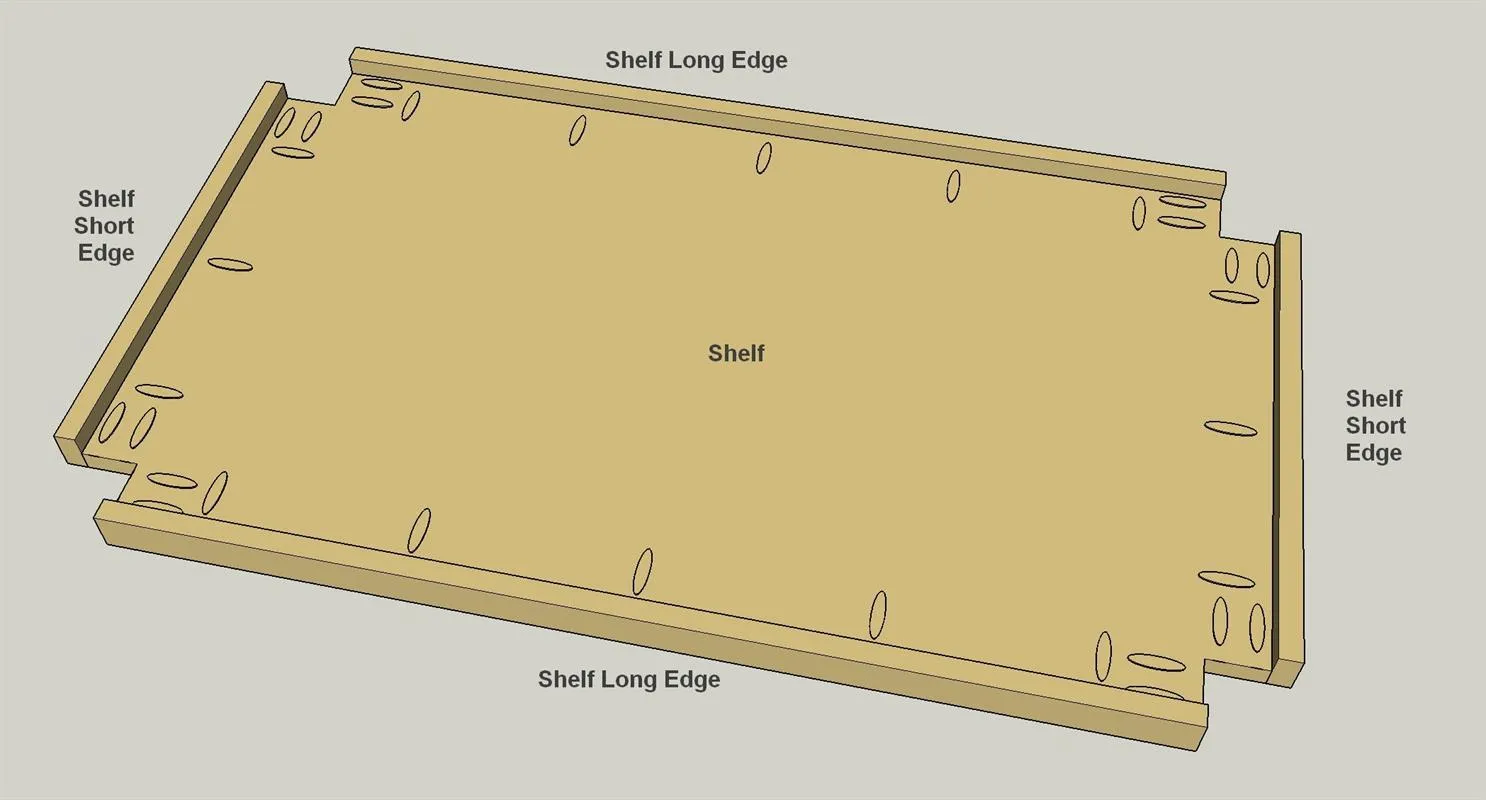
- Cut two Shelves to size from 3/4" plywood, as shown in the cutting diagram.
- Cut the notches at each corner using a jig saw.
- Then, with your pocket hole jig set up for 3/4" material, drill pocket holes in the Shelves, as shown.
6Add Shelf Edging
Cut two Shelf Long Edges and two Shelf Short Edges to length from 1x2 boards, as shown in the cutting diagram. Then attach the Edges to each Shelf using 1 1/4" fine-thread pocket hole screws, as shown.
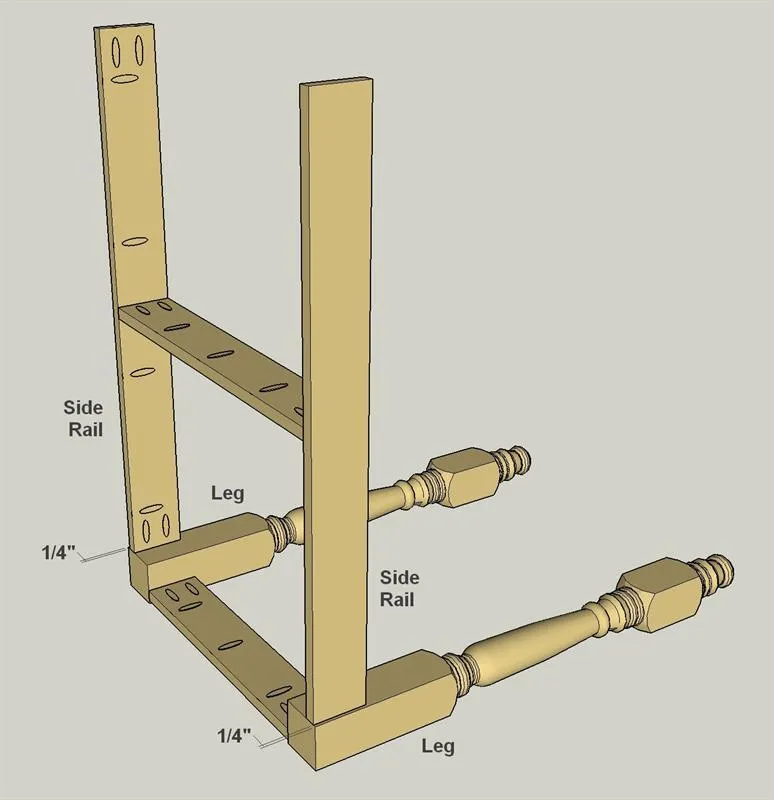
7Attach the Side Rails
- Now you can start assembling the island base.
- First, attach the Rail/Support assembly to one set of Legs using 1 1/4" fine-thread pocket hole screws, as shown. Note that the Side Rails are inset 1/4" from the outer face of the Legs. Make sure that the pocket holes are oriented correctly for attaching the island top later.
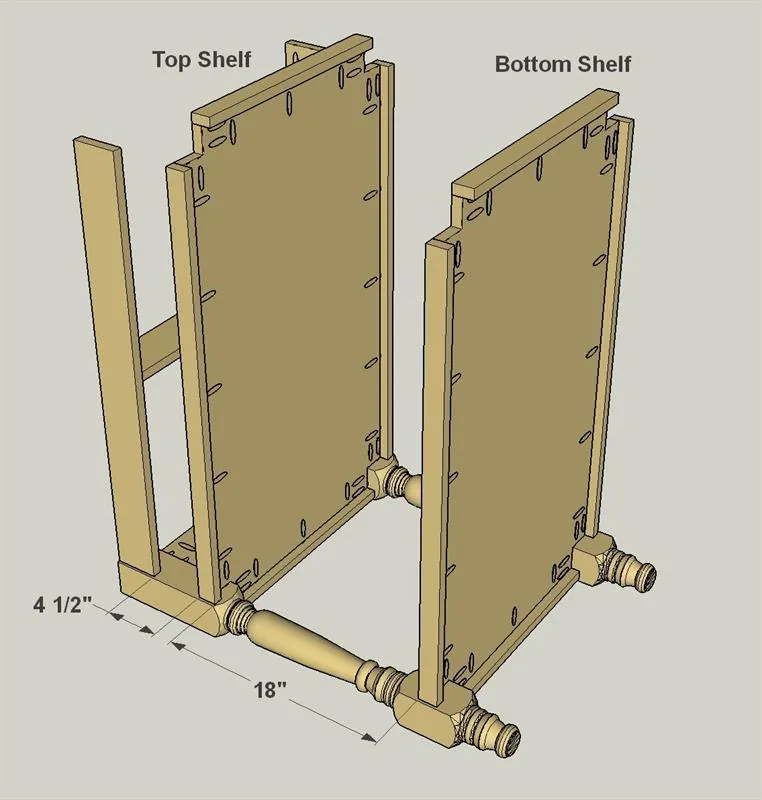
8Secure the Shelves
Next, attach the Shelf assemblies to the same Legs using 1 1/4" fine-thread pocket hole screws, as shown. Make sure you have the Shelves spaced properly before you drive in the screws.
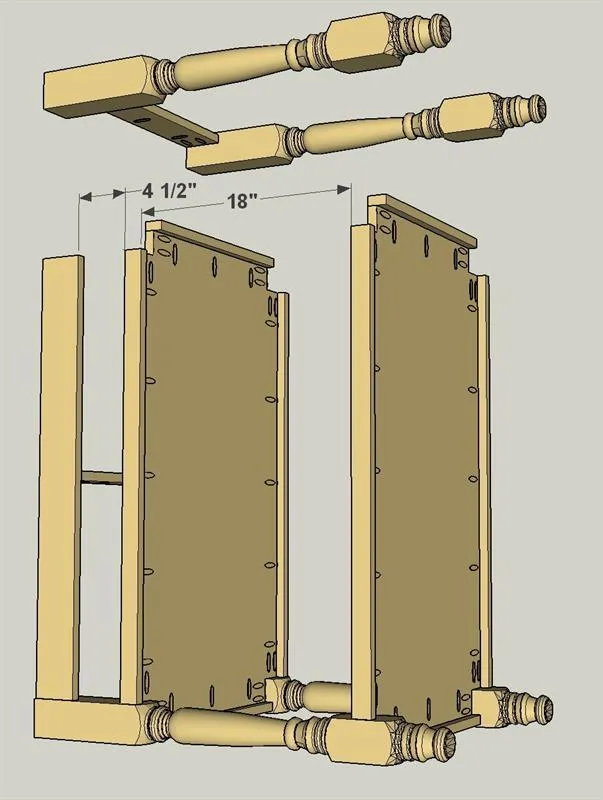
9Add the Other Legs
Now you can attach the second set of Legs using 1 1/4" fine-thread pocket hole screws, as shown. Once again, check the Shelf spacing before you drive in the screws to ensure that the Shelves will sit level.
10Understand the Top Assembly
- Now you can begin creating the island top. Though it looks like it’s made from thick boards, it’s actually all made from ordinary 1x6 boards (we used soft maple). You’ll start by making an extra-long panel, then cutting off the ends.
- Then you’ll attach these cutoffs underneath and add long edge boards to create this unique look.
11Cut the Top Boards
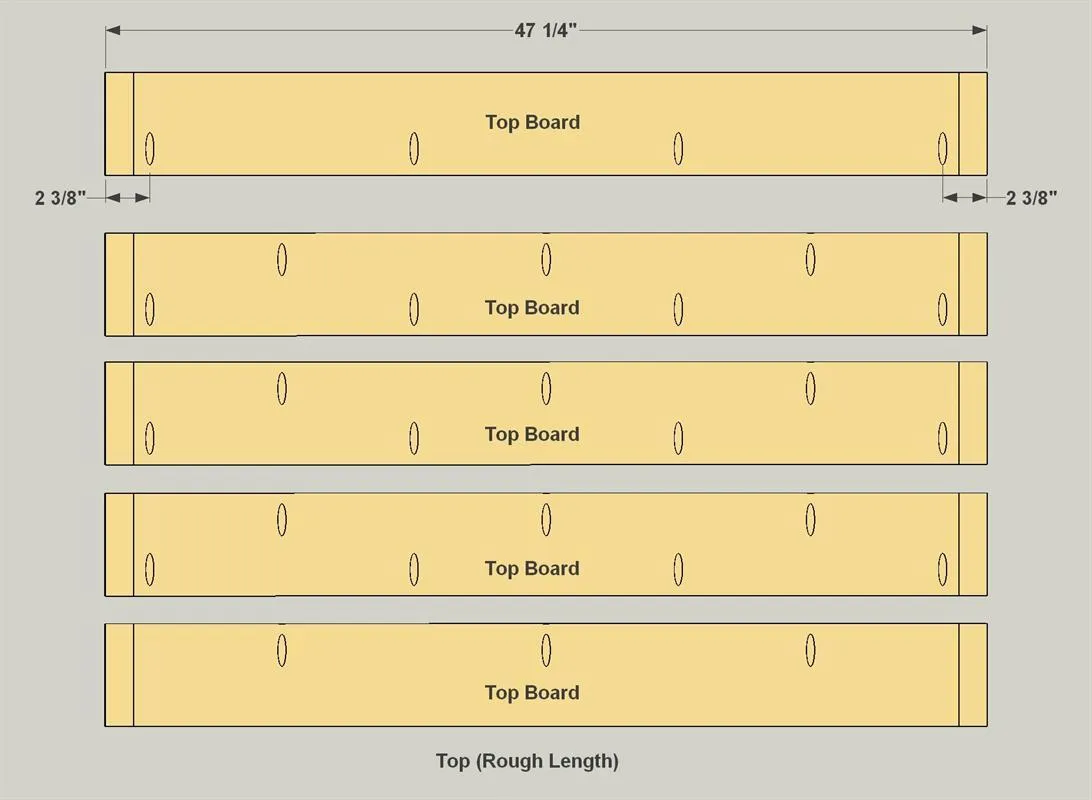
- Cut five Top Boards to length from 1x6 boards, as shown in the cutting diagram. Note that you’re cutting these longer than the final length of the island top.
- Then, with your pocket hole jig set up for 3/4" material, drill pocket holes in the Top Boards, as shown. The holes nearest the ends of each board need to be positioned away from the ends, as shown.
12Assemble and Cut the Top
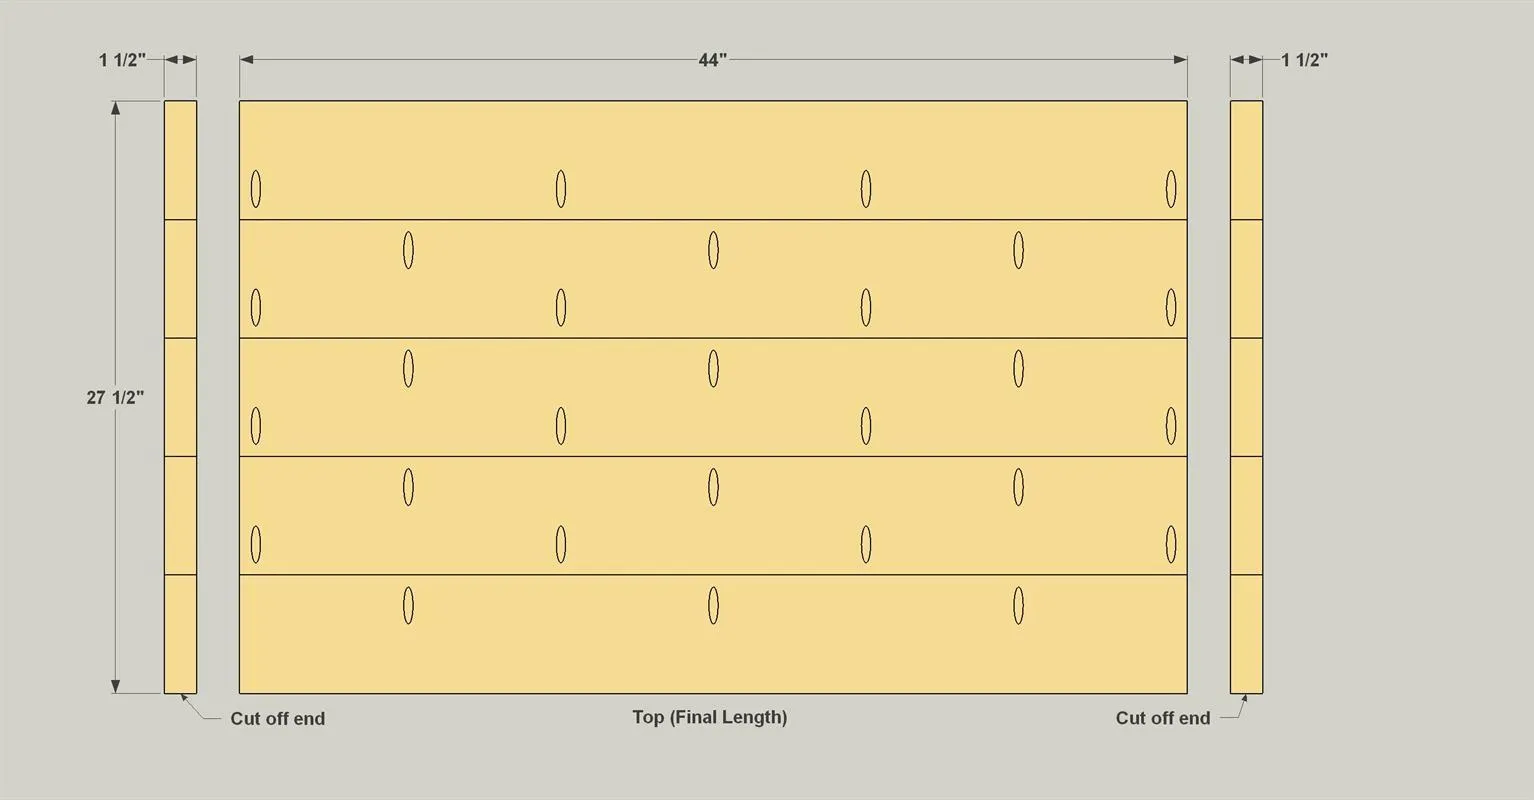
Next, add the Top Boards using wood glue and 1 1/4" coarse-thread pocket hole screws. Make sure you have glue spread along the board edges all the way to the ends. After the glue sets, cut 1 1/2" off each end of the Top assembly, as shown. A circular saw with an edge guide works great for doing this.
13Edge the Top
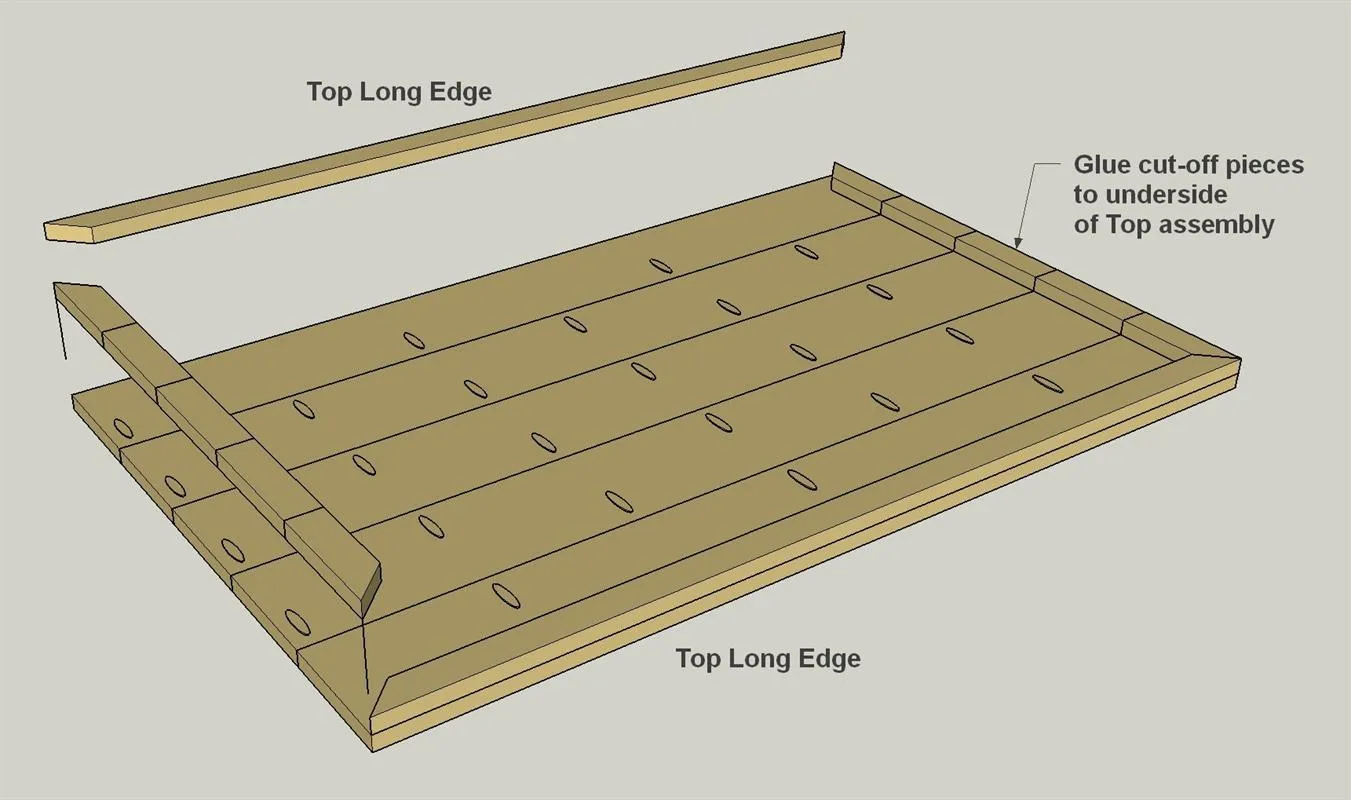
- Now you can add the pieces underneath the Top panel to create the thick look. To do this, start by cutting two Top Long Edges to length from a 1x2 board, mitering the end of each piece at 45°.
- Then take the trips you cut off of the top and miter the ends at 45°, as well. Make sure you align the miters with the ends of the strips so that you don’t cut off any length.
14Glue on the Top Edges
With the pieces cut, you can glue them to the underside of the Top assembly. Use clamps or weight the pieces down while the glue sets. Once it does, scrape off any glue squeeze-out, and then sand the Top assembly smooth.
15Secure the Top and Add Finish
Once you have the Top assembly done, you’re ready to attach it to the island base. If you plan to paint the base, though, do that before attaching the top. Be sure, also, that you use a food-safe finish on the top. Linseed oil or butcher-block finish works great.
Tip: Get the Right Angle When you attach the top to the island base, space is too tight to get a full-size drill and driver in position. Pick up a right-angle attachment for your drill, which you can get for as little as $20, plus a short #2 square-drive bit, and you’ll be able to attach the screws in tight quarters without a problem.
Tags
- Kitchen
- Intermediate
Reviews & builds
No reviews yet
Sign in to review this plan or share your build.
No reviews yet. Be the first to build this.