 Notch
Notch- Difficulty
- Intermediate
- Time
- 6.3–12.3 hours
- Cost
- $$$
About this build
This cute little table and chairs is the perfect place for your child, grandchild, niece or nephew to play. They can write with chalk on the blackboard top, play with their toys, color, draw or write you a thank you note. Easy to build, uses 1/4 sheet of plywood, 1 1X8X96″ board and 1 1/2 96″ studs.
Tools
Essential
- Band Saw
- Brad Nailer
- Drill / Driver
- Jigsaw
- Miter Saw
- Pocket Hole Jig
- Random Orbit Sander
- Router
- Router Table
- Table Saw
Optional / nice to have
- Bar / Pipe Clamps
- Tape Measure
Materials
| Item | Qty |
|---|---|
| Plywood, 3/4" Thick Quarter Sheet | 1 board |
| Board, 1x8 96" | 1 board |
| Board, 2x4 96" | 1 board |
| Board, 2x4 48" | 1 board |
| Titebond I Woodglue | 1 each |
| Kreg 1 1/4" coarse pocket screws | 110 each |
| Rust-Oleum Black Chalk Board - Latex Paint | 1 each |
| 100 - 220 grit sandpaper | 8 each |
| 1 1/4" brad nails | 100 each |
| Minwax Polycrylic Finish | 1 each |
| Kreg Pine Wood Plugs | 16 each |
Overall cost: $$$. Lumber prices vary by region, species, and season, so we give a band rather than a figure we would only be pretending to know.
Cut list
| Part | Qty | T × W × L |
|---|---|---|
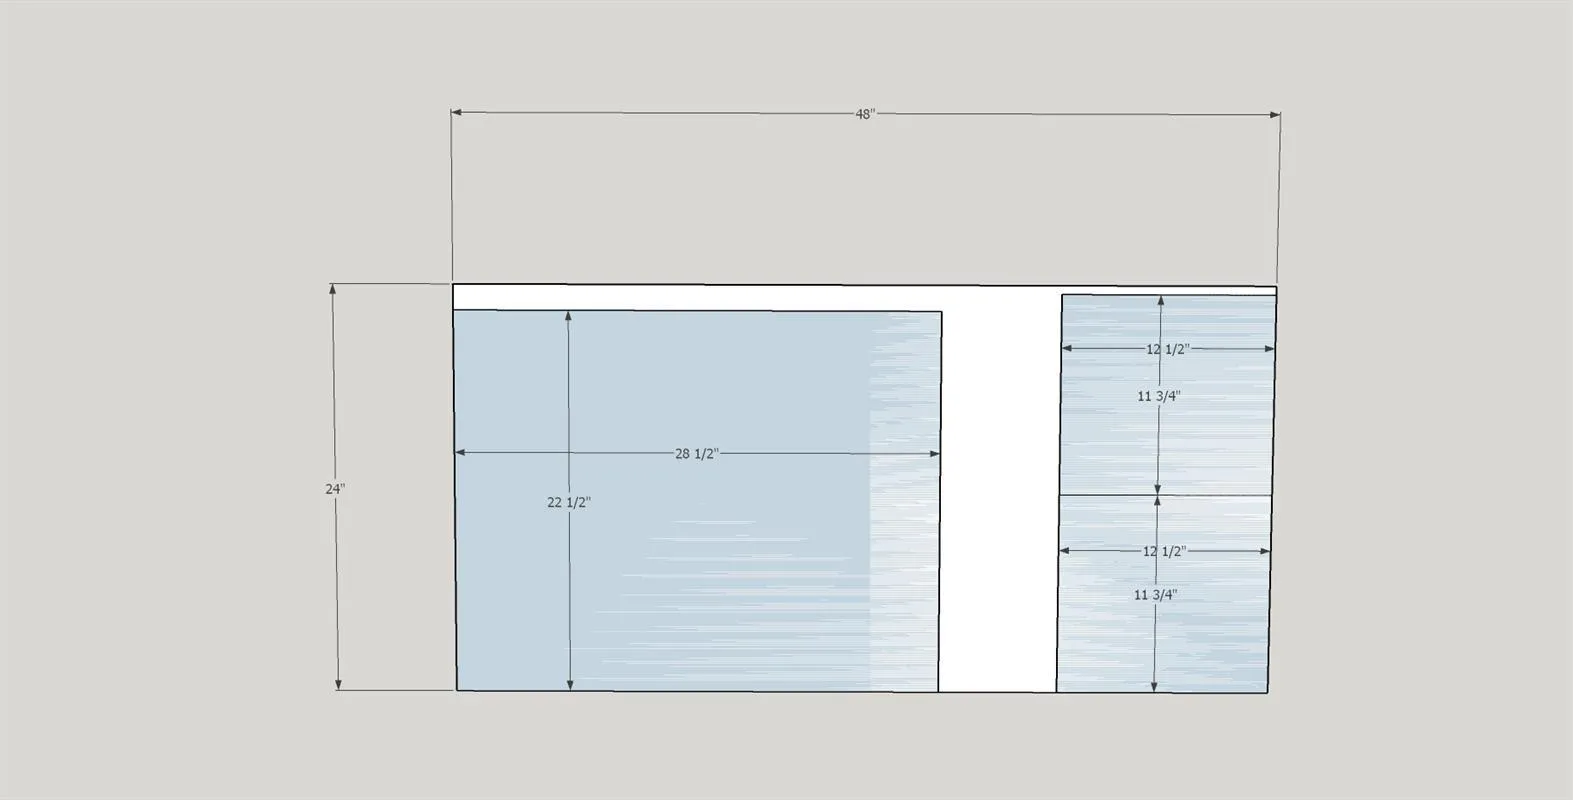
| Table Top - Plywood | 1 | 3/4" × 22" × 28" |
| Chair Seats - Plywood | 2 | 3/4" × 11" × 12" |
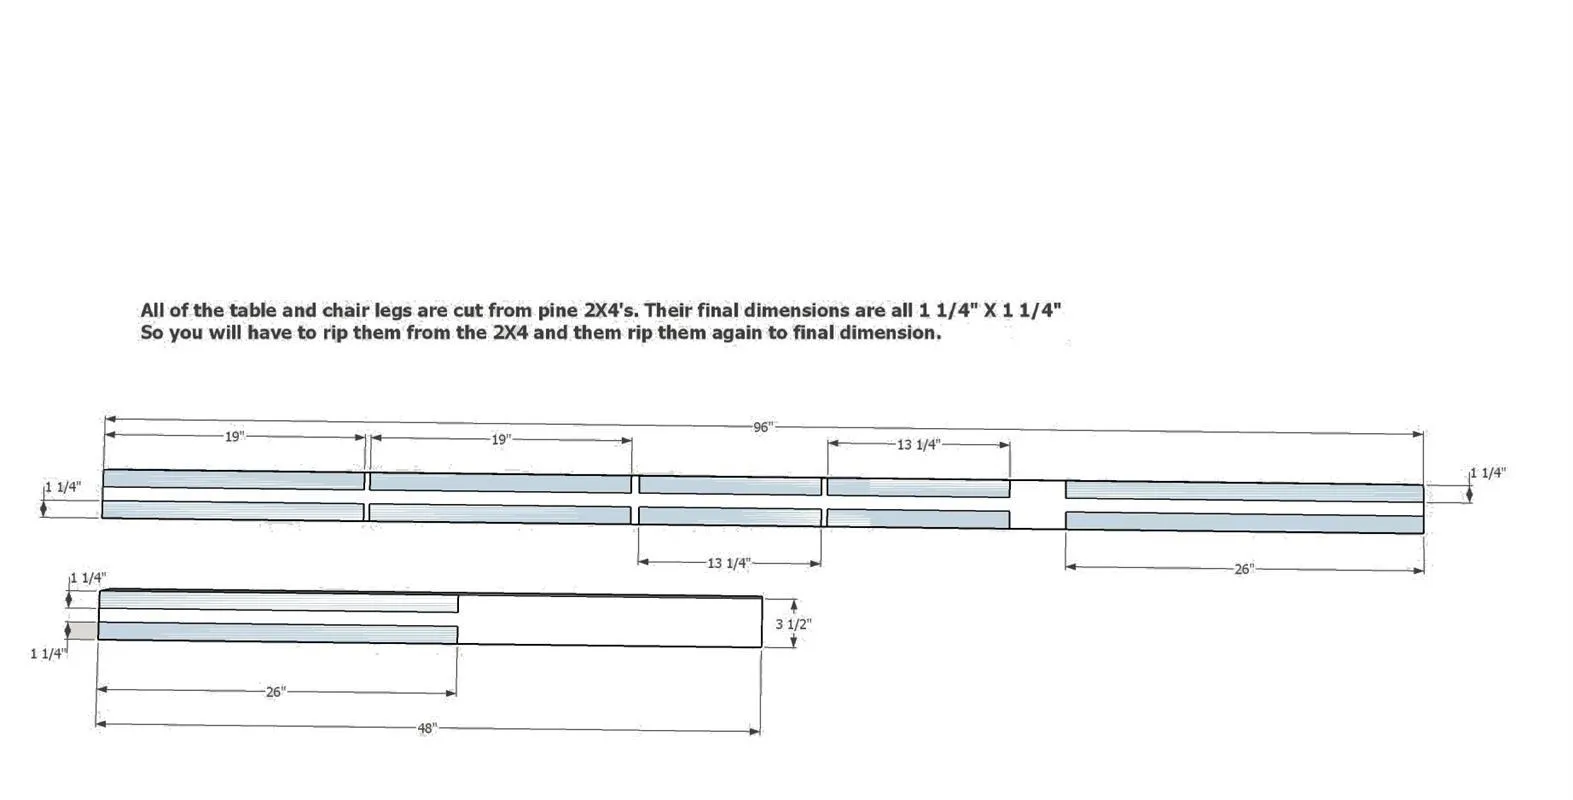
| Table Legs - Pine | 4 | 1" × 1" × 19" |
| Rear Chair Legs - Pine | 4 | 1" × 1" × 26" |
| Front Chair Legs - Pine | 4 | 1" × 1" × 13" |
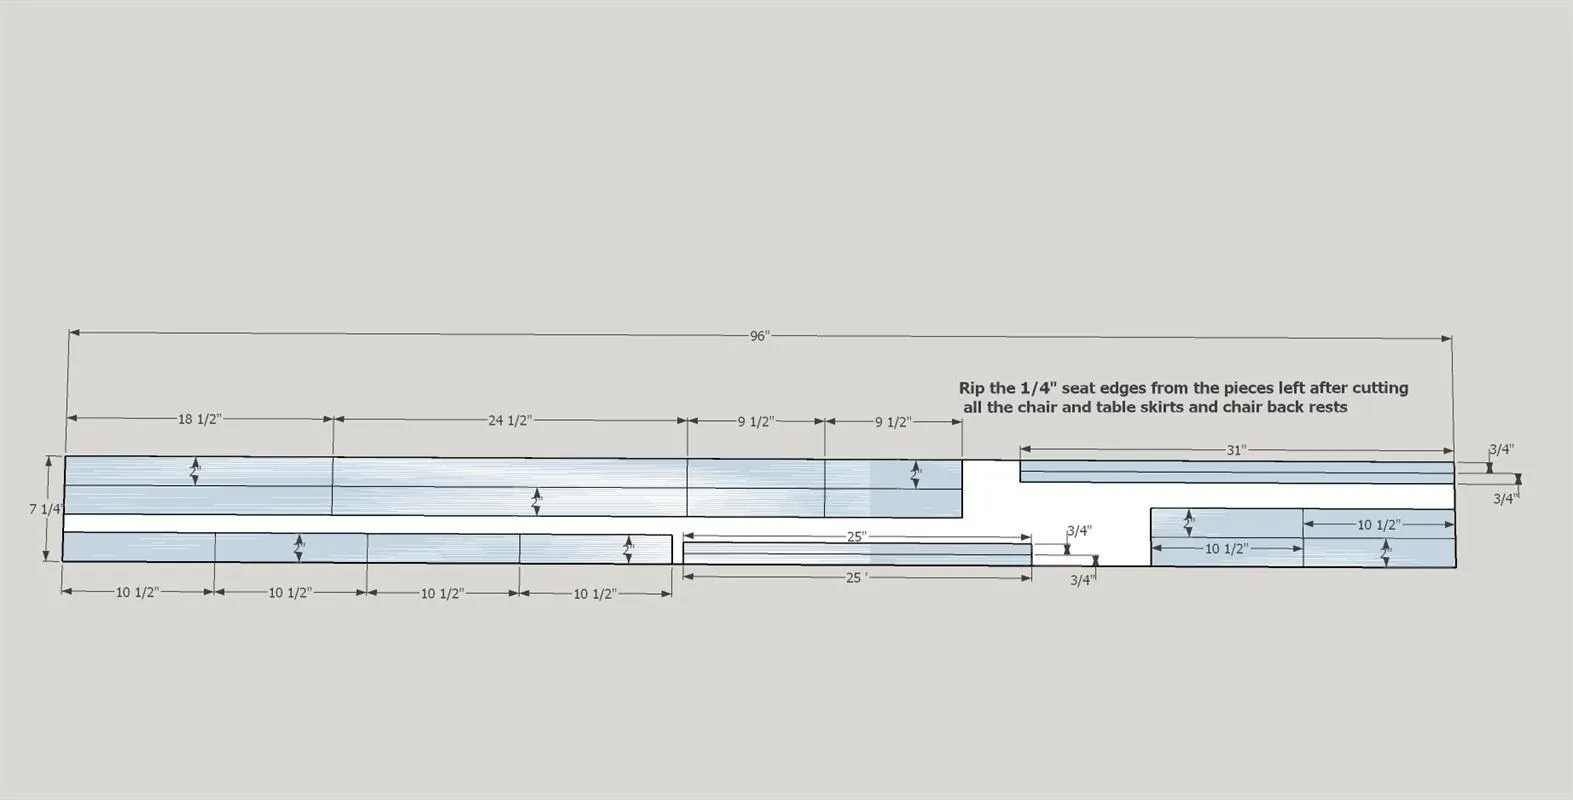
| Table Top Frames - Pine | 2 | 3/4" × 3/4" × 30" |
| Table Top Frames - Pine | 2 | 3/4" × 3/4" × 24" |
| Table Skirt Boards - Pine | 2 | 3/4" × 2" × 24" |
| Table Skirt Boards - Pine | 2 | 3/4" × 2" × 18" |
| Chair Skirt Boards - Pine | 4 | 3/4" × 2" × 10" |
| Chair Skirt Boards - Pine | 4 | 3/4" × 2" × 9" |
| Seat Edging Sides - Pine | 4 | 1/4" × 3/4" × 10" |
| Seat Edging Backs - Pine | 2 | 1/4" × 3/4" × 10" |
| Seat Edging Fronts - Pine | 2 | 1/4" × 3/4" × 13" |
| Chair Back Supports | 4 | 3/4" × 2" × 10" |
What to buy
Buy 11 boards at 8 ft.
1" × 1"
3 boards
3/4" × 22"
1 board
3/4" × 11"
1 board
3/4" × 2"
3 boards
3/4" × 3/4"
2 boards
1/4" × 3/4"
1 board
Assumes 8 ft stock, a 1/8" saw kerf, and buying each part at its own width. Change the board size or kerf on the full board plan →
Instructions
1Introduction
Please be sure to read through complete instructions before you begin any work on this project. Also keep in mind that plywood may be slightly thinner than its stated thickness. 3/4" plywood may actually be 23/32".
2Cut plywood pieces
- Cut the table top and chair seats from the 3/4" plywood sheet. Please note that in the picture of the completed chairs the seats were made from edge glued pine. You can do that. However, I believe that the plywood seats, with pine edging, will hold up better.
- Sand with 100 grit then 150 grit sandpaper.
3Cut table and chair legs
- Use your table saw to rip 1 1/4" pine boards from 2X4's. You should be able to get two from each 2X4. Leaving your table saw set at 1 1/4" rip the boards so that they are 1 1/4" by 1 1/4".
- Then cut the boards to the lengths shown in the attached cut diagram.
- Sand with 100 grit then 150 grit sandpaper.
4Cut 3/4" pine pieces pieces
Using the dimensions in the following diagram cut the pieces required for assembly.
5Drill pocket holes in skirt pieces
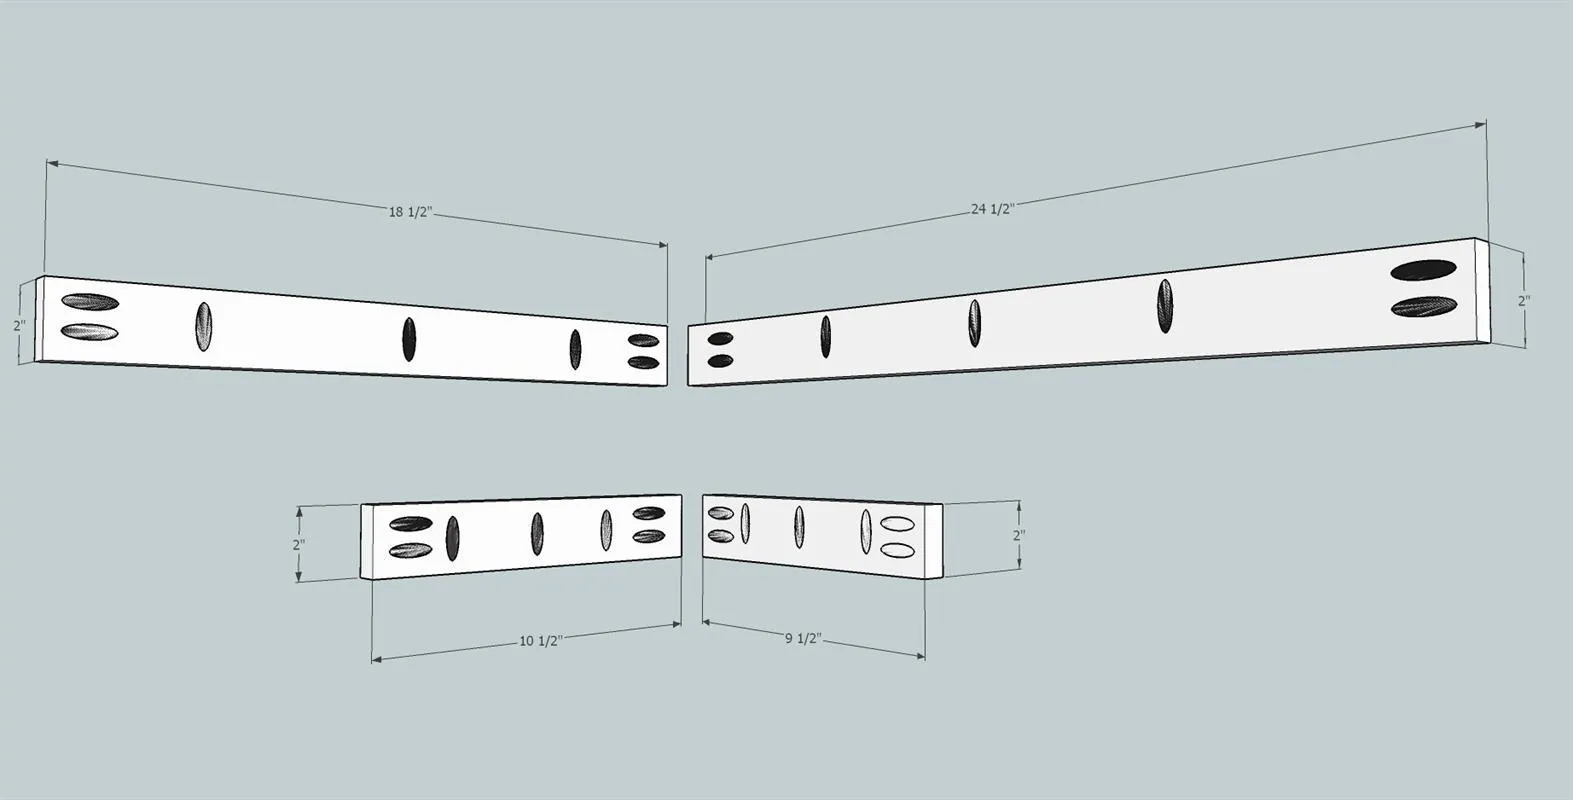
Using a Kreg pocket jig (set to 3/4" for all holes in this design) drill holes, as shown in the attached diagram, in the table and chair skirt pieces, 12 in total. It is a good idea to mark where the holes will be to prevent mistakes. Sand with 100 grit then 150 grit sandpaper.
6Drill Pocket holes in back rests
Using a Kreg pocket jig drill two holes in ends of all four chair back rests. It is a good idea to mark where the holes will be to prevent mistakes. Sand with 100 grit then 150 grit sandpaper.
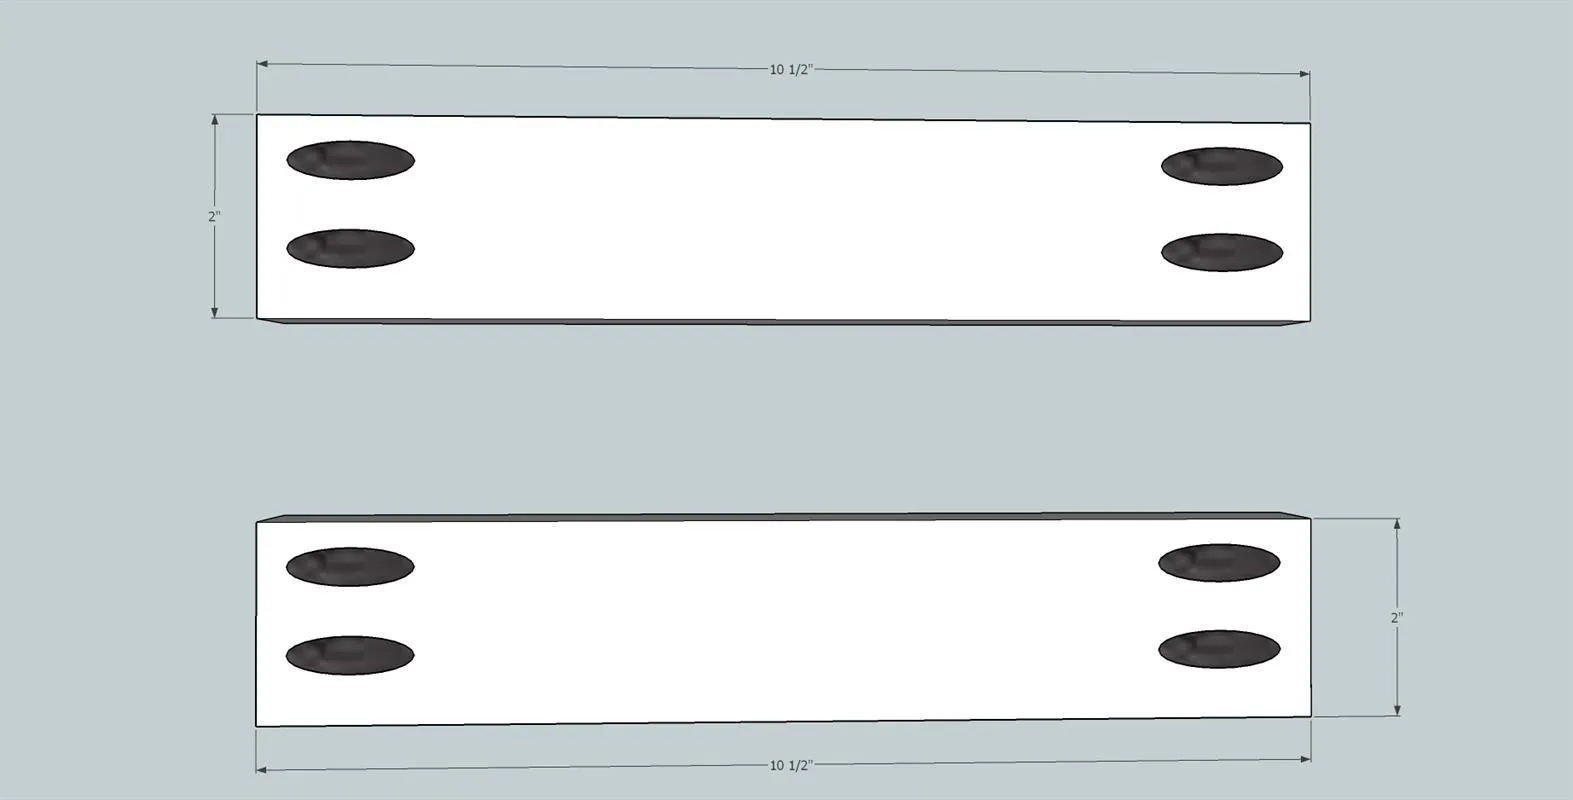
7Table leg assembly
Using Kreg 1 1/4" coarse pocket screws and Titebond I wood glue attach the table skirts to the legs.They should be flush with the outside of the legs.
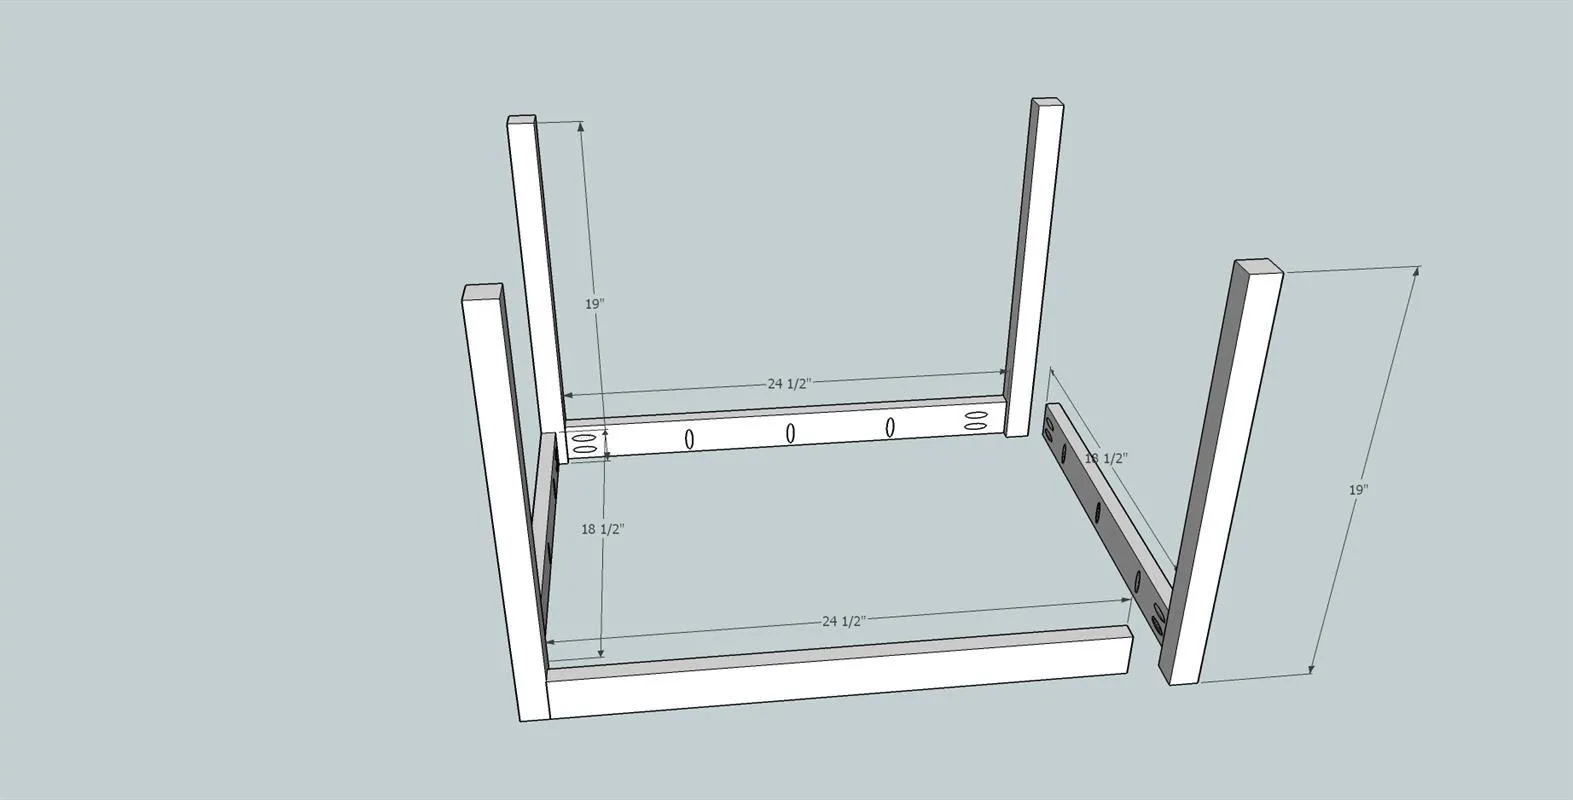
8Paint the table top
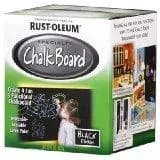
Apply Rust-Oleum Black Chalk Board paint to the top of the table. Follow manufacturers recommendations.
9Frame table top
Fitting the top frame will require you to cut 45 degree angles on ends of the four table top framing pieces from step 5. Two should be 30" at the outside of the angles and the other two should be 24" at the outside of the angles. You might have to nibble a little off at a time as you fit them to the top. Assemble frame to top using wood glue and 1 1/4" brad nails. As the 3/4" pine edging might be slightly thicker than the plywood top, make sure that the frame is flush with the painted top surface. Any excess should be on the bottom side of the top.
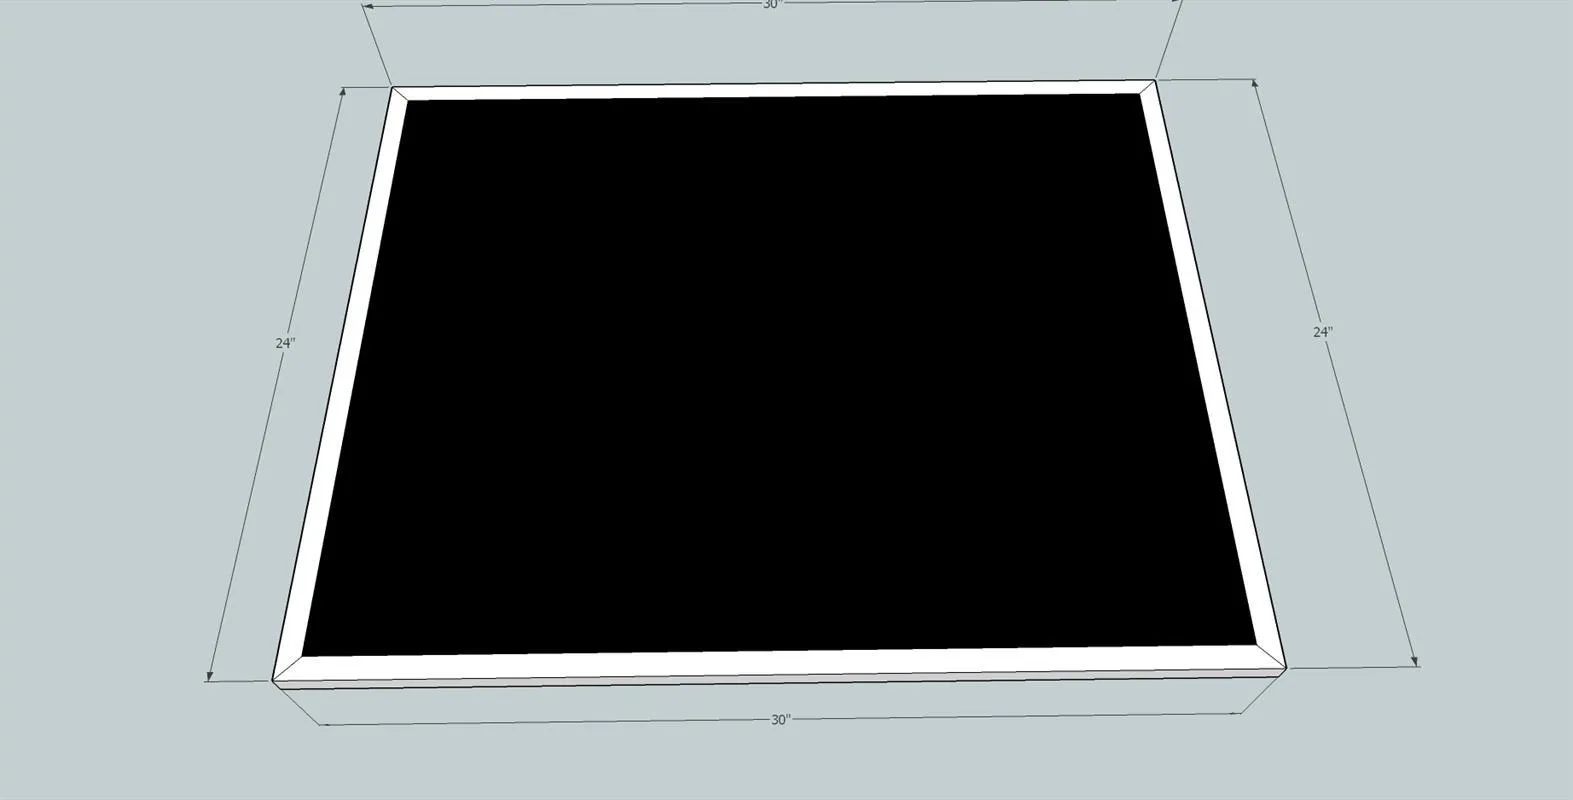
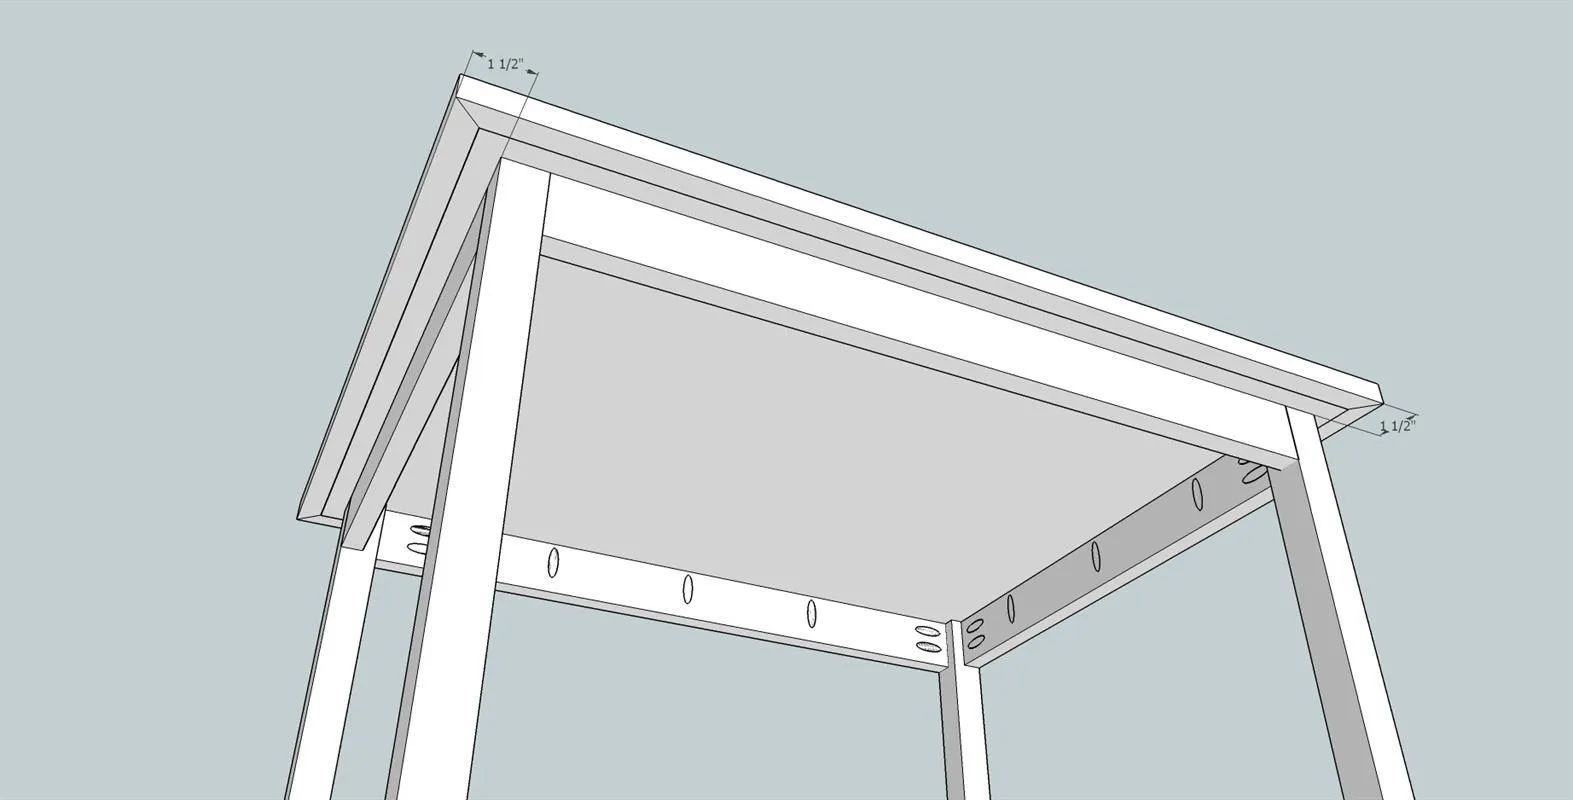
10Attach table top
Using Kreg 1 1/4" coarse pocket screws attach the table leg and skirt assembly to the top.The top should overlap about 1 1/2" on all sides.
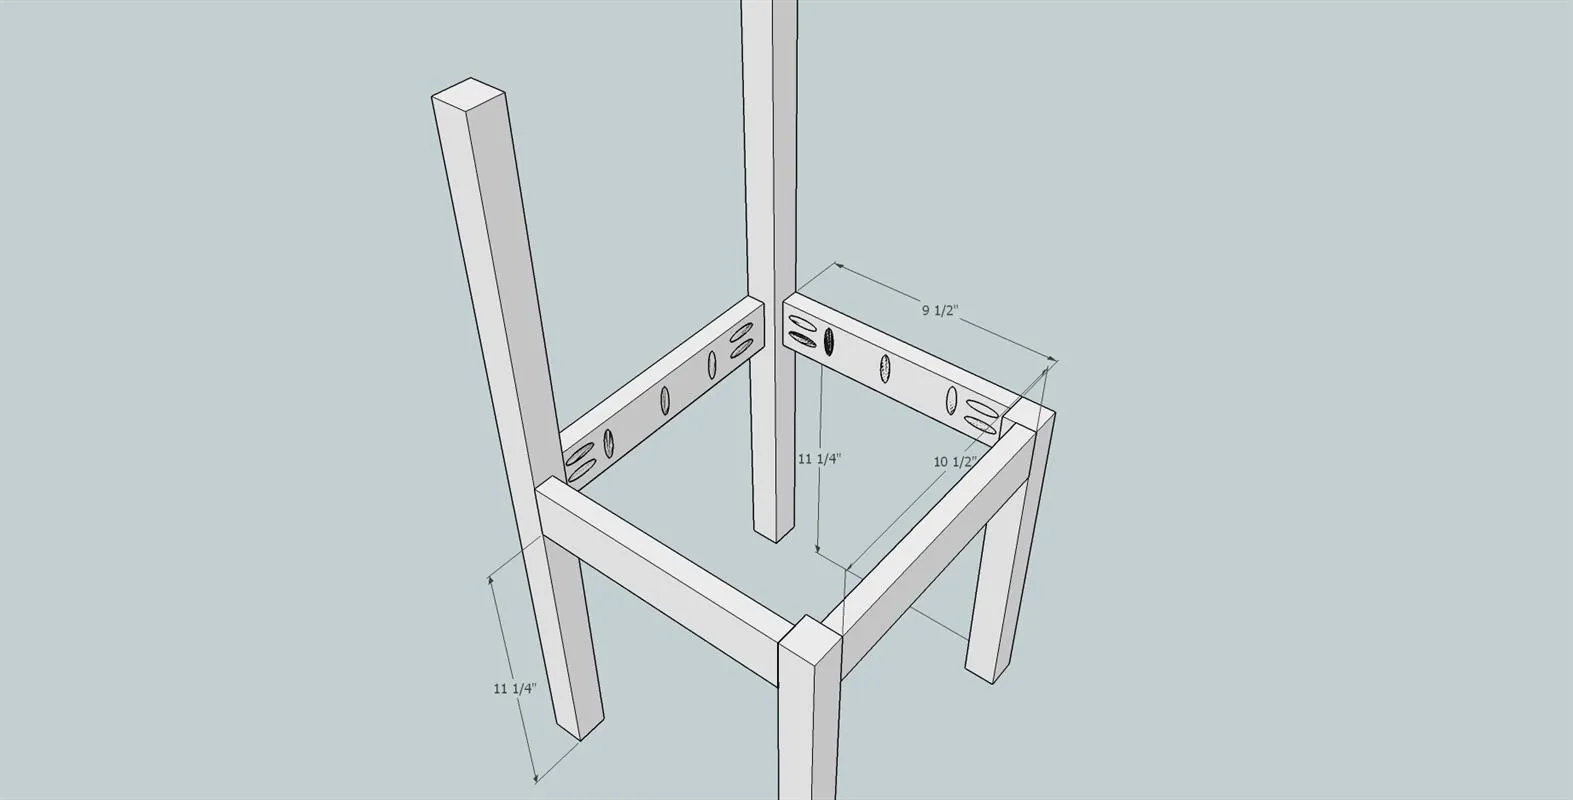
11Chair leg assembly
Using Kreg 1 1/4" coarse pocket screws and Titebond I wood glue attach the chair skirts to the legs.They should be flush with the outside top of the front legs. The skirts should attach to the outside edge of back legs 11 1/4" up from the bottoms. See attached diagram. Do this for both chairs.
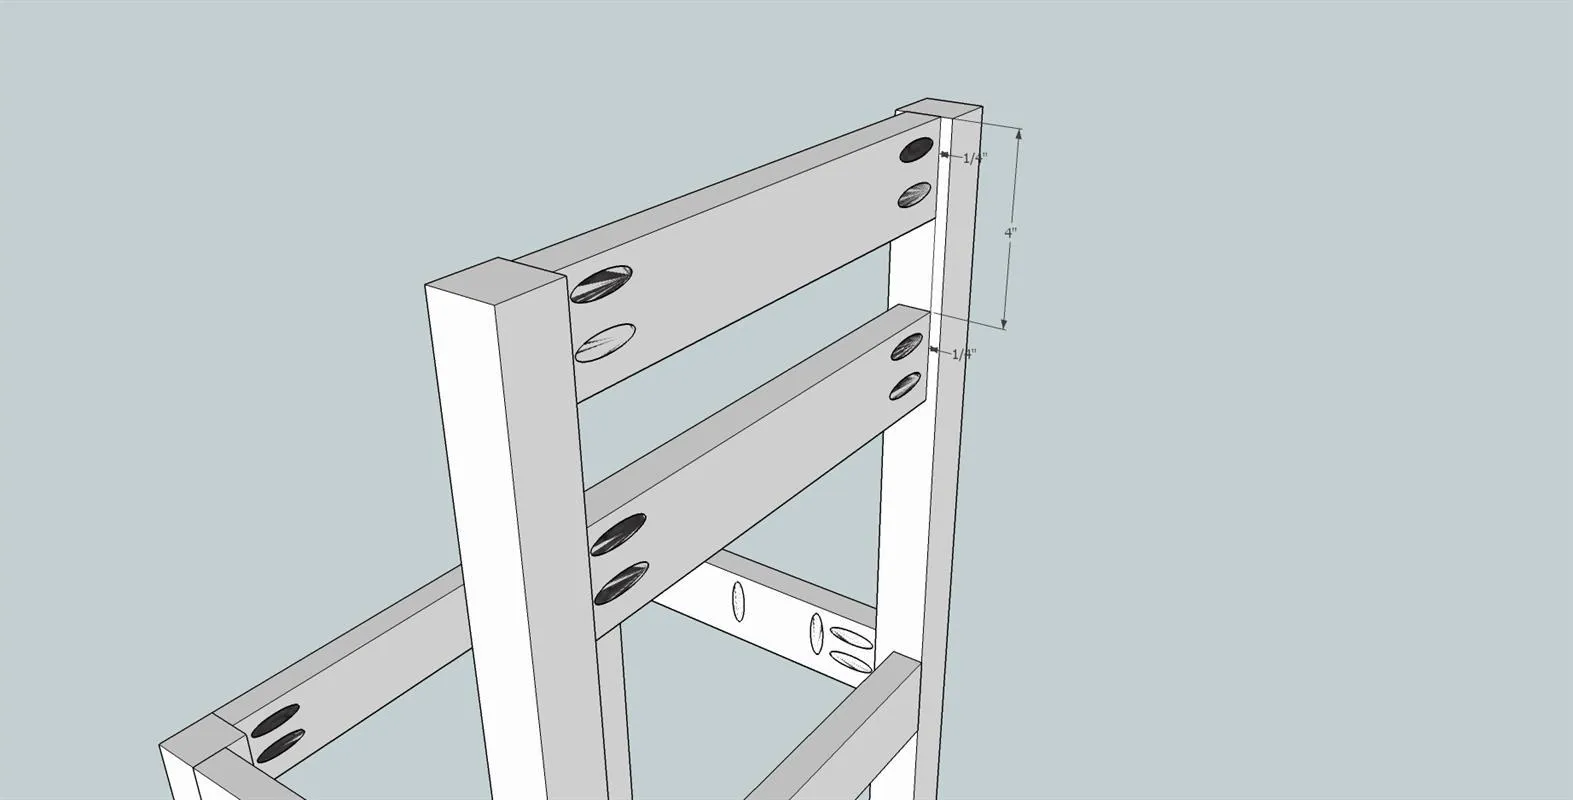
12Chair back rest assembly
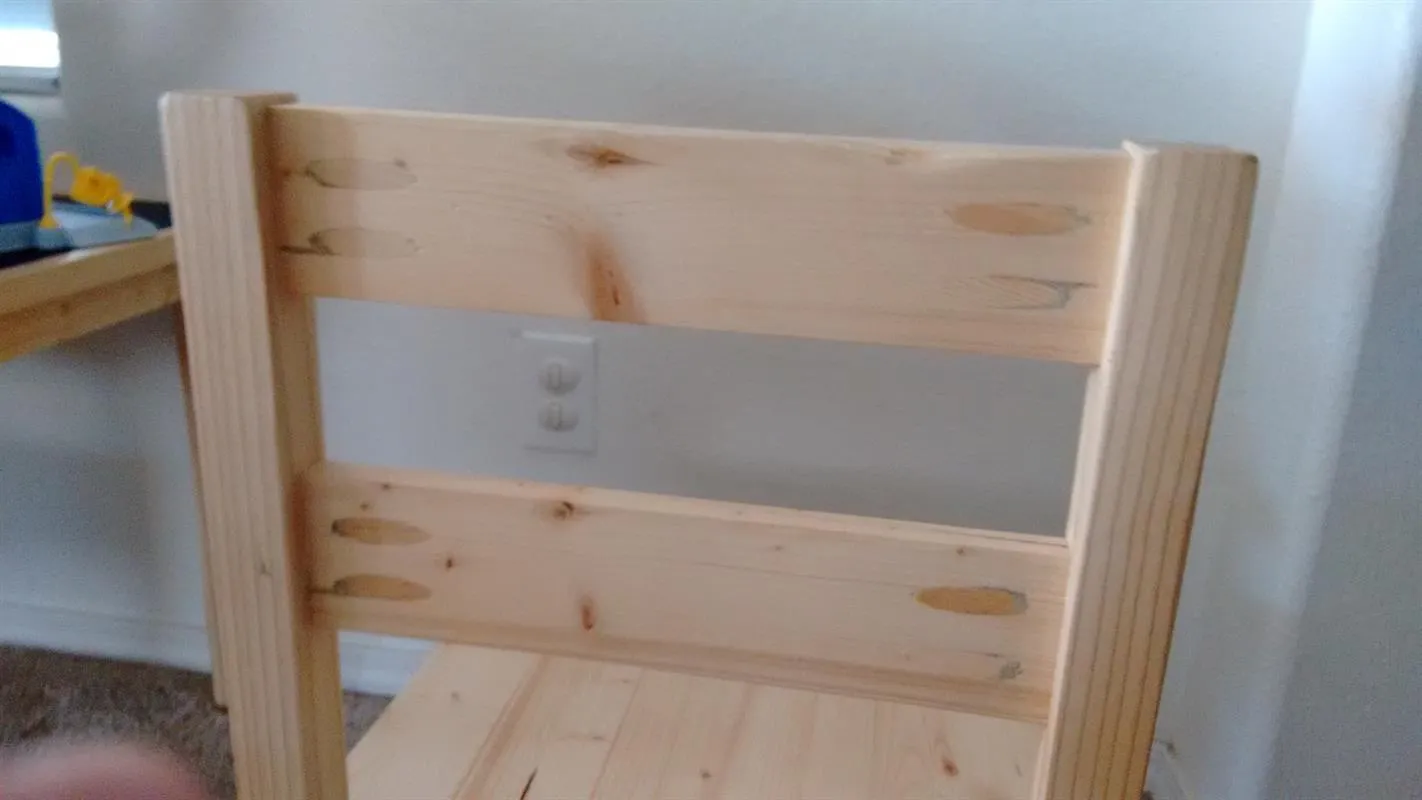
Using Kreg 1 1/4" coarse pocket screws and Titebond I wood glue attach the chair backs to the back legs.They should be 1/4"from the outside of the legs. The top back rest is flush with the top of the legs and the lower back rest is 4" down from the top. See attached diagram. Do this for both chairs. Now use the Kreg Pine Wood Plugs to fill the 16 pocket holes in the back supports. Using 80 - 150 grit sandpaper smooth the plugs flush with the back rest boards.
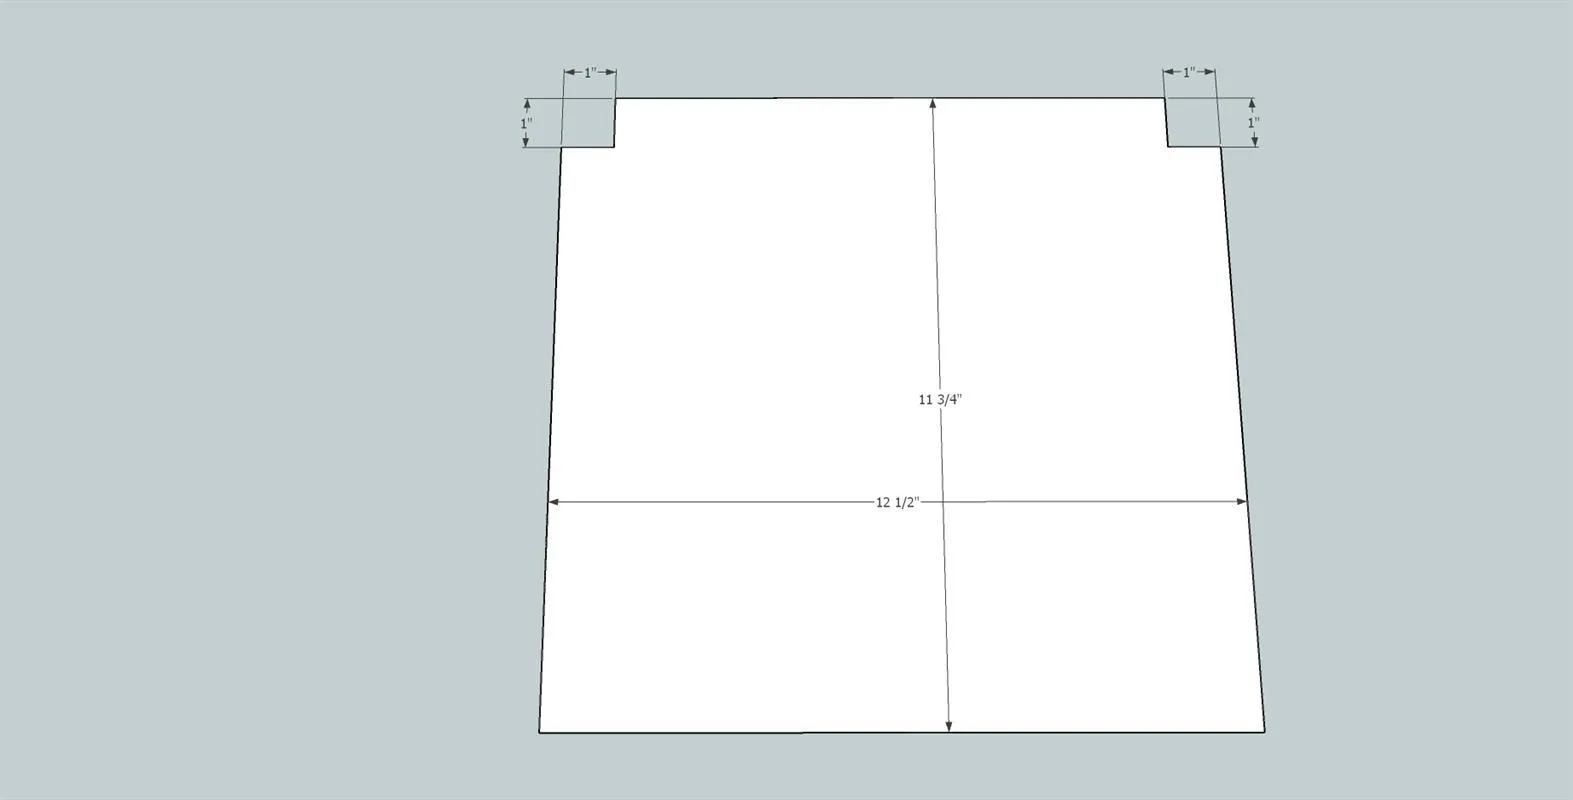
13Cut seat tops to final dimensions
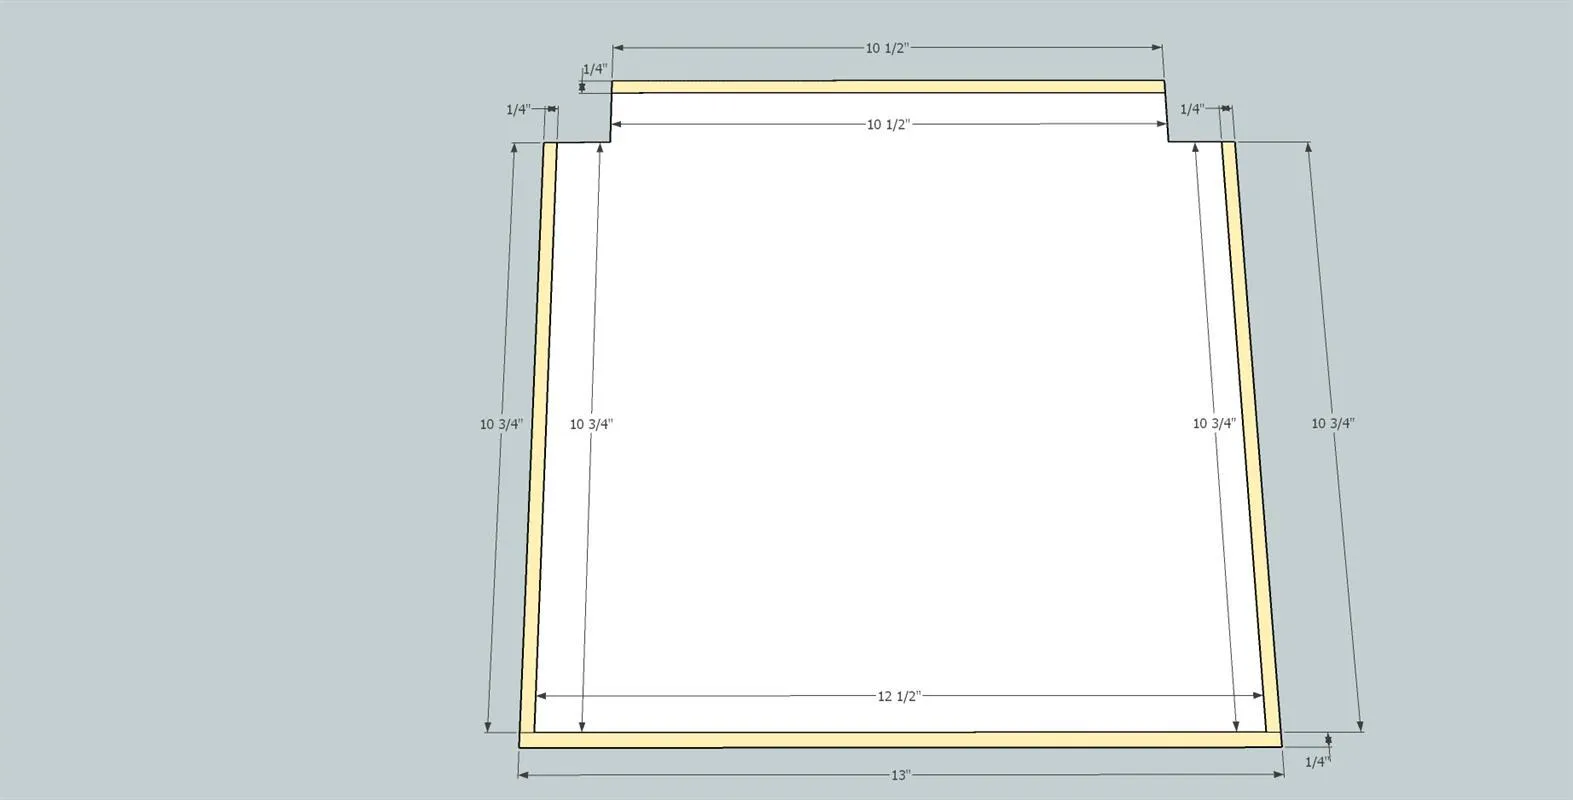
Mark the two 1" X 1" sections that need to be cut from the two rear corners of the seat tops. Use a jig saw or band saw to make the cuts.
14Attach the seat edging
- Use wood glue and 1 1/4" brad nails to attach the seat edging.
- Attach the back edging first, it should be flush with the top and ends of the seat.
- Attach the sides next, they should also be flush with the top and both ends of the seat.
- Finally attach the front edges. They should be flush with the top of the seats and the ends of the side edging. See attached diagram.
15Attach seat tops
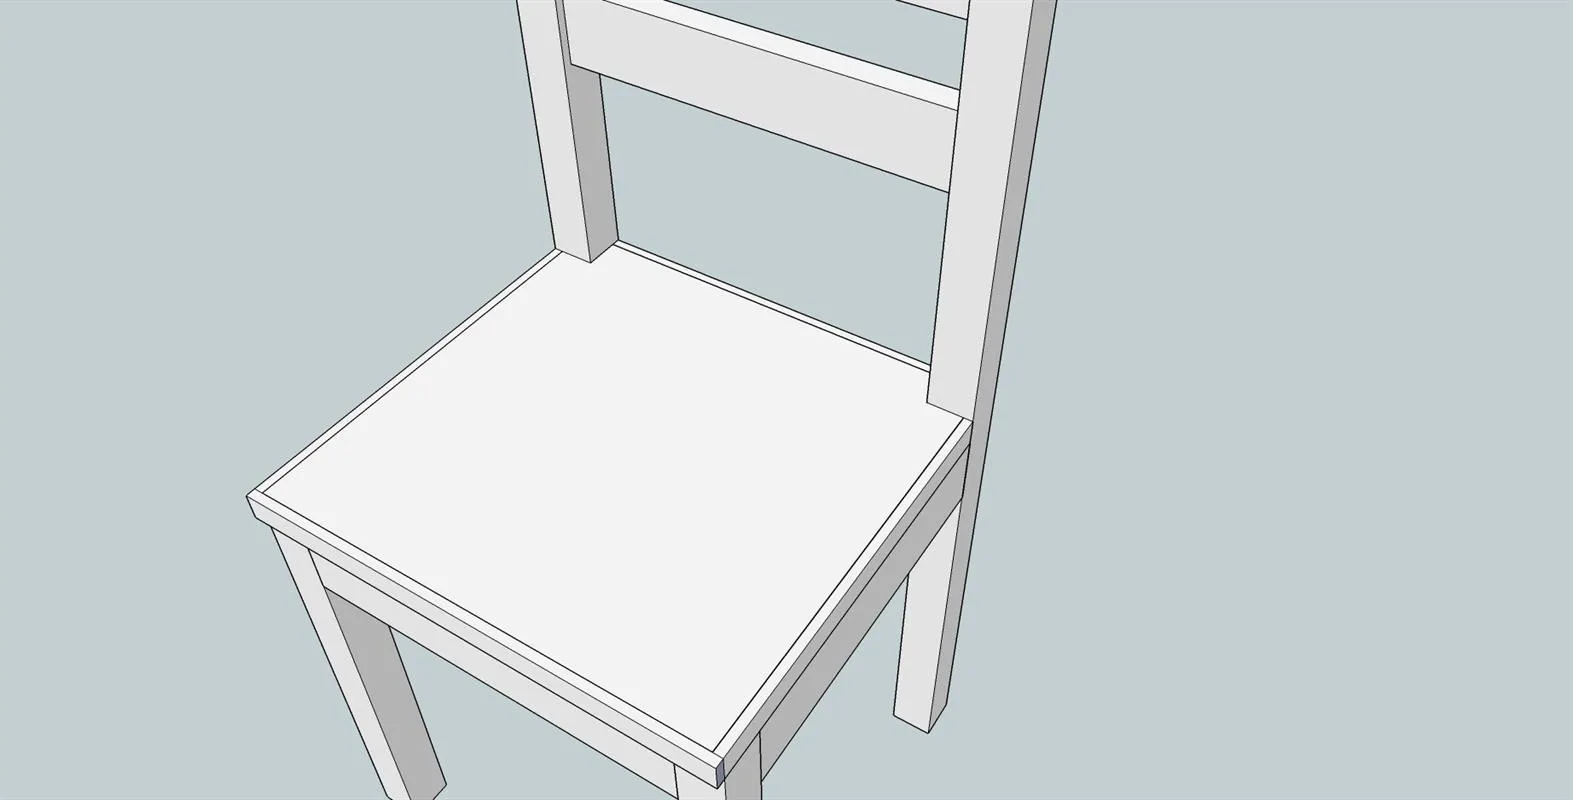
Use Kreg 1 1/4" coarse pocket screws to attach the seat tops to the chair skirts. Make sure that the two cut corners of the seat slide completely between the back legs.
16Finish
- Now that the build is complete use 150 - 220 sandpaper to do a once over on all surfaces in preparation for the finish.
- Clean well to remove all dust. (I use compressed air and clean dry rags) I did not use a stain, just finished with Minwax Polycrylic Satin finish. DO NOT use finish on the Chalk Board area of the table top. I used blue painters tape to mask off that area and then gave the table and chairs three coats of Satin finish following manufacturers instructions.
Tags
- Kid Spaces and Play Room
- Intermediate
Reviews & builds
No reviews yet
Sign in to review this plan or share your build.
No reviews yet. Be the first to build this.