 Notch
NotchArched-Top Headboard
Step-by-step build — 11 steps. Also available as a print sheet.
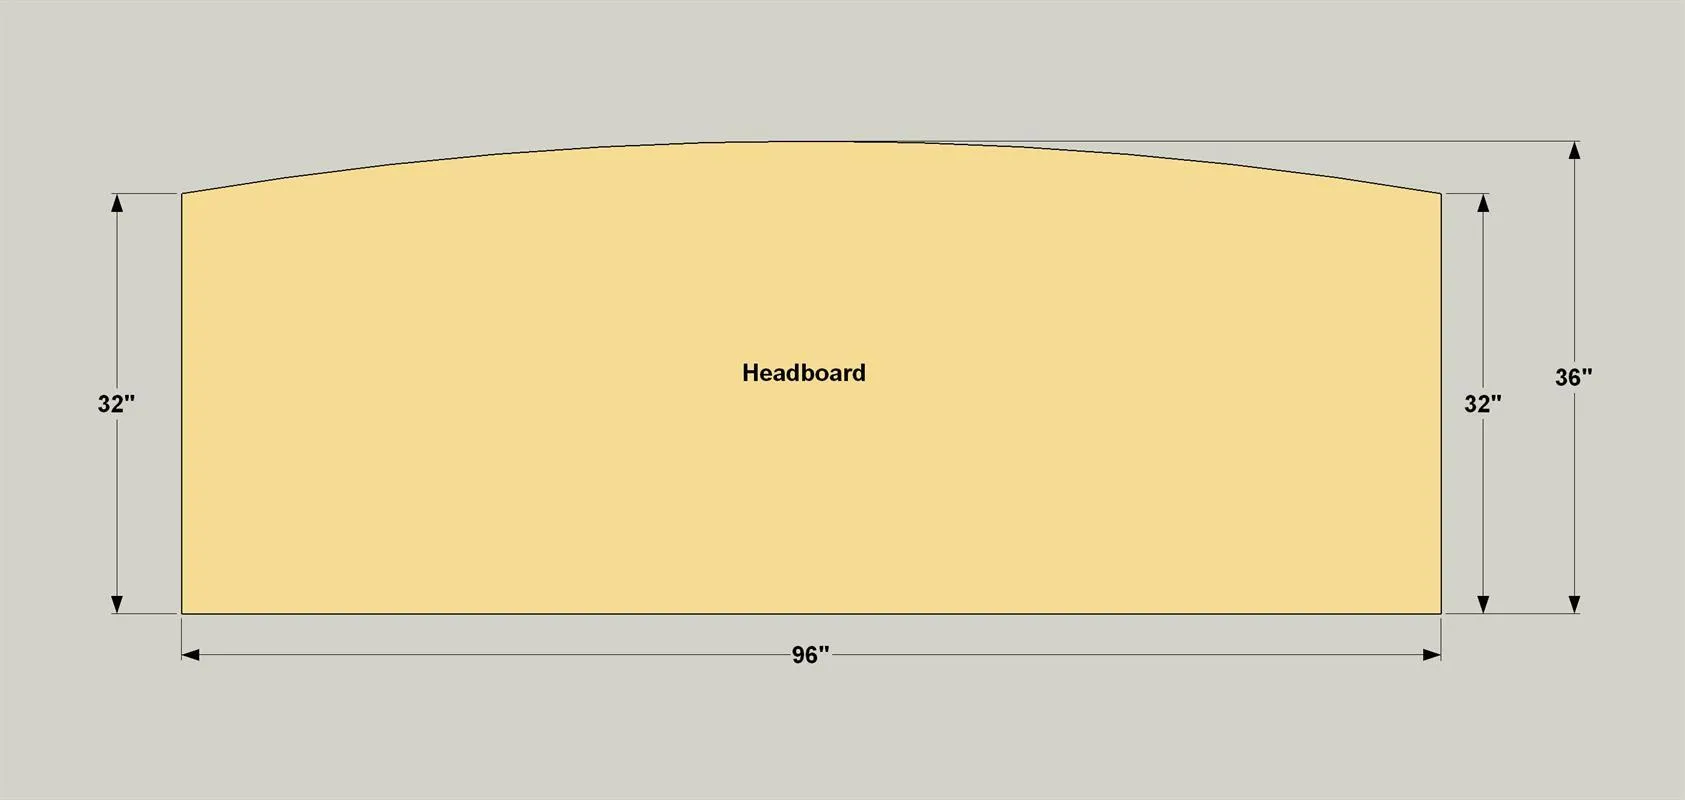
1Cut the Headboard Face
- The first step in creating this project is to cut the Headboard Face from a sheet of 3/4" plywood, as shown in the cutting diagram. To do that, you need to first lay out the arched shape. See the Tip below for a great way to create a smooth arc.
- Once you have it drawn on, use a jigsaw with a fine-tooth blade to cut the arch as close to the line as possible.
- Now sand the arch smooth to the line with a random-orbit sander or a belt sander.
- Take care to keep the edge flat and square to the face as you sand.
- Tip: Use a Thin Strip for a Smooth Arch An easy way to lay out a large arc is to use a thin piece of wood to create the shape, and then simply trace it. We used a long piece of screen molding, which you can pick up for a few dollars.
- First mark the side height of the Headboard on the ends of the plywood.
- Next, find the center and mark its height. Drive a small nail in at this center point.
- Lay the molding on edge against that nail.
- Then, on one end, pull the molding down until it aligns with your mark on the side of the plywood, and hold it there by clamping a scrap block. Do the same on the other side, and the arc will take shape. You can “adjust” the arc a bit by pushing and pulling on the molding if necessary.
- Now carefully trace the arc with a pencil.
2Make a Pair of Side Fillers
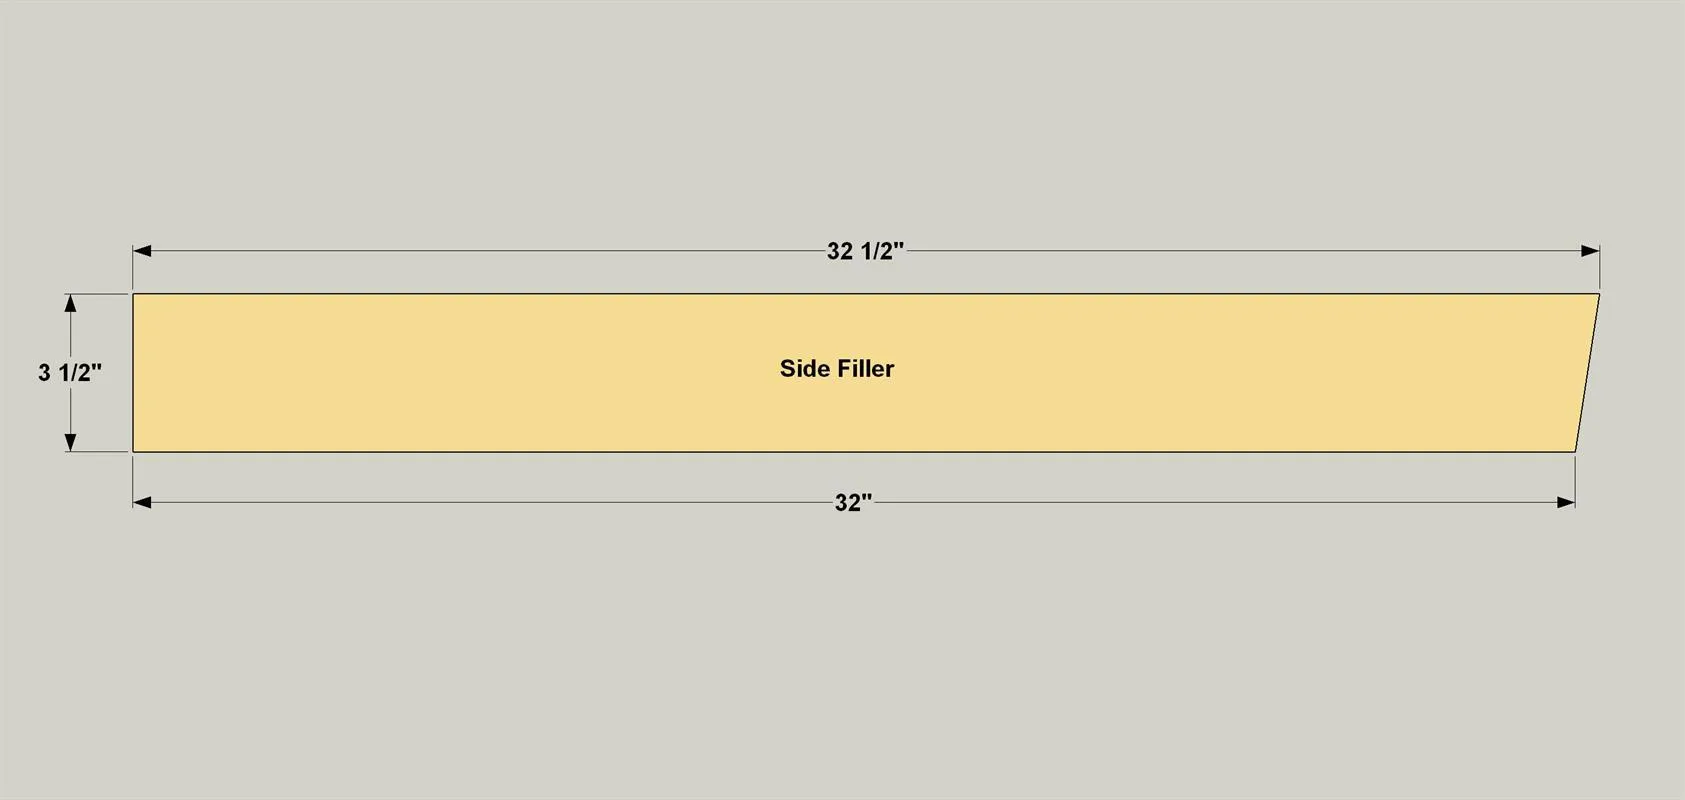
- Now you can cut two Side Fillers to size, as shown in the cutting diagram. You could make them from a 1x4 board, but we used leftover plywood. Make them extra-long at first.
- Then set each Side Filler in place against backside of the Headboard Face. Make sure that the straight factory edge of each Side Filler is aligned with the sides of the Headboard Face and that the bottom of the Fillers is even with the bottom edge of the Headboard Face.
- Then trace the arched shape of the Headboard Face onto each Side Filler, and cut the Side Fillers to final length using a jigsaw.
3Attach the Side Fillers
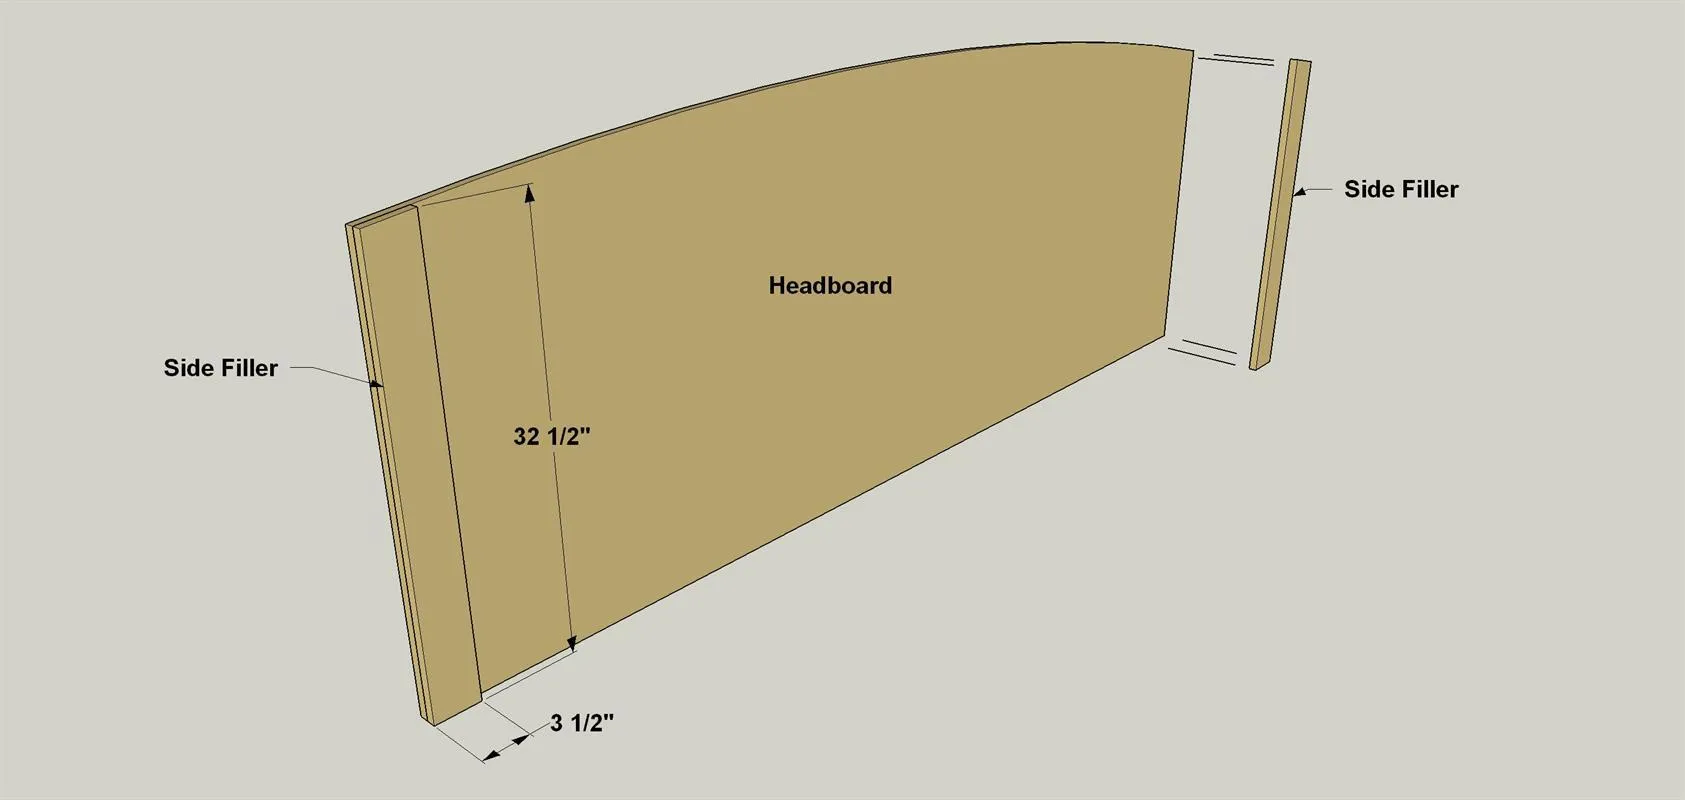
- Spread glue on the Side Fillers, and then clamp them in place on the backside of the headboard face, making sure the ends and edges are aligned.
- Clamp the Fillers in place, and then drive in 1 1/4" brads. 6-8 nails per Side Filler should be plenty. You can use a brad nailer if you have access to one, or just use a hammer and loose brads.
4Make a Top Filler
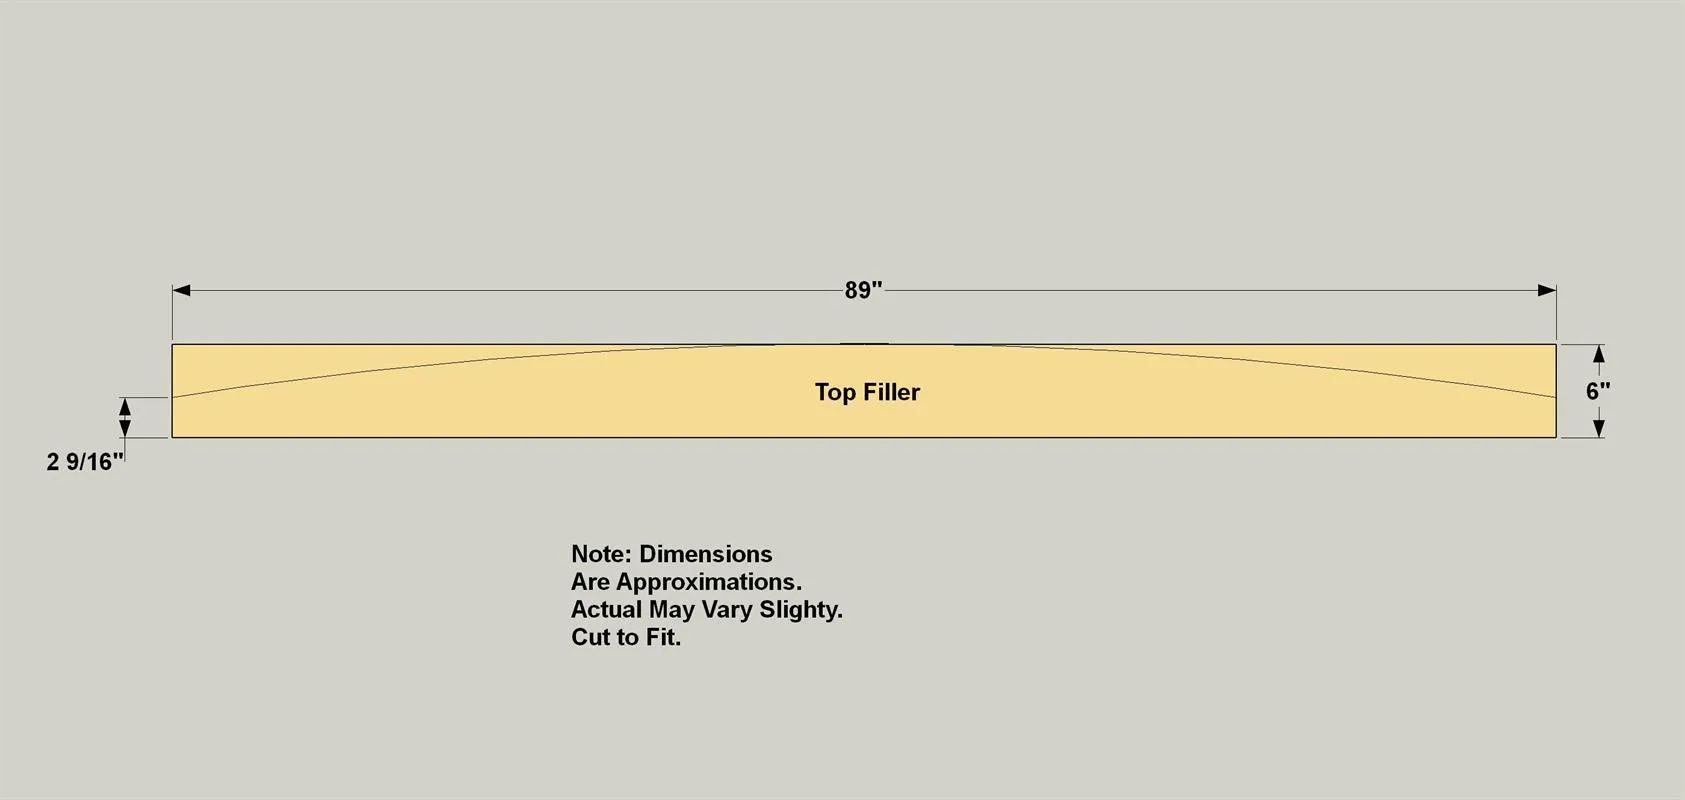
- Now you need to create a Top Filler.
- Once again, we cut ours from leftover plywood, as shown in the cutting diagram.
- Start by cutting an extra-wide piece from your remaining plywood.
- Then cut it to length.
- Lay the Top Filler in place between the Side Fillers, and then trace arc from the Headboard Face on to the Top Filler.
- Cut the arch with a jigsaw.
5Attach the Top Filler
Spread glue on the Top Filler, and then clamp it in place, making sure the upper edge is even with the arched edge of the Headboard Face. Secure the Top Filler with 1 1/4" brads. After the glue dries, sand edges of the headboard assembly as necessary to ensure that you have a flat, even surface for the iron-on veneer edge banding that you’ll add next.
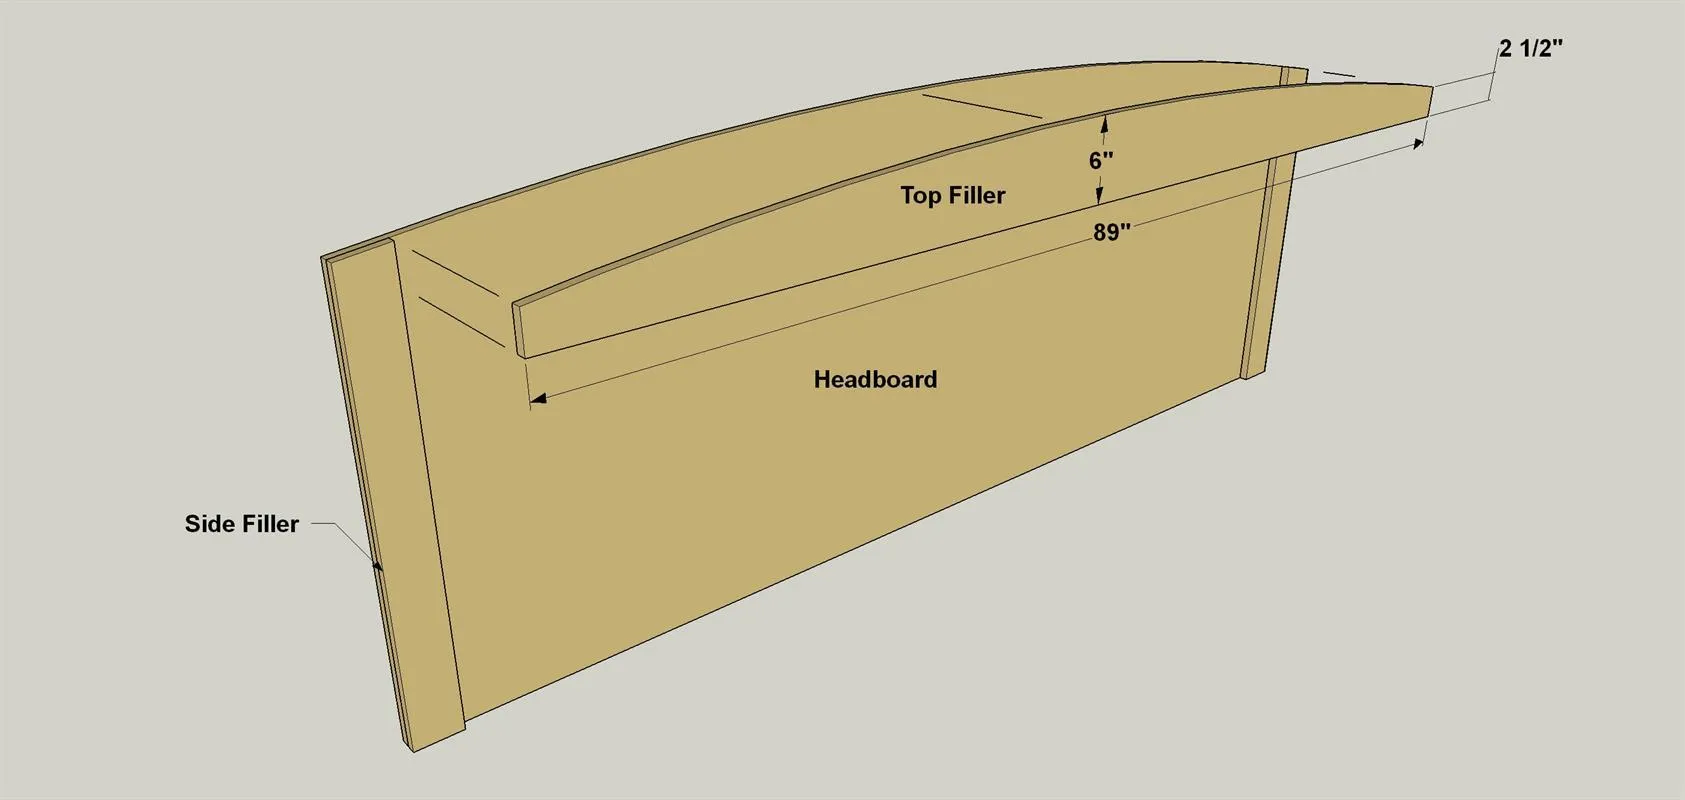
6Veneer the Edges
- Cut two pieces of 2"-wide iron-on veneer edge banding slightly longer than the sides of the headboard.
- Then cut one piece slightly longer than the arched top edge. Starting with the sides of the headboard, position the edge banding so it overlaps on both edges and at the ends.
- Apply the banding using an iron, according to the manufacturer’s directions. When the glue has cooled, trim the edging flush at the ends using a utility knife, and flush along the edges using an edge trimmer. After edging both sides, apply the edge banding to the arched top, as well. Lightly sand all of the veneer edges by hand, just enough to soften the sharp edges. It only takes a few strokes. Be careful so you don’t sand through the thin plywood face veneer.
7Cut the Floating Side Tables
- Cut two Table Tops, two Table Sides and two Table Bottoms from a 1 x 12 board, as shown in the cut diagram.
- Set your pocket hole jig for 3/4" material and drill pocket holes in the Table Tops and Table Sides as shown. Notice there are left side and right side parts so pay close attention to the pocket hole placement on these parts.
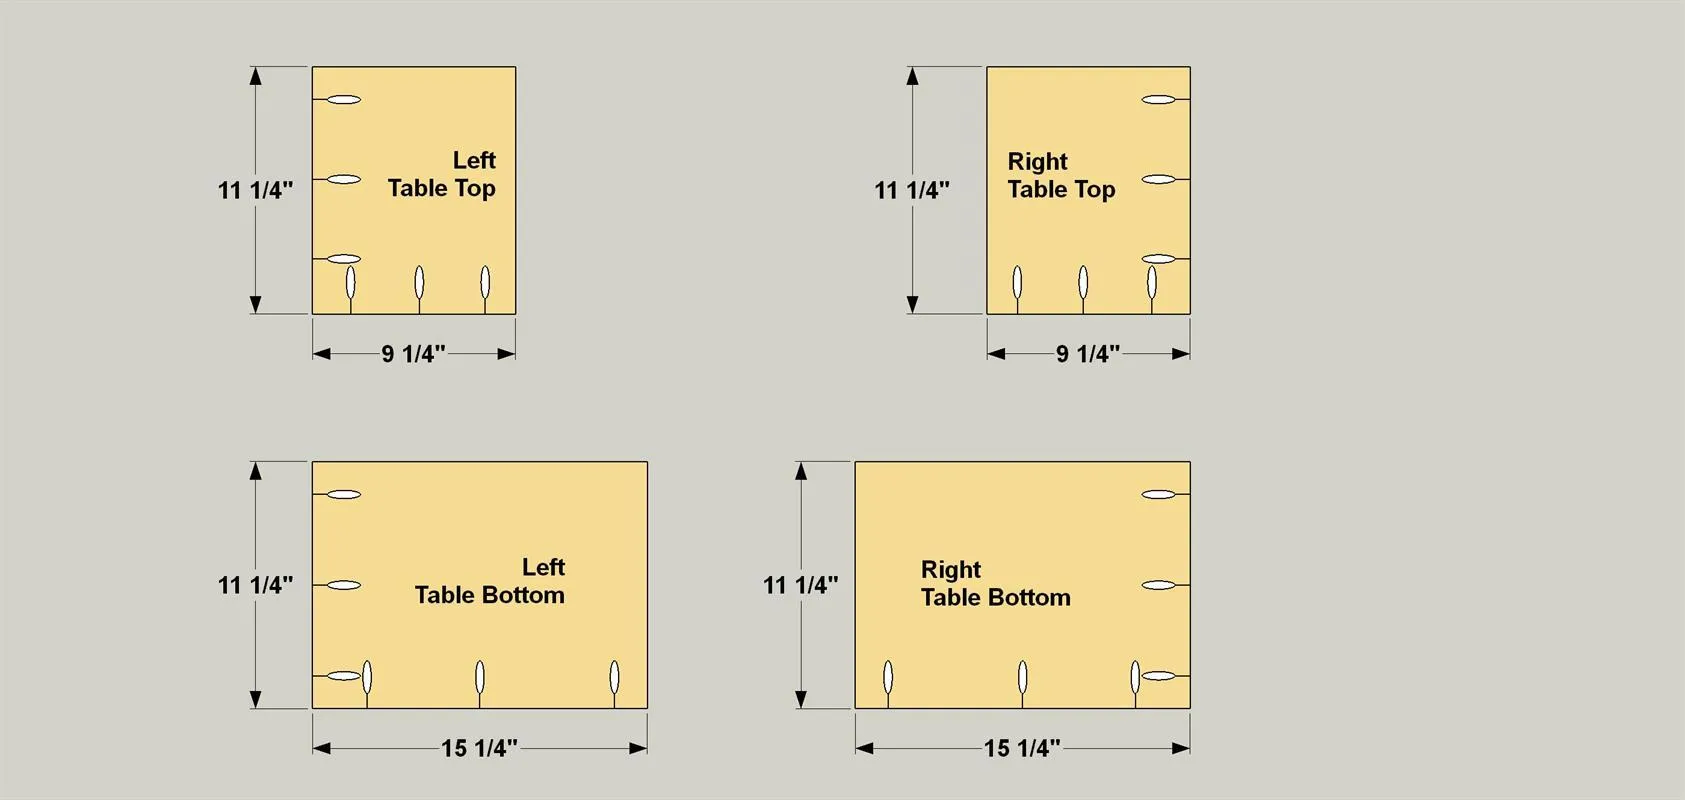
8Attach the Top to the Side
Attach the Table Tops to the Table Sides using 1 1/4" fine-threaded pocket screws. Make sure the Top and Side edges are flush with one another and the pocket holes face downward.
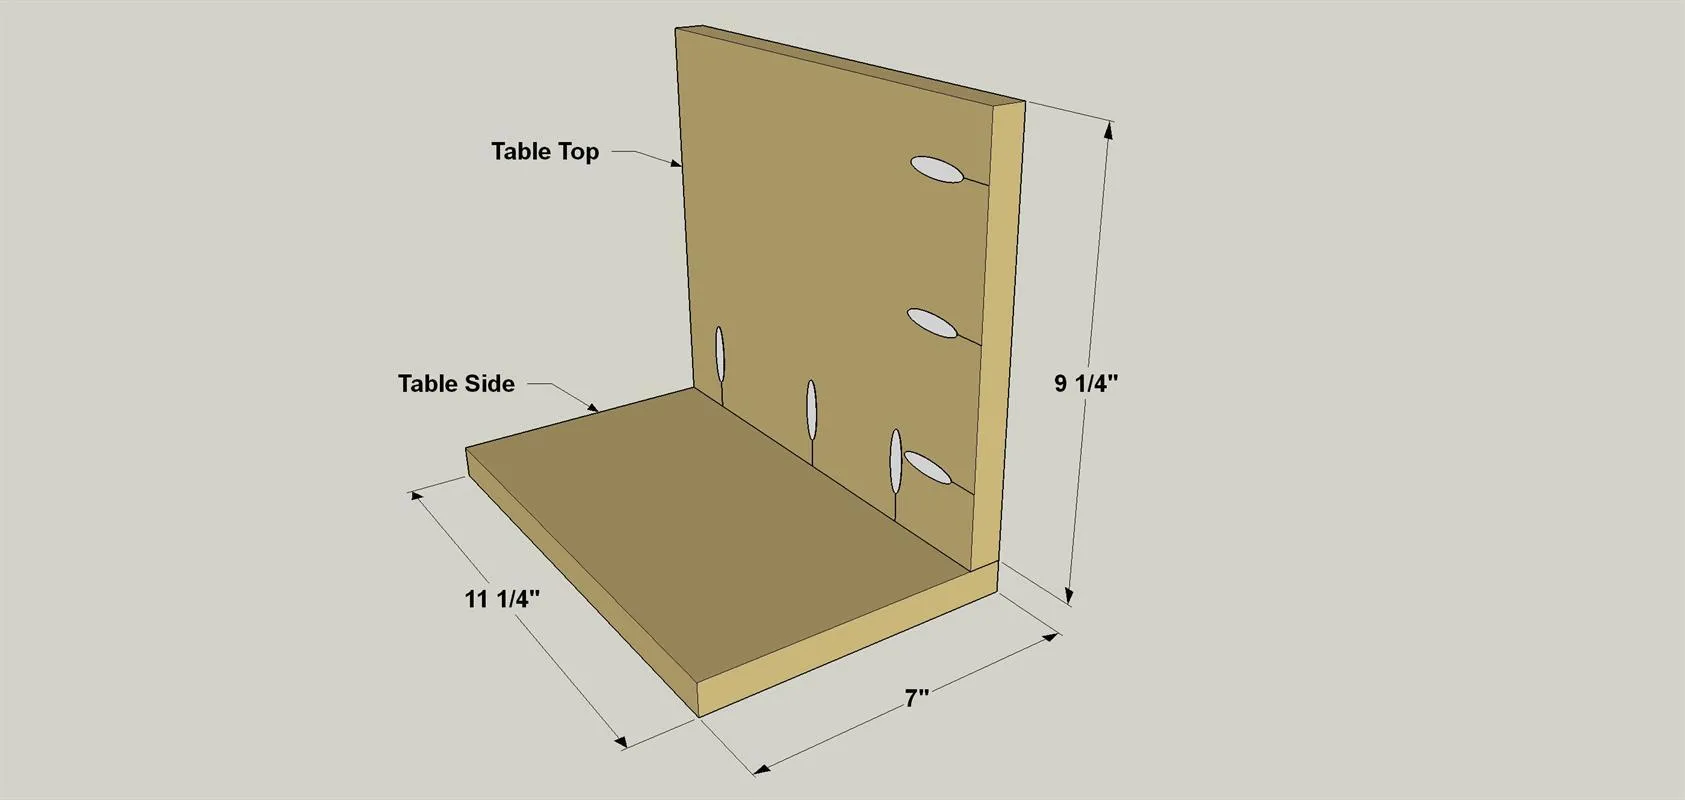
9Attach the Bottom to the Side
Attach the Table Bottoms to the Table Sides using 1 1/4" fine-threaded pocket screws. Again, align the edges and make sure the pocket holes face downward.
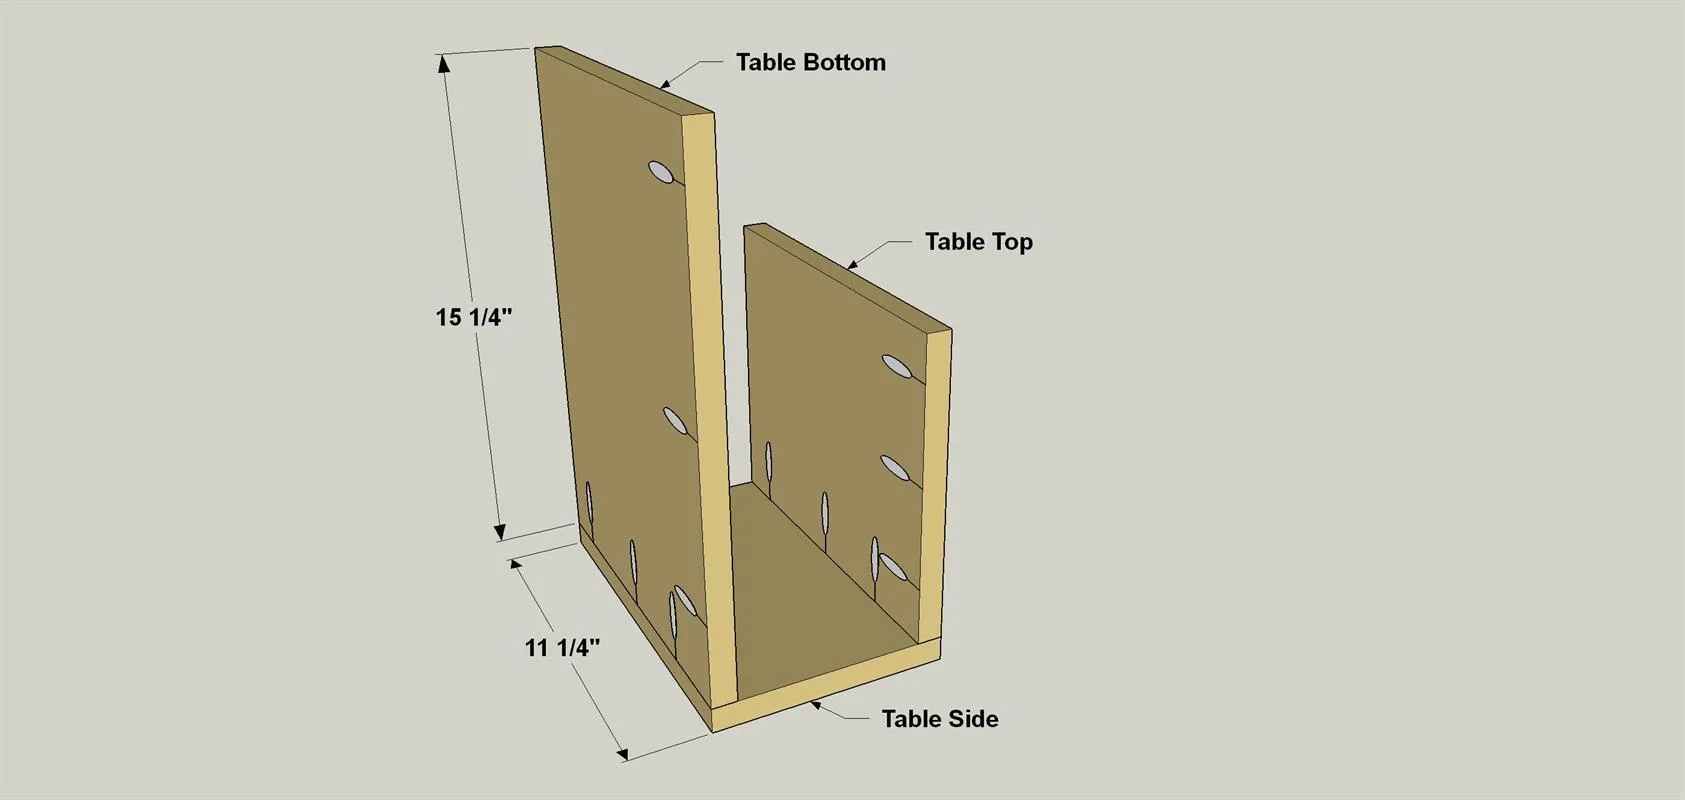
10Attach the Tables
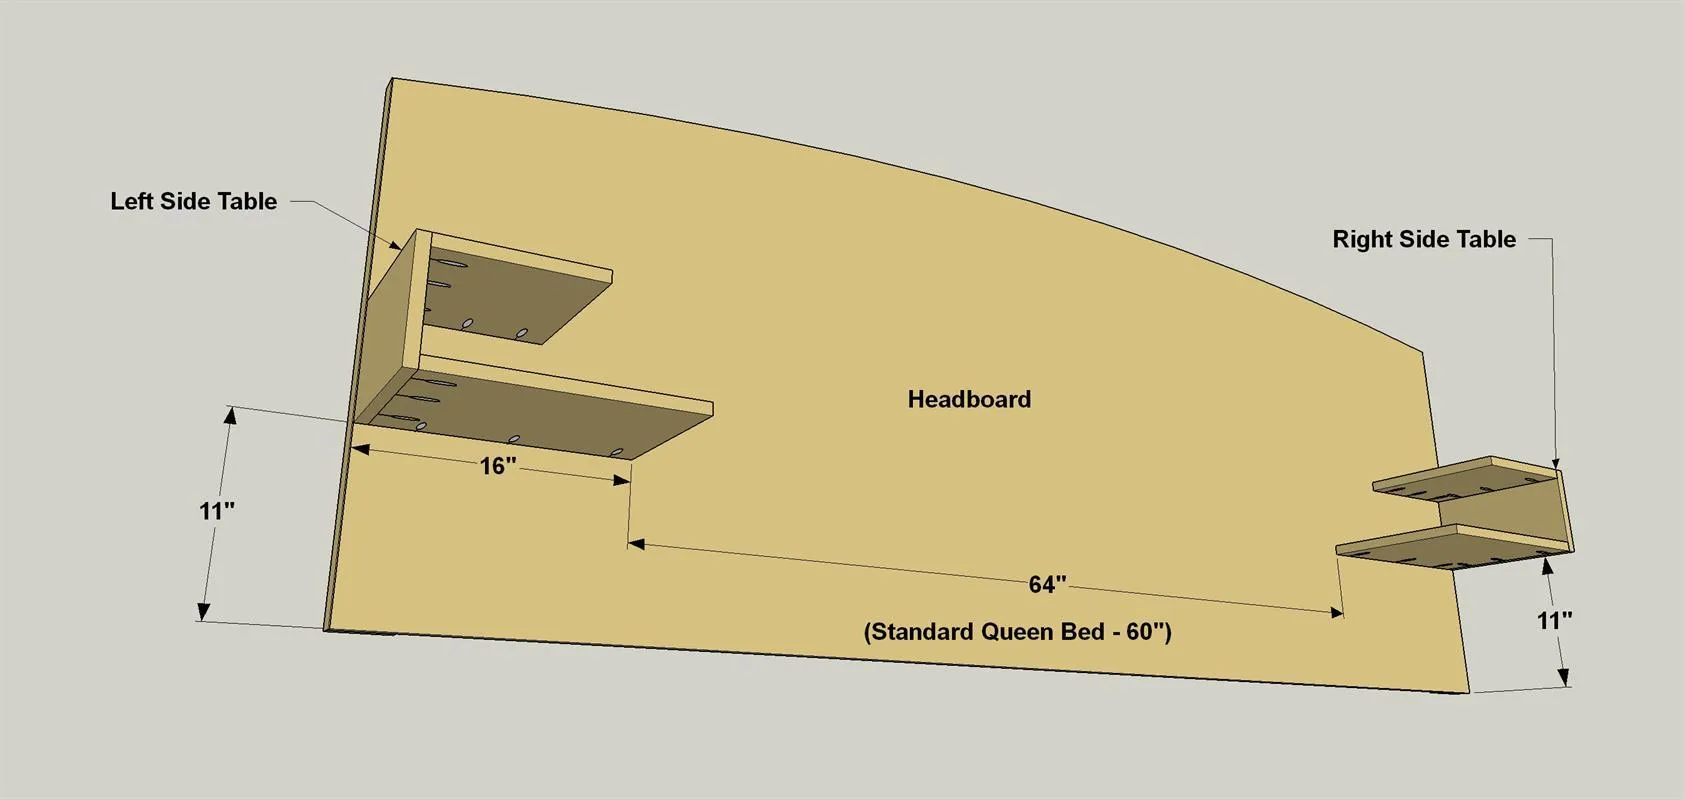
Attach the Tables to the Headboard Face where shown using 1 1/4" coarse-threaded pocket screws. Course-tread screws provide a stronger connection when attaching to plywood.
11Sand and Apply a Finish
- Sand all of the edges and surfaces as needed.
- Then then thoroughly clean dust off of the headboard before applying your favorite finish. To create the washed finish shown here, we used a light blue color (Oatlands Dainty Blue from Valspar) and thinned it about 25% with water. We applied the paint with a foam roller, and then quickly wiped off the excess with rags while the paint was still wet.