 Notch
Notch- Difficulty
- Expert
- Time
- 11–21.5 hours
- Cost
- $$$
About this build
This cabinet borrows its styling from the metal cabinets that were once commonplace in doctor’s and dentist’s offices. This one, though, is made from plywood and dimensional boards you can pick up at a home center. Glass panels give it personality, and offer a chance to hone your router skills.
Tools
Essential
- Circular Saw
- Drill / Driver
- Jigsaw
- Miter Saw
- Pocket Hole Jig
- Random Orbit Sander
- Router
Optional / nice to have
- Tape Measure
Materials
| Item | Qty |
|---|---|
| Plywood, 3/4" Thick Full Sheet | 1 board |
| Plywood, 1/2" Thick Half Sheet | 1 board |
| Board, 1x2 96" | 6 board |
| Board, 1x3 24" | 1 board |
| Square Dowel, 1/4" 48" | 8 board |
| 1 1/4" coarse pocket hole screws | 108 each |
| 1" coarse pocket hole screws | 22 each |
| 25' roll iron-on edge banding | 1 each |
| 1" diameter door pulls | 2 each |
| Pairs 1 1/2" no-mortise door hinges | 2 each |
| 1/8" glass, 12 5/8" x 34 5/8" | 2 each |
| 1/8" glass, 14 1/4" x 34 1/2" | 1 each |
Overall cost: $$$. Lumber prices vary by region, species, and season, so we give a band rather than a figure we would only be pretending to know.
Cut list
| Part | Qty | T × W × L |
|---|---|---|
| Bottom | 1 | 3" × 17" × 21" |
| Divider | 1 | 3" × 17" × 21" |
| Top | 1 | 3" × 17" × 21" |
| Lower back | 1 | 3" × 16" × 18" |
| Upper back | 1 | 3" × 18" × 37" |
| Side | 2 | 3" × 15" × 16" |
| Shelf | 2 | 1" × 12" × 13" |
| Front/back leg | 4 | 3/4" × 2" × 5" |
| Side leg | 4 | 3/4" × 1" × 5" |
| Base front/back rail | 2 | 3/4" × 1" × 15" |
| Base side rail | 2 | 3/4" × 1" × 11" |
| Lower front stile | 2 | 3/4" × 1" × 16" |
| Upper front stile | 2 | 3/4" × 1" × 37" |
| Side stile | 4 | 3/4" × 1" × 37" |
| Side rail | 4 | 3/4" × 1" × 12" |
| Upper door stile | 2 | 3/4" × 1" × 37" |
| Upper door rail | 2 | 3/4" × 1" × 13" |
| Lower door stile | 2 | 3/4" × 1" × 15" |
| Lower door rail | 2 | 3/4" × 1" × 13" |
| Long side glass top | 4 | 1/4" × 1/4" × 34" |
| Short side glass stop | 4 | 1/4" × 1/4" × 12" |
| Long door glass stop | 2 | 1/4" × 1/4" × 34" |
| Short door glass stop | 2 | 1/4" × 1/4" × 13" |
| Door panel | 1 | 1" × 12" × 13" |
What to buy
Buy 15 boards at 8 ft.
3" × 18"
1 board
3" × 17"
1 board
3" × 16"
1 board
3" × 15"
1 board
1" × 12"
1 board
3/4" × 2"
1 board
3/4" × 1"
6 boards
1/4" × 1/4"
3 boards
Assumes 8 ft stock, a 1/8" saw kerf, and buying each part at its own width. Change the board size or kerf on the full board plan →
Instructions
1Begin with the Base
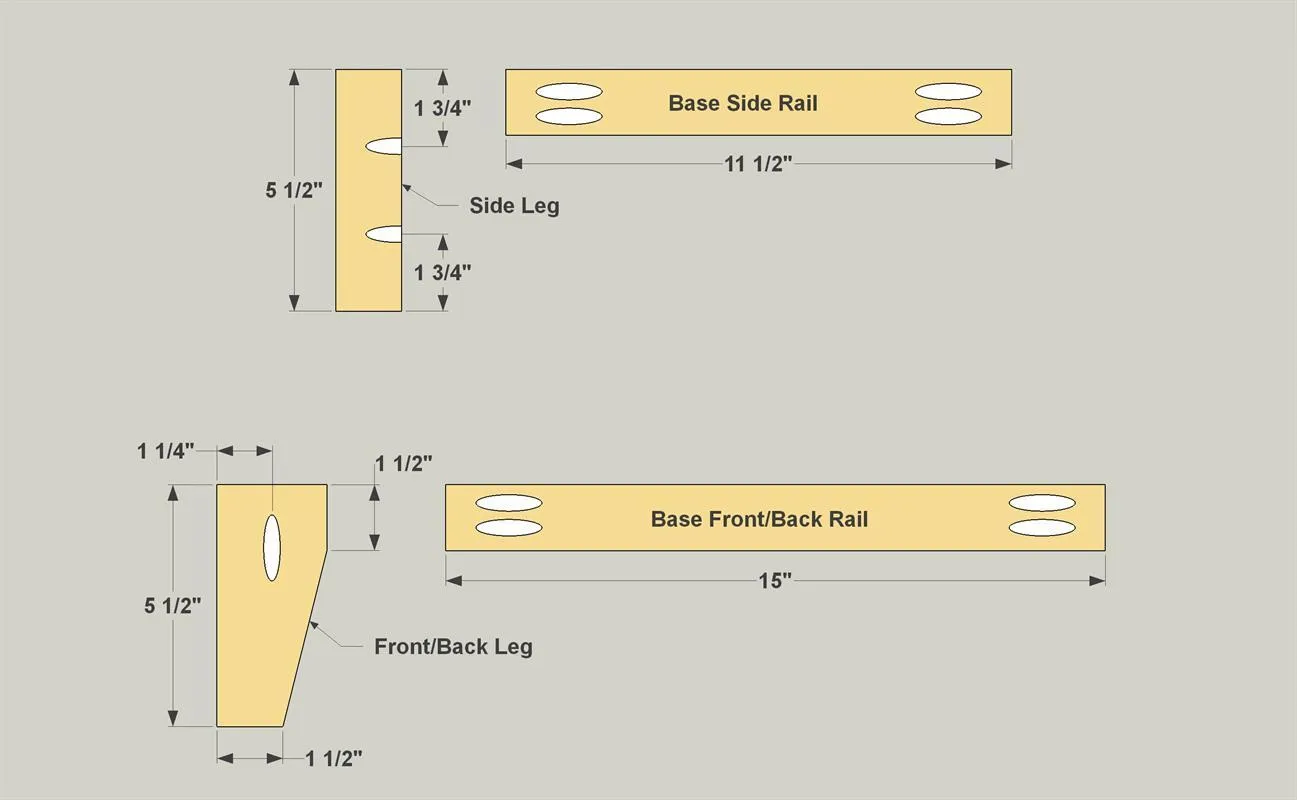
- Cut two Base Front/Back Rails, two Base Side Rails, and four Base Side Legs to length from 1x2 boards (we used pine), as shown in the cutting diagram.
- Also cut four Base Front/Back Legs.
- Then cut the angle on the Front/Back Legs using a jigsaw. With your pocket-hole jig set up for 3/4" stock, drill pocket holes where shown in all of these pieces, as shown.
2Assemble the Base
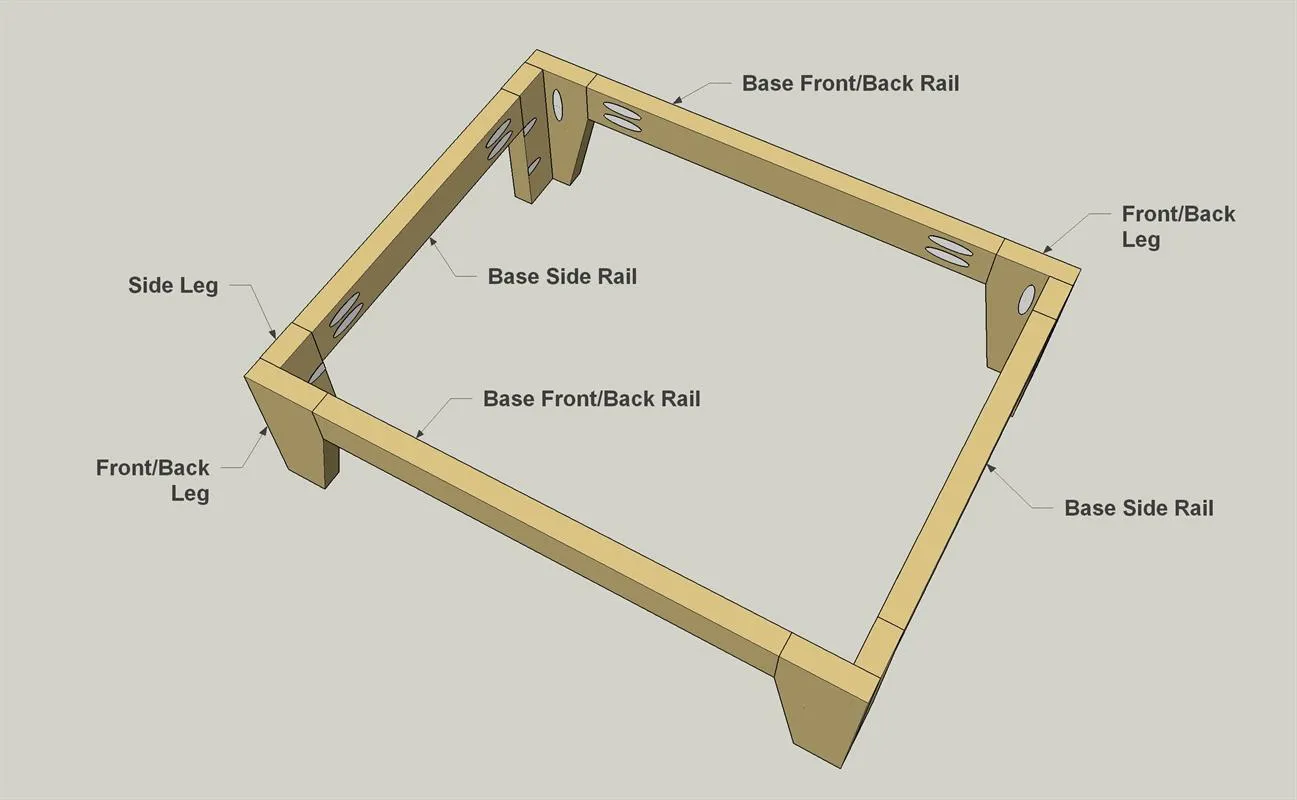
Now you can assemble the base using 1 1/4" coarse-thread pocket hole screws, as shown.
3Create the Bottom, Divider and Top
Cut a Bottom, Divider, and Top to size from 3/4" plywood (we used birch), as shown in the cutting diagram. Then, add iron-on edging to all edges of these pieces to cover up the exposed plywood.
Tip: Iron On a Finished Edge Plywood is a wonderful material for building projects. Most of the time, though, you don’t want the raw exposed edges to show. To hide them, you can use iron-on edging. It comes with adhesive already applied. You just cut it to rough size, apply it using a hot iron, and then trim it with a utility knife and sand the trimmed areas smooth.
4Attach the Bottom
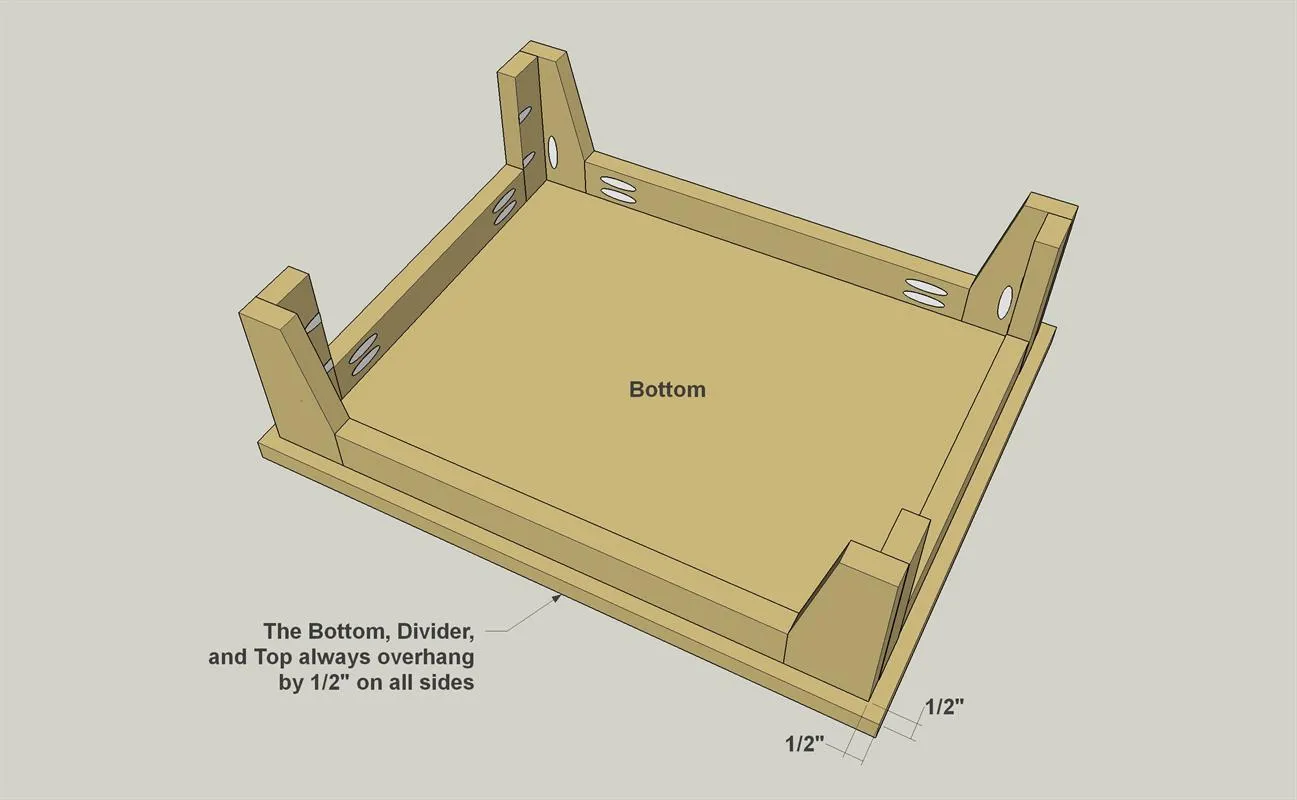
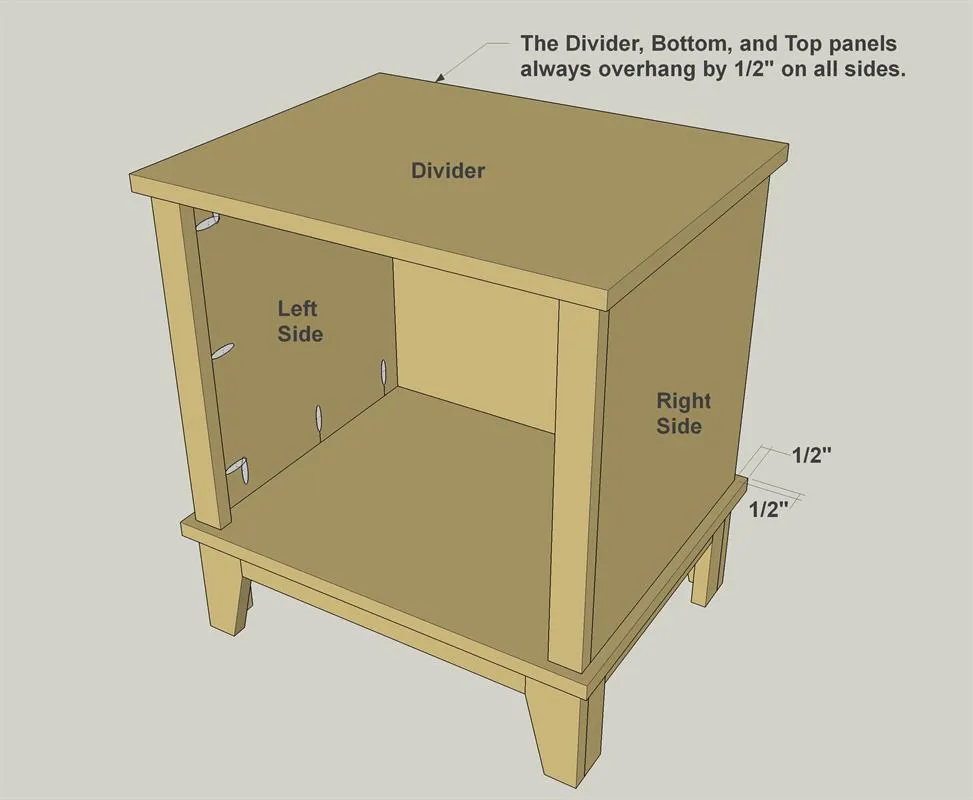
With the plywood edging complete, you can now attach the Bottom to the base assembly, as shown. Note that the Bottom overhangs 1/2" on all sides.
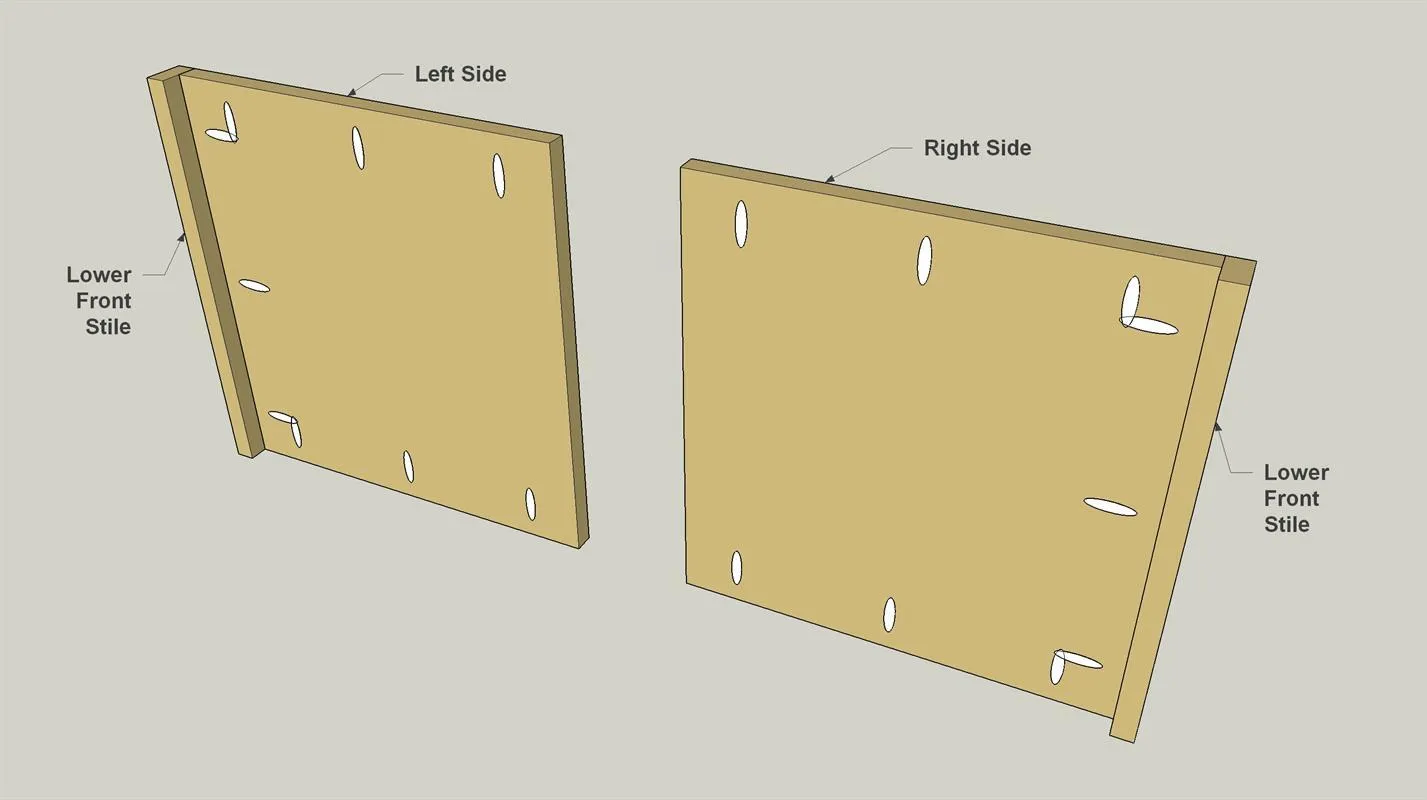
5Make the Lower Sides
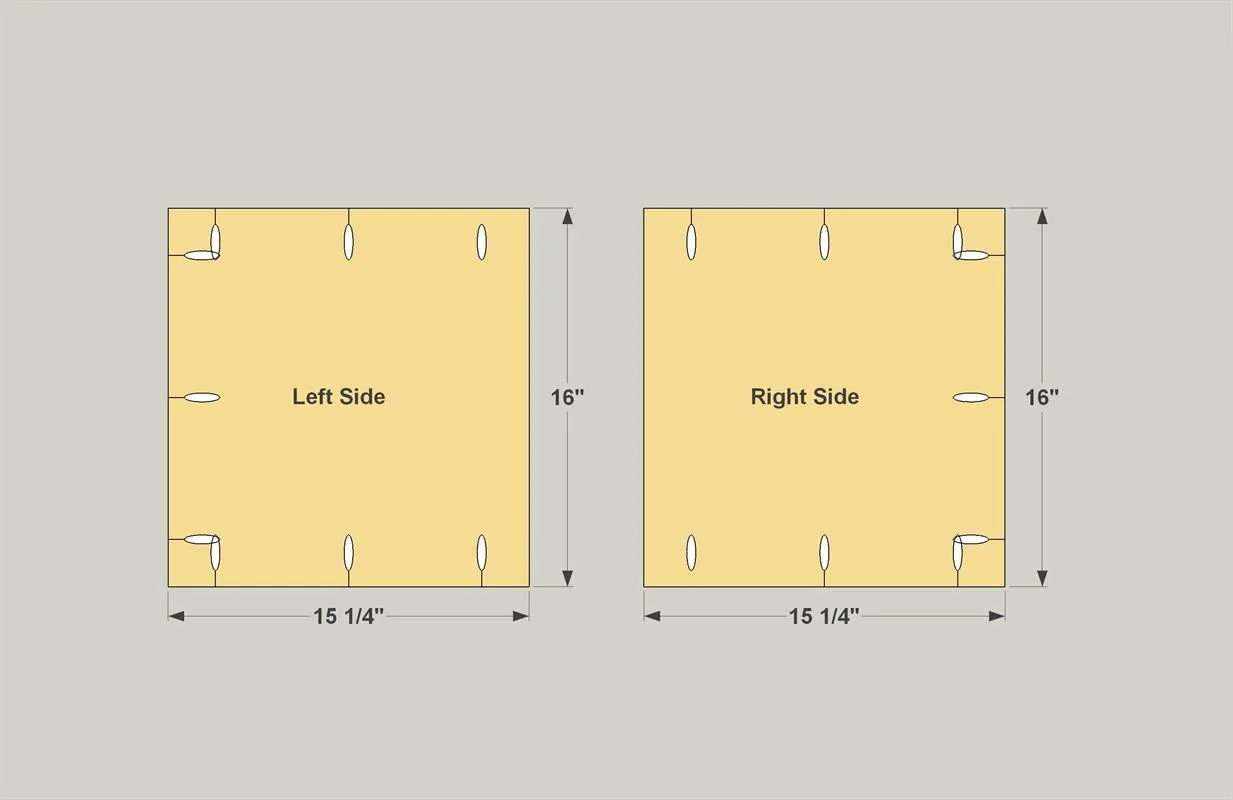
- Cut two Lower Sides to size from 3/4" plywood, as shown in the cutting diagram.
- Also cut two Lower Front Stiles to length from 1x2 boards.
- Then, with your pocket-hole jig set up for 3/4" stock, drill pocket holes where shown in Lower Sides.
6Assemble the Lower Sides
Now attach the Lower Front Stiles to the Lower Sides using 1 1/4" coarse-thread pocket hole screws. Make sure you are creating two “mirror image” assemblies, as shown.
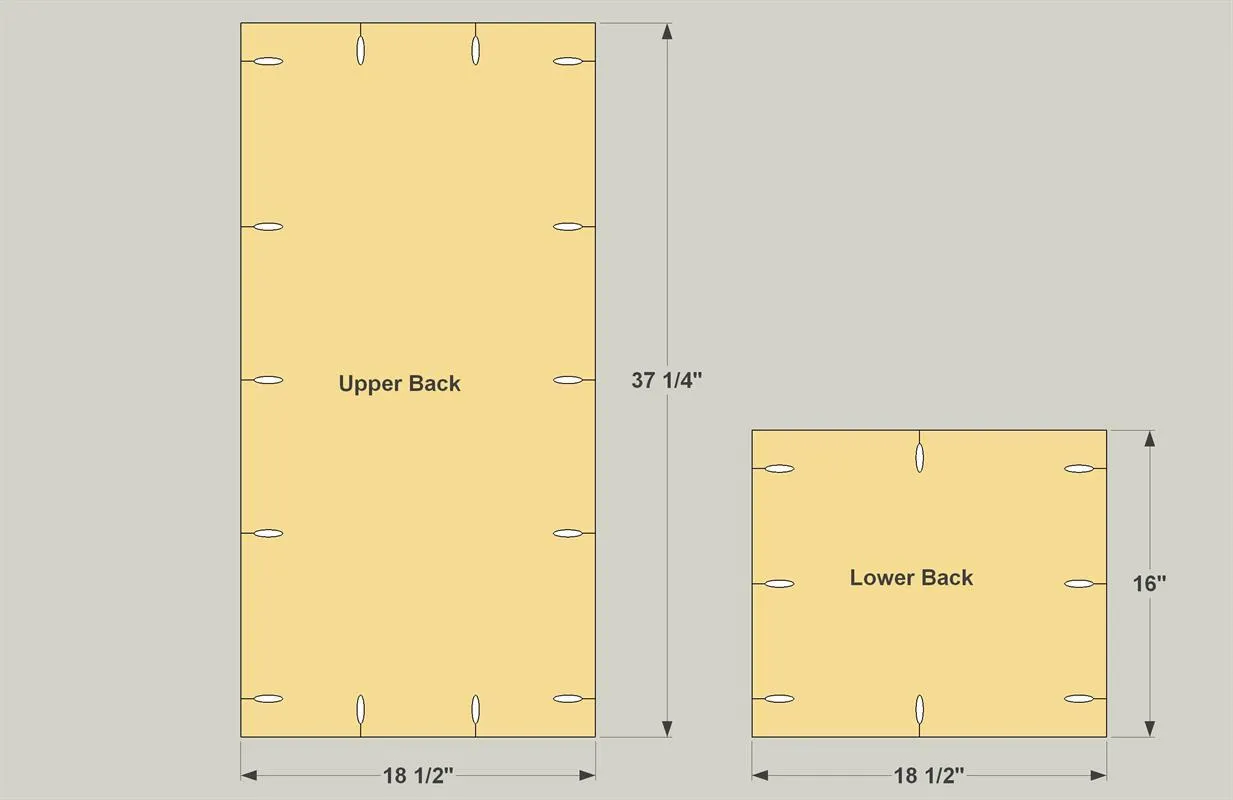
7Make the Backs
Cut a Lower Back and an Upper Back to size from 3/4" plywood, as shown in the cutting diagram. With your pocket-hole jig set up for 3/4" stock, drill pocket holes where shown in the Backs.
8Assemble the Lower Cabinet
You can assemble the lower portion of the cabinet now by attaching the Back, Divider, and side assemblies to the base assembly using 1 1/4" coarse-thread pocket hole screws.
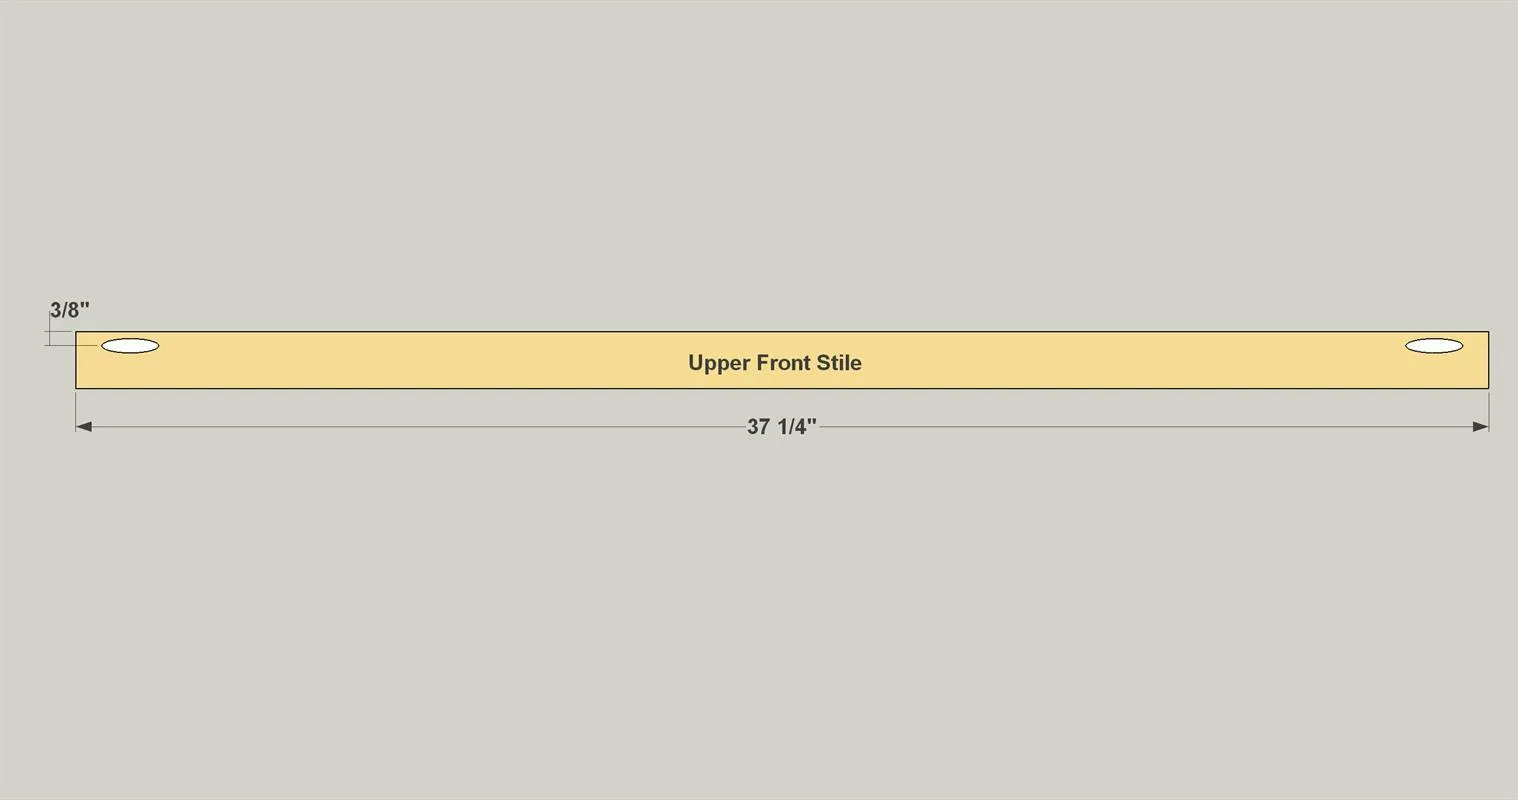
9Make Upper Front Stiles
Cut two Upper Front Stiles to length from 1x2 boards, as shown in the cutting diagram. With your pocket-hole jig set up for 3/4" stock, drill pocket holes where shown in the ends of these pieces.
10Make the Upper Side Parts
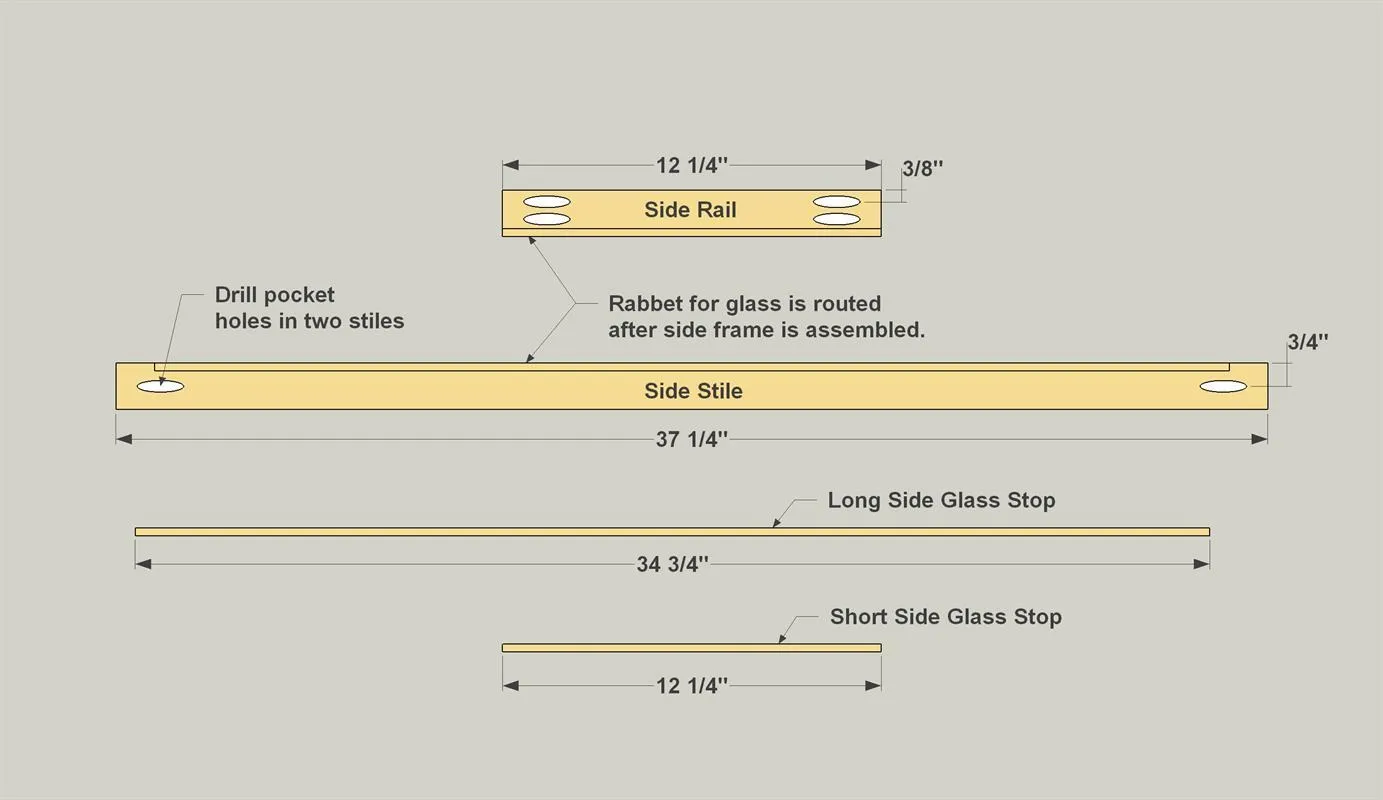
Cut four Upper Side Stiles and four Upper Side Rails to length from 1x2 boards, as shown in the cutting diagram. With your pocket-hole jig set up for 3/4" stock, drill pocket holes in the Upper Side Rails. It’s important that you offset these holes toward one edge, as shown, to leave space for a rabbet you’ll rout later.
11Assemble the Upper Sides
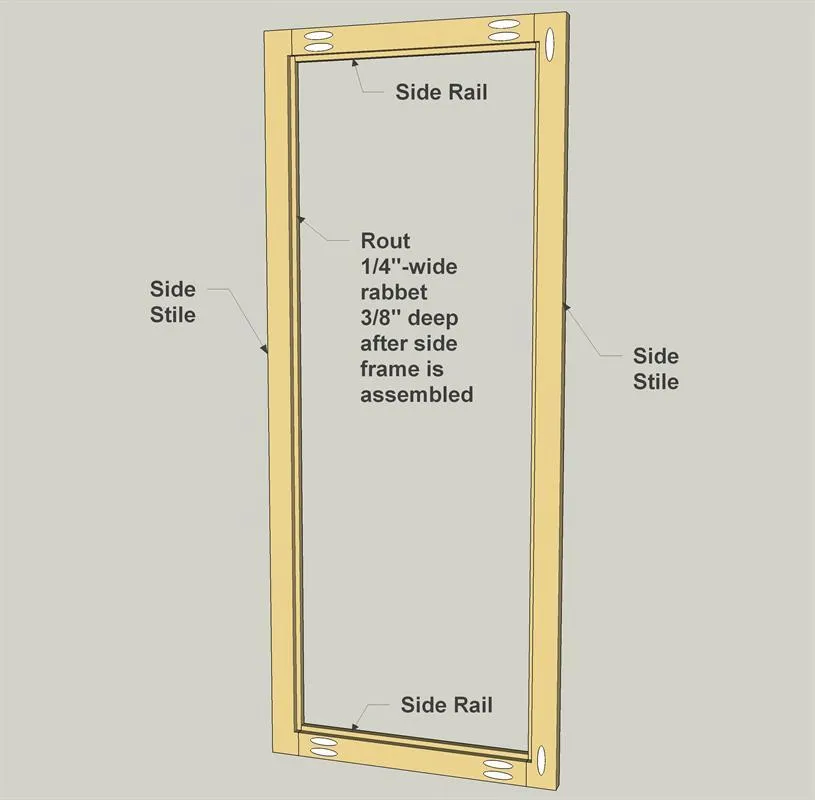
- Now you can assemble the upper side frames, as shown, using 1 1/4" coarse-thread pocket hole screws. Make sure as you attach the Stiles that the pocket holes are offset to the outside, as shown.
- Then you can create the recess around the inside, called a rabbet, for the glass to fit into. You do this with a router and a rabbeting bit. This bit has a bearing that rides along the wood to ensure a consistent cut. Be sure the bit will create a 1/4"-wide rabbet, and cut the rabbet 3/8" deep. See the Tip for more information.
Tip: Point the Way to Proper Routing When you’re using a router on the edge of a board, it can be clanging to know which way to move the router. Here’s an easy tip. With your bit installed and the router turned off, place it on the piece you are cutting so that the bit is against the edge you want to rout. With your right hand, point your thumb at the edge, and your forefinger will point the way you should move the router.
12Assemble the Upper Cabinet
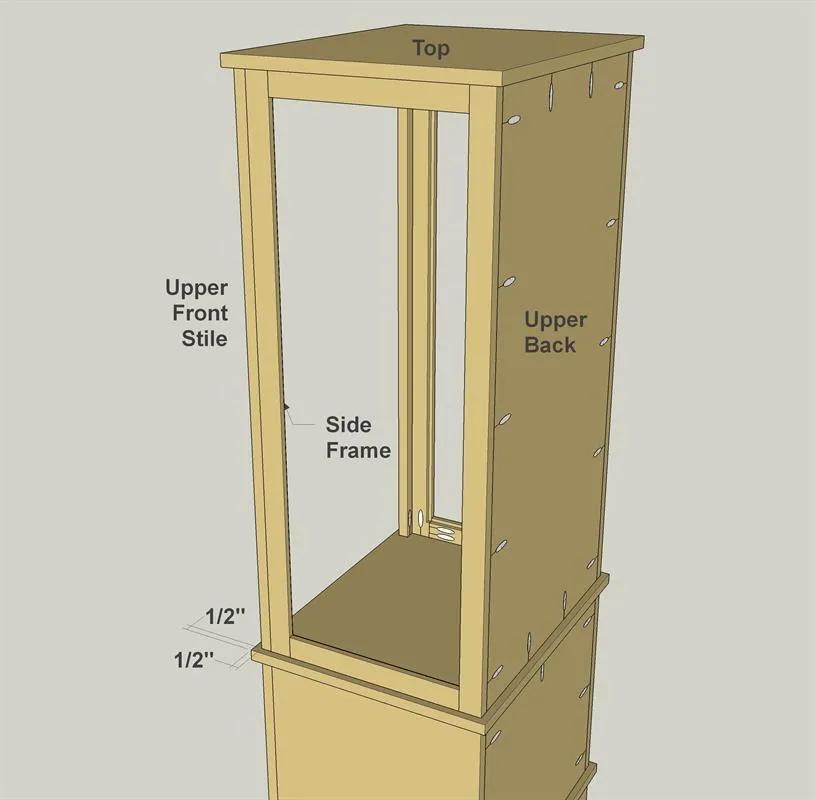
You can assemble the upper portion of the cabinet. To do this, start by attaching the Upper Back, the side frame assemblies, and the Top using 1 1/4" coarse-thread pocket hole screws. Then you can add the Upper Front Stiles. In addition to being attached to the Top and Divider with pocket hole screws, the Upper Front Stiles need to be glued to the side frames. You can use clamps to hold the stiles tight to the frames while the glue dries, or wrap masking tape tightly around in several spots.
13Test-Fit the Glass and Stops
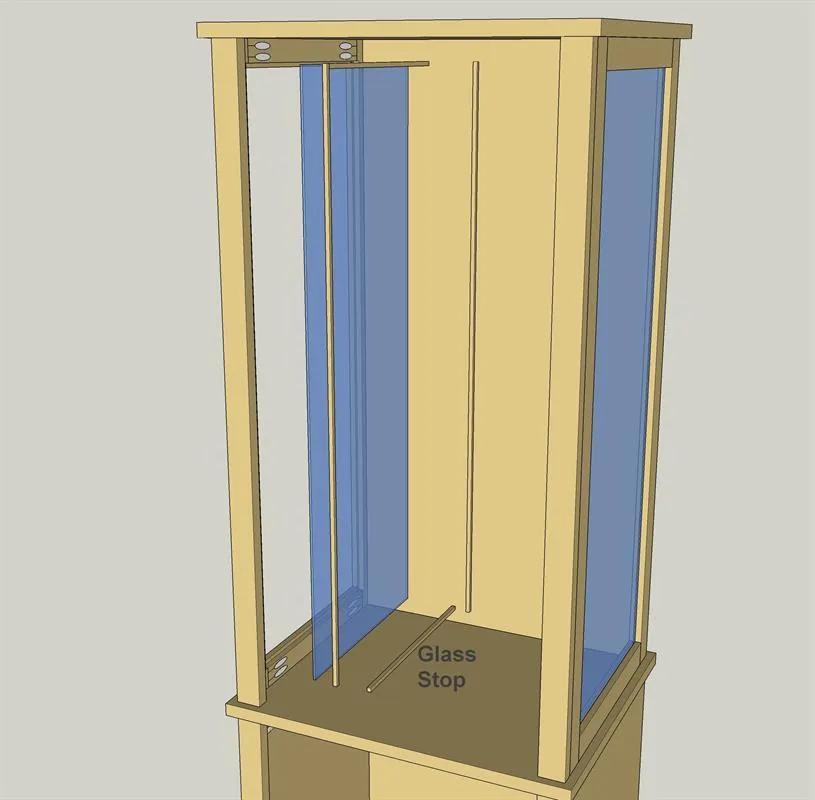
This is a good time to cut Long and Short Side Glass Stops to fit, and to test fit them, along with the glass. You probably don’t want to glue the stops in place now, though. It’s easier to paint or stain everything first, and then add the glass.
14Make the Upper Door Parts
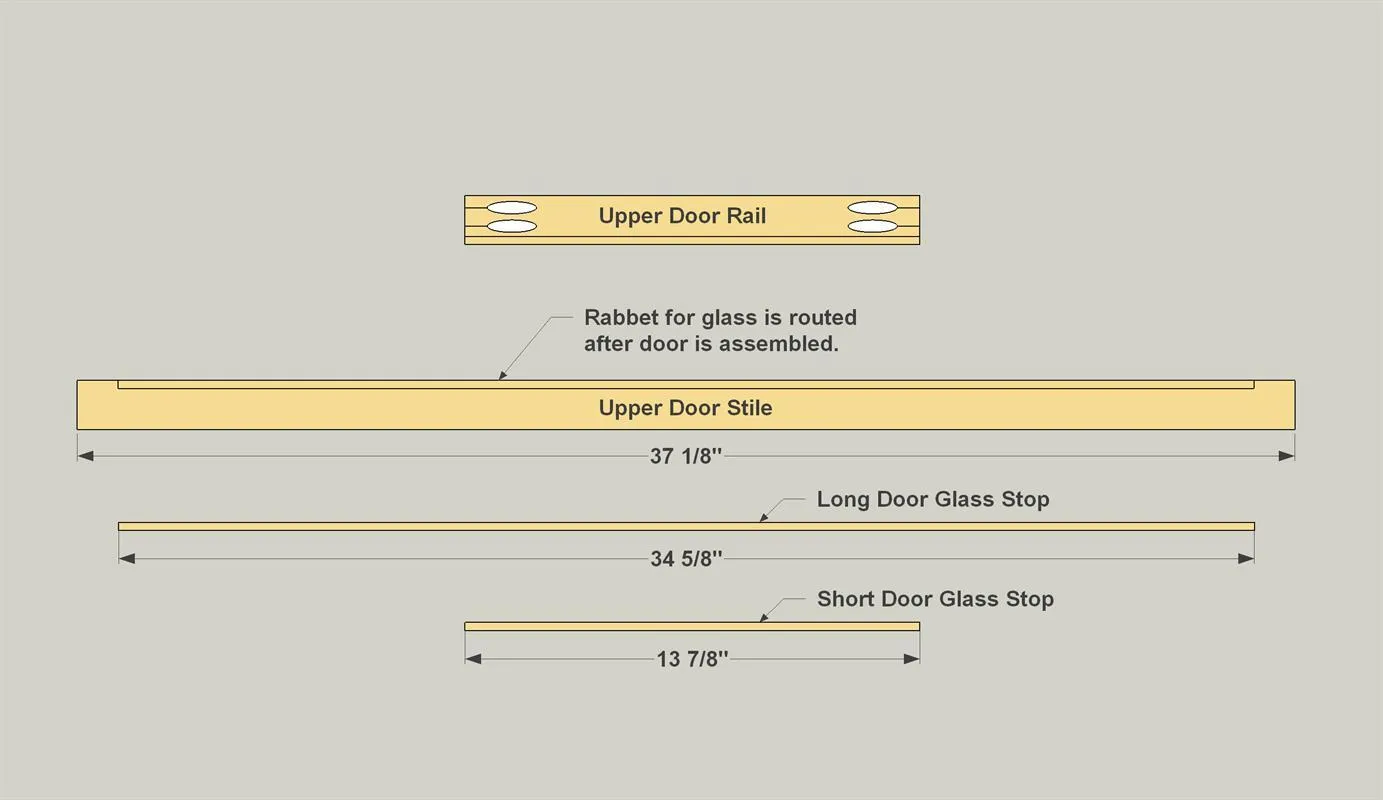
Cut two Upper Door Stiles and two Upper Door Rails to length from 1x2 boards, as shown in the cutting diagram. With your pocket-hole jig set up for 3/4" stock, drill pocket holes in the Upper Side Rails. It’s important that you offset these holes toward one edge, just as you did with the upper side pieces.
15Assemble the Upper Door
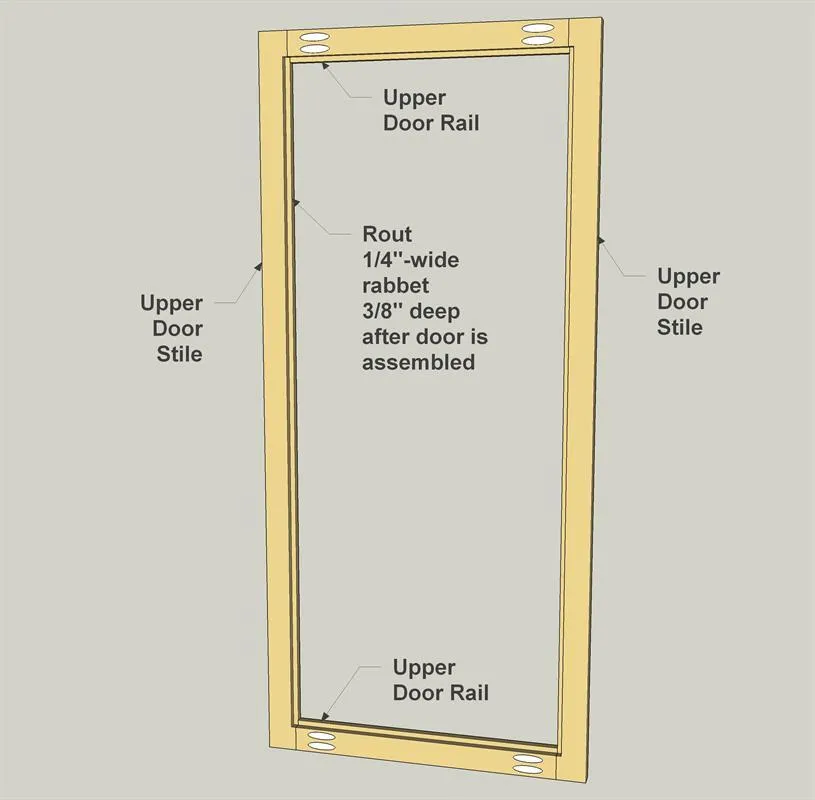
- Now you can assemble the upper door, as shown, using 1 1/4" coarse-thread pocket hole screws. Make sure as you attach the Stiles that the pocket holes are offset to the outside, as shown.
- Then you can create the rabbet for the glass, just as you did on the side frames.
16Test-Fit the Door Glass and Stops
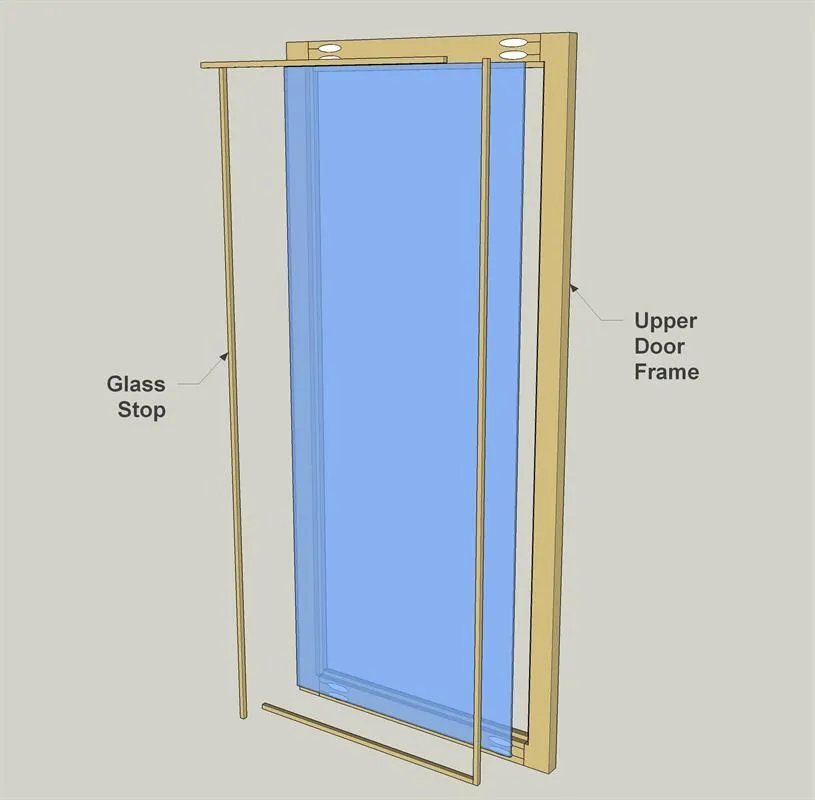
Again, this is a good time to cut Long and Short Door Glass Stops to fit, and to test fit them, along with the glass, as you did with the sides.
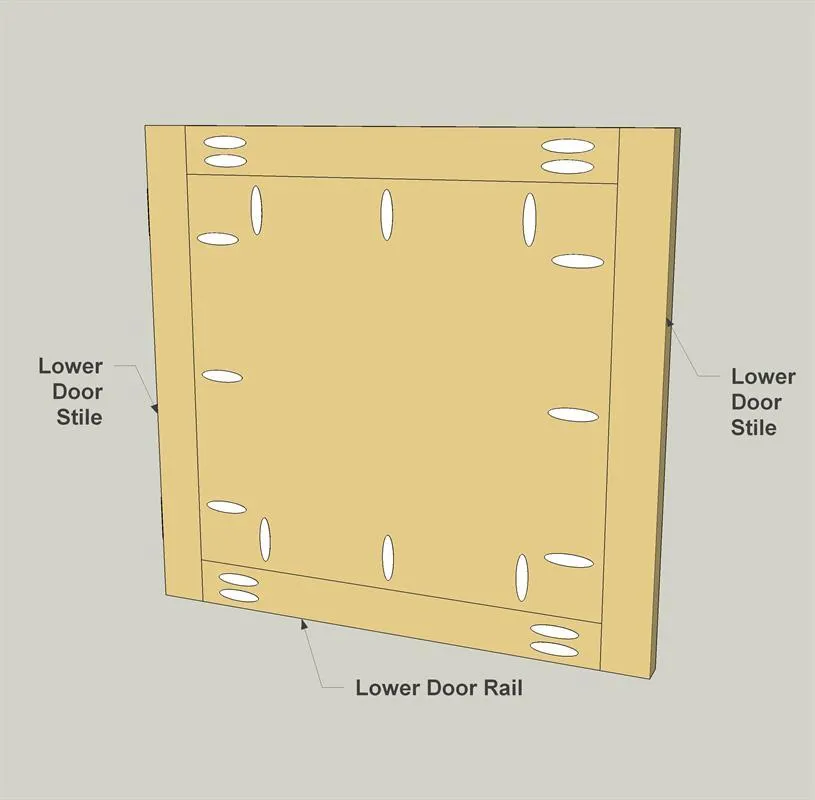
17Make the Lower Door Parts
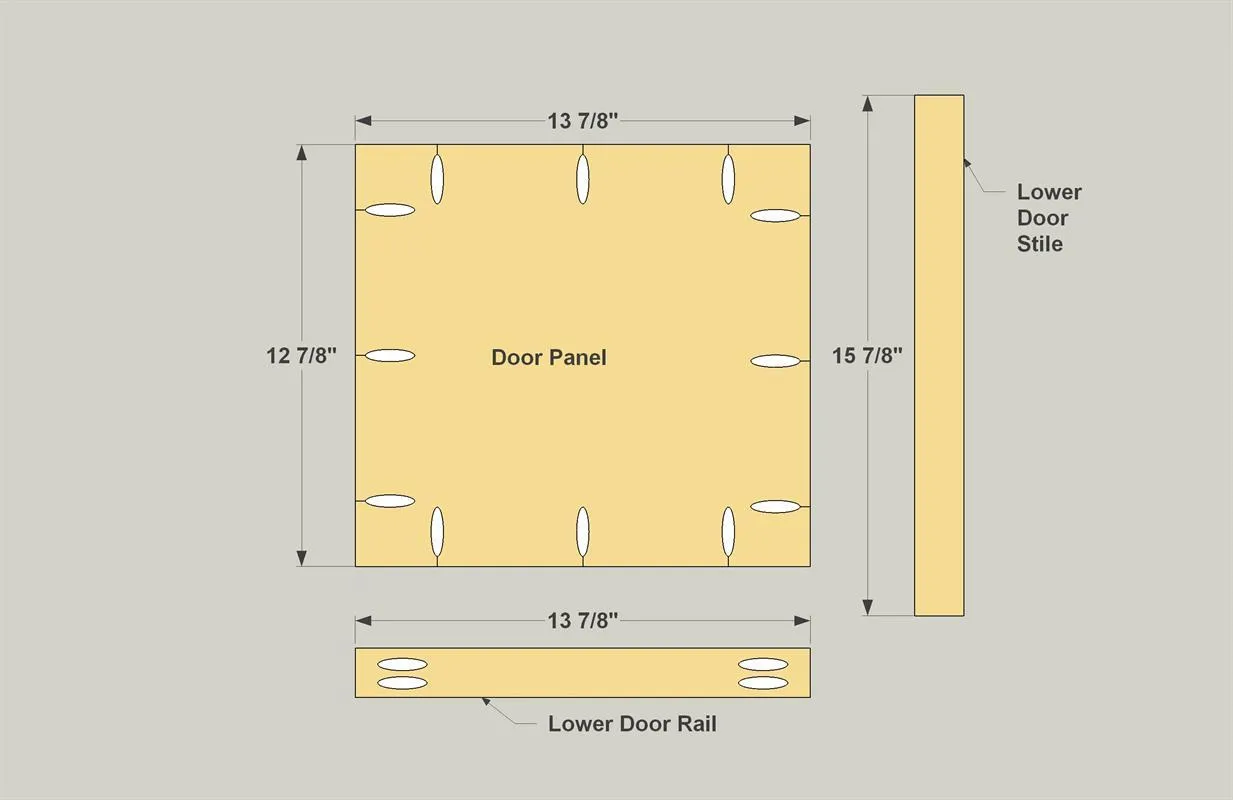
- Cut two Lower Door Stiles and two Lower Door Rails to length from 1x2 boards, as shown in the cutting diagram.
- Also cut a Lower Door Panel to size from 1/2" plywood, as shown in the cutting diagram. With your pocket-hole jig set up for 3/4" stock, drill pocket holes in the Lower Door Rails, as shown. Change your jig setup to 1/2" stock, and then drill pocket holes in the Lower Door Panel.
18Assemble the Lower Door
Now you can assemble the lower door, as shown. Use 1 1/4" coarse-thread pocket hole screws to assemble the Stiles and Rails. For the panel, make sure it’s flush with the back faces of the rails, and then attach it using 1" coarse-thread pocket hole screws.
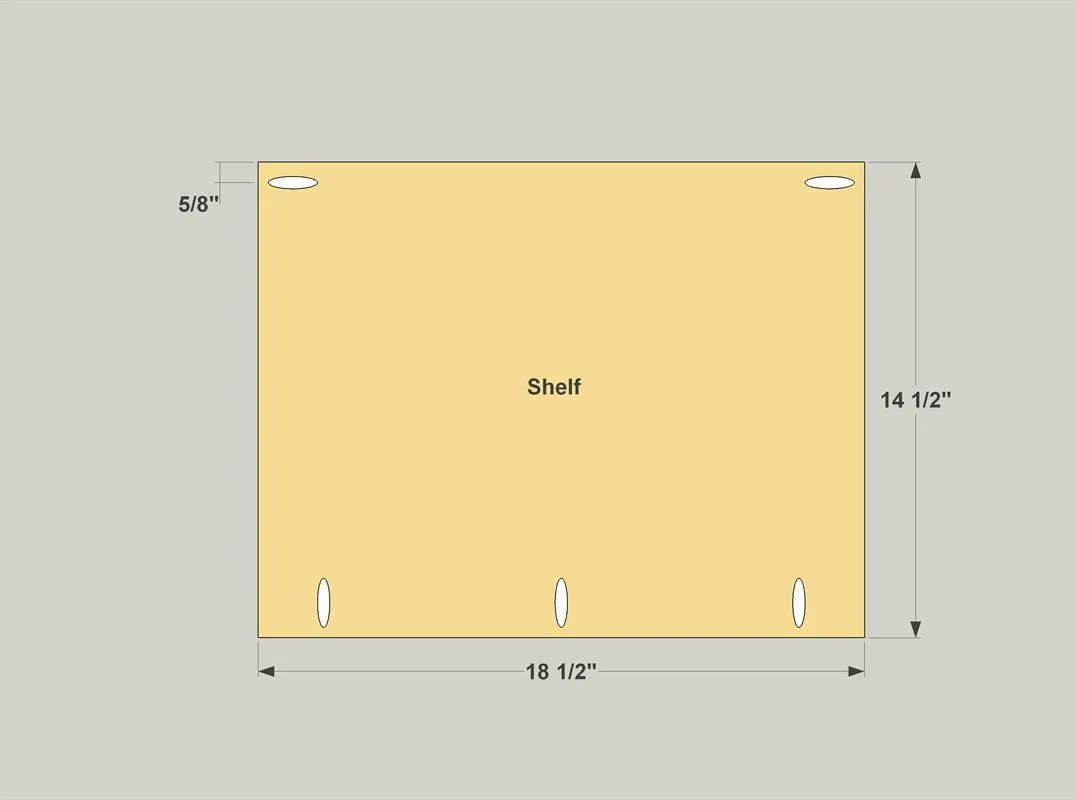
19Make the Shelves
Cut two Shelves to size from 1/2" plywood, as shown in the cutting diagram. Then, with your jig set for 1/2" stock, drill pocket holes in the Shelves, as shown.
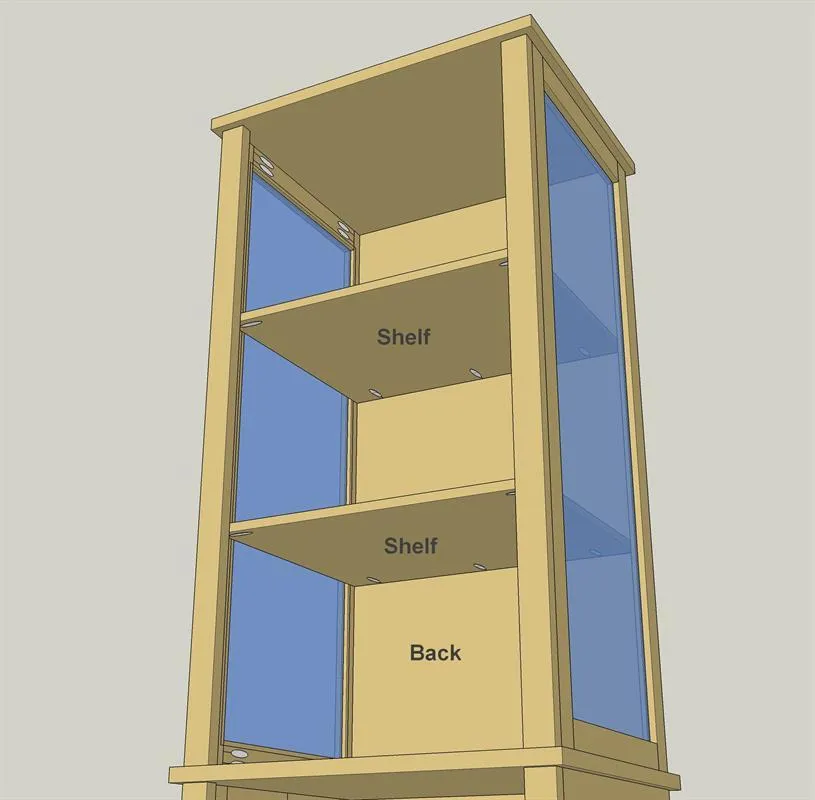
20Finish, Install Glass and Shelves
With all the parts complete, this is a good time to paint or finish the cabinet. Be sure to do the glass stops, as well. Hen you can put the glass in place and glue in the Glass Stops. After that, the shelves can go in and get attached with 1" coarse-thread pocket hole screws.
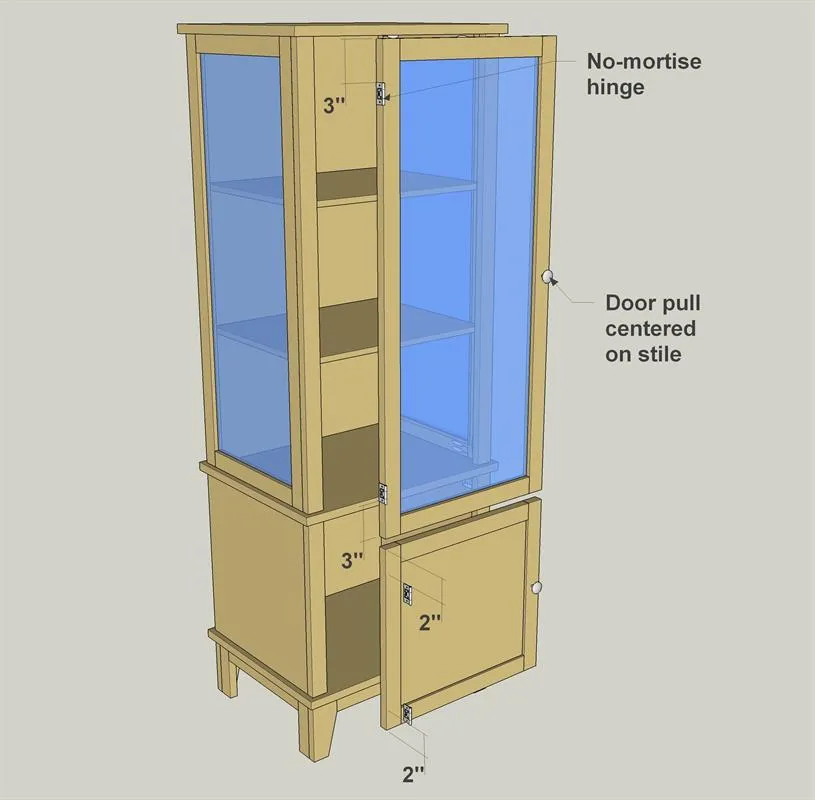
21Hang the Doors
All that’s left to complete your cabinet is installing the doors. Install them using no-mortise hinges. These make it a lot easier to install doors, since you don’t have to recess (mortise) them into the wood. Add a couple of dorr pulls, and your cabinet is all set to go.
Tags
- Bathroom
- Advanced
Reviews & builds
No reviews yet
Sign in to review this plan or share your build.
No reviews yet. Be the first to build this.